Category: How To Style

How To Style

  • Rustic Industrial Bedroom Decor Ideas

    Rustic Industrial Bedroom Decor Ideas

    Imagine a space where the raw elegance of exposed brick meets the warmth of reclaimed wood, where the cool gleam of metal accents complements the comforting textures of worn fabrics. This is the essence of rustic industrial bedroom design – a captivating blend of contrasting elements that creates a uniquely inviting and stylish haven. We delve into the science of aesthetics, exploring the principles of texture, color, and spatial arrangement to craft a bedroom that’s both visually striking and deeply personal.

    This exploration dissects the key components of this design style, from selecting the perfect color palette and furniture to strategically employing lighting and accessories. We’ll examine the careful balance required to integrate rustic charm with industrial grit, avoiding a cluttered aesthetic while maintaining a sense of comfort and warmth. The journey will cover practical considerations, such as optimizing storage in smaller spaces and selecting durable, aesthetically pleasing materials that stand the test of time.

    Ultimately, our goal is to equip you with the knowledge and inspiration to create a bedroom that reflects your unique personality and embodies the captivating allure of rustic industrial design.

    Defining Rustic Industrial Style

    Rustic industrial bedroom decor ideas

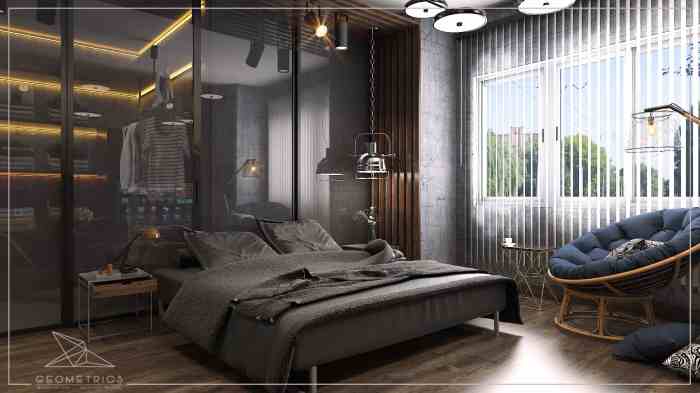
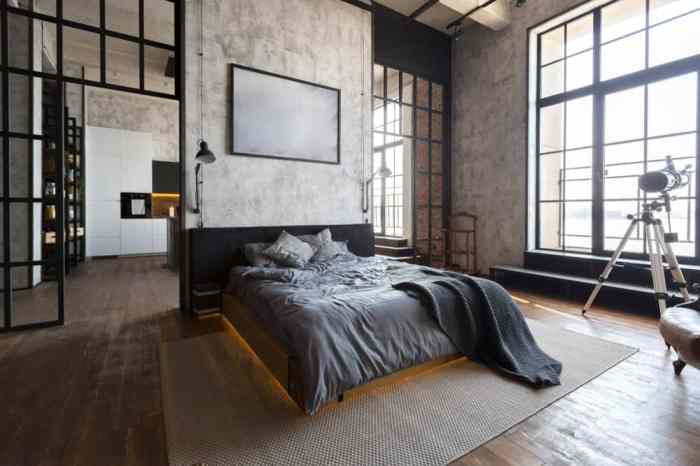
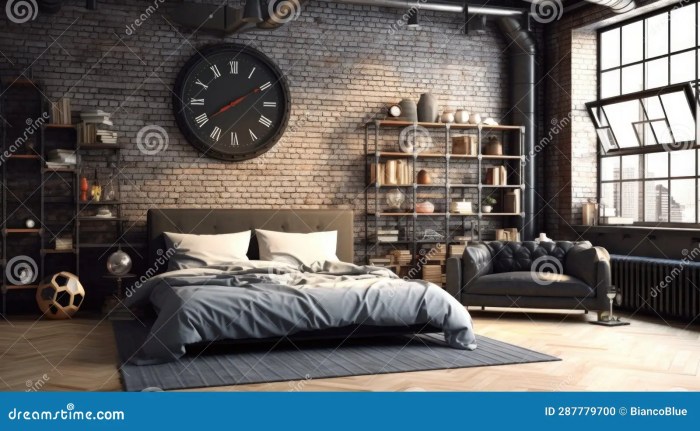
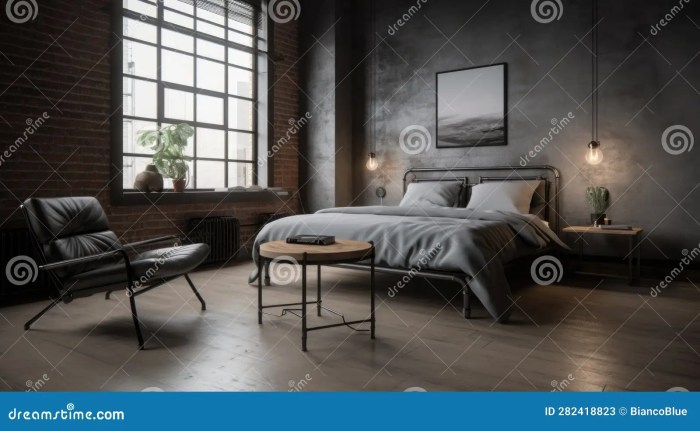
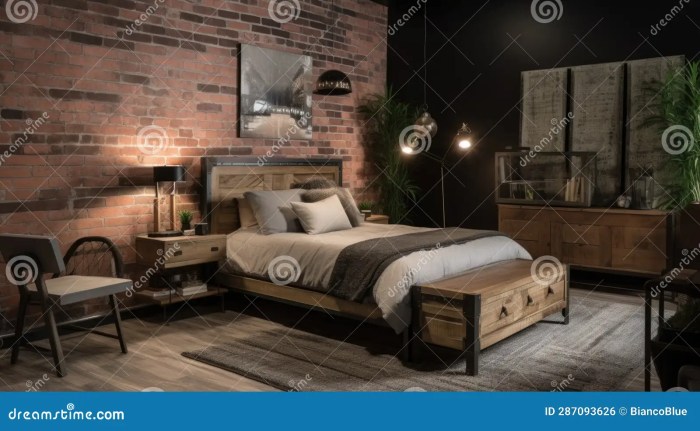
    Rustic industrial bedroom design represents a fascinating juxtaposition of seemingly disparate aesthetics: the raw, utilitarian elements of industrial design and the warmth, texture, and handcrafted feel of rustic style. This blend creates spaces that are both visually striking and surprisingly comfortable, reflecting a contemporary appreciation for repurposed materials and a connection to nature.The core elements of this style lie in the strategic combination of these contrasting design philosophies.

    Industrial design, born from the aesthetics of factories and warehouses, emphasizes exposed brick, metal piping, and functional, often repurposed, furniture. Rustic design, conversely, draws inspiration from nature and traditional craftsmanship, incorporating natural wood, stone, and elements that evoke a sense of age and history.

    Contrasting Rustic and Industrial Styles in a Bedroom Setting

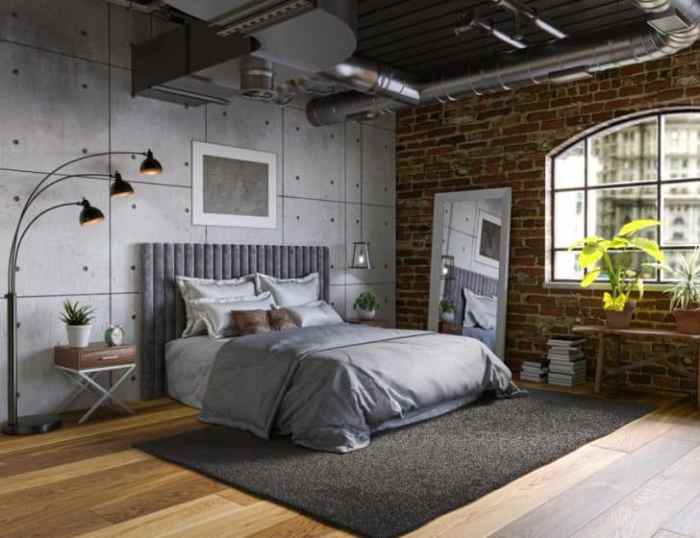
    In a bedroom setting, the contrast is particularly effective. The cool, metallic tones of industrial elements—think a metal bed frame or exposed ductwork—are softened and warmed by the inclusion of rustic features. This might involve a reclaimed wood headboard, a chunky knit throw blanket, or a woven rug made from natural fibers. The juxtaposition prevents the industrial elements from feeling cold or sterile, while the rustic components avoid appearing overly romanticized or overly quaint.

    The result is a balanced aesthetic that is both stylish and inviting.

    Contrasting Textures and Materials

    The success of rustic industrial design hinges on the masterful interplay of contrasting textures and materials. The rough, uneven texture of exposed brick walls might be paired with the smooth, polished surface of a metal pendant lamp. The warmth and grain of reclaimed wood flooring can be complemented by the cool, hard surface of a concrete accent wall. The tactile nature of a chunky wool throw is beautifully juxtaposed against the smooth, cool feel of a metal nightstand.

    This variety of textures creates visual interest and adds depth to the space. Consider the tactile experience: running your hand along the smooth metal, then feeling the rough grain of the wood—this multi-sensory approach is crucial to the success of the style.

    Rustic Industrial Bedroom Mood Board

    Imagine a mood board showcasing the key features. The backdrop is a photograph of a distressed brick wall, its uneven texture subtly highlighted. On this backdrop, we see several key images: a close-up of reclaimed wood with visible nail holes and natural variations in grain; a photograph of a vintage metal factory lamp, its aged patina suggesting years of use; a swatch of a thick, chunky knit throw in a natural, earthy tone; a sample of a worn, distressed leather armchair; and a close-up of a concrete floor with subtle variations in color and texture.

    These elements, together, visually represent the key components of the rustic industrial aesthetic: the raw, industrial elements softened and warmed by the organic textures and aged appeal of the rustic components. The overall feeling evoked is one of relaxed sophistication, a space that is both stylish and comfortable, blending the best of both worlds.

    Color Palettes and Textures

    The successful implementation of a rustic industrial bedroom design hinges on a careful selection of color palettes and textures. These elements work in concert to create the desired atmosphere – a blend of raw, utilitarian elements with the warmth and comfort of a lived-in space. The interplay between color and texture significantly influences the overall mood and perceived spaciousness of the room.The judicious use of color palettes is crucial in balancing the contrasting aesthetics of rustic and industrial styles.

    A poorly chosen palette can easily tip the balance, resulting in a space that feels either too cold and sterile or overly cluttered and chaotic. Texture, meanwhile, adds depth and visual interest, enhancing the tactile experience of the room and providing a sense of comfort and grounding.

    Rustic Industrial Color Palettes

    Several color palettes effectively capture the essence of rustic industrial design. Neutral tones form the foundation, offering a versatile backdrop against which bolder accents can be introduced. Think of the muted earth tones found in aged wood and weathered metal. For example, a base of warm greys and creamy whites can evoke the feeling of a well-worn factory loft, while incorporating subtle hints of deep browns and blacks adds depth and richness.

    The incorporation of rusty oranges and deep blues adds a touch of industrial grit, echoing the patina of aged metal and worn paint. Alternatively, a palette of muted greens and greys can create a more calming and nature-inspired feel, while still retaining the industrial edge. These palettes often incorporate a monochromatic approach, using variations of a single color family to maintain visual harmony and prevent the room from feeling overly busy.

    Incorporating Metallic Accents

    Metallic accents, a hallmark of industrial design, can be carefully introduced to enhance the rustic aesthetic without overwhelming it. Instead of gleaming chrome or polished steel, consider using metals with a more aged or distressed finish. For instance, blackened steel, bronze, or copper offer a warmer, more rustic feel. These metals can be incorporated through lighting fixtures, hardware (such as drawer pulls and hinges), or decorative elements like trays and wall art.

    The contrast between the rough texture of the rustic elements and the smooth, cool touch of the metal creates a visually engaging dynamic. The use of patinaed metals further enhances this contrast, suggesting age and history.

    Natural Wood Finishes in Rustic Industrial Bedrooms

    Natural wood finishes are integral to the rustic aspect of this style. The warmth and texture of wood provide a counterpoint to the cooler tones and harder surfaces typically associated with industrial design. Reclaimed wood, with its inherent imperfections and variations in color and grain, is particularly well-suited. The visible knots, cracks, and variations in tone tell a story, adding character and authenticity.

    Other options include woods with a distressed or whitewashed finish, which can further enhance the rustic aesthetic. The choice of wood type will also influence the overall feel of the room; darker woods like walnut or oak can create a more dramatic effect, while lighter woods like pine or maple offer a brighter, more airy ambiance. Consider the grain pattern and texture when selecting wood finishes; a coarser grain will add to the rustic feel, while a finer grain might better complement the industrial elements.

    Texture Comparison in Rustic Industrial Bedrooms

    Texture Description Color Palette Suggestion Application Example
    Wood Natural, warm, varied grain patterns, can be reclaimed or new, offers tactile warmth. Warm greys, browns, creams, muted greens Reclaimed wood headboard, wooden flooring, exposed beams
    Metal Cool, hard, smooth or distressed finishes, can be blackened steel, copper, or bronze. Blacks, greys, bronze, copper Metal bed frame, industrial-style lighting fixtures, metal shelving
    Fabric Soft, textured, can be linen, cotton, or wool, adds comfort and visual interest. Neutral tones, deep blues, muted greens Linen bedding, wool throw blankets, cotton curtains

    Furniture Selection and Placement

    Creating a rustic industrial bedroom requires careful consideration of furniture choices to achieve the desired aesthetic and functionality. The key lies in balancing the raw, utilitarian elements of industrial design with the warmth and texture of rustic style. This involves selecting pieces that reflect both eras while ensuring they complement each other seamlessly within the available space.The selection of beds, nightstands, and dressers plays a crucial role in establishing the overall atmosphere.

    Material choices significantly impact the visual appeal and longevity of these pieces. Furthermore, the arrangement of furniture is paramount, especially in smaller bedrooms, where maximizing space and functionality is critical.

    Suitable Materials for Rustic Industrial Furniture

    The inherent character of rustic industrial style is best captured through the use of specific materials. Reclaimed wood, with its visible imperfections and unique grain patterns, embodies the rustic aspect. The history embedded within each board adds depth and narrative to the space. Its inherent strength and durability, when properly treated, ensure longevity. Metal, particularly aged or blackened steel, represents the industrial element.

    Metal accents, such as bed frames, legs on nightstands, or drawer pulls, introduce a contrasting texture and a touch of ruggedness. The combination of these materials creates a compelling visual dialogue, showcasing the beauty of both natural and man-made elements. For instance, a bed frame constructed from reclaimed wood with blackened steel accents would perfectly exemplify this style.

    A dresser made from reclaimed wood with metal drawer pulls would similarly contribute to the cohesive design.

    Bed Selection and Placement in a Rustic Industrial Bedroom

    The bed forms the centerpiece of any bedroom, and its selection significantly influences the overall aesthetic. A low-profile bed frame constructed from reclaimed wood or metal, or a combination of both, is ideal. The headboard, if present, can be made from reclaimed wood with a simple, unadorned design, or it could be a metal panel with a slightly distressed finish.

    Placement of the bed should prioritize maximizing space and allowing for easy movement around the room. In smaller bedrooms, placing the bed against a wall is often the most practical solution. Leaving adequate space around the bed for easy access is crucial for comfort and functionality. Consider the size of the room; a king-size bed might overwhelm a small space, while a full or queen-size bed might be more suitable.

    Nightstand and Dresser Selection for a Rustic Industrial Bedroom

    Nightstands and dressers should complement the bed, maintaining consistency in style and materials. Reclaimed wood nightstands with metal legs or simple metal nightstands with a distressed finish are excellent choices. Functionality is important; consider nightstands with drawers or shelves for storage. Dressers, similarly, should be chosen based on storage needs and the overall aesthetic. A reclaimed wood dresser with metal hardware or a metal dresser with a rustic finish would both be suitable.

    The placement of these pieces should be strategic. Nightstands should be placed within easy reach of the bed, while dressers should be positioned to optimize space and avoid obstructing walkways.

    Furniture Arrangement in a Small Rustic Industrial Bedroom

    Optimizing space in a small bedroom is paramount. Strategic furniture placement is crucial. In a small rustic industrial bedroom, a simple and uncluttered approach is key. Avoid overcrowding the room with furniture. Utilize multi-functional pieces, such as a bed with built-in drawers or a dresser with a mirror, to maximize storage without compromising space.

    Consider using wall-mounted shelves instead of bulky floor-standing units to free up floor space. The strategic placement of a mirror can also create an illusion of more space, enhancing the room’s perceived size. A well-lit room also contributes to a feeling of spaciousness.

    Incorporating Vintage or Repurposed Furniture

    Vintage or repurposed furniture adds unique character to a rustic industrial bedroom. A vintage metal trunk can serve as a coffee table or a unique nightstand. An old industrial workbench can be repurposed as a vanity or a dresser. An antique wooden ladder can be creatively used as a bookshelf or a decorative element. The key is to select pieces that complement the overall aesthetic and add to the room’s story.

    The patina and history embedded in these pieces enrich the overall design, adding a touch of authenticity and personality. These repurposed items introduce a unique narrative to the space, reflecting a blend of history and contemporary design.

    Lighting and Accessories

    Rustic industrial bedroom decor ideas

    Illumination and carefully chosen accessories are paramount in achieving a truly authentic rustic industrial bedroom aesthetic. The interplay of light and shadow, coupled with thoughtfully selected decorative elements, transforms a simple space into a haven reflecting both rugged charm and refined style. The correct balance creates an atmosphere that is both inviting and visually stimulating.

    Ambient, Task, and Accent Lighting

    Effective lighting design in any space relies on a layered approach, combining ambient, task, and accent lighting. Ambient lighting provides overall illumination, task lighting focuses light on specific areas (like a bedside table), and accent lighting highlights features and creates visual interest. In a rustic industrial bedroom, this layered approach can be beautifully achieved with a variety of fixtures.

    For example, a large industrial-style pendant light could serve as ambient lighting, while strategically placed bedside lamps provide task lighting for reading. Accent lighting could be provided by smaller, decorative wall sconces or even strategically placed candles. The strategic layering ensures the room is well-lit for various activities while maintaining a specific atmosphere.

    Suitable Lighting Fixtures for Rustic Industrial Style

    The inherent character of rustic industrial style demands lighting fixtures that reflect its blend of raw materials and functional design. Edison-style filament bulbs, with their warm, glowing light and exposed filaments, are a quintessential choice. These bulbs, often housed in metal cages or simple glass shades, instantly evoke a sense of vintage industrial chic. Pendant lights, particularly those with exposed metalwork and a distressed finish, further enhance the aesthetic.

    Metal shades in colors like matte black, dark bronze, or galvanized steel complement the overall palette. Reclaimed wood beams or pipes can also be incorporated into the lighting fixtures themselves, reinforcing the rustic element. For bedside lighting, adjustable gooseneck lamps with metal bases and simple shades offer both functionality and style.

    Decorative Accessories: Enhancing the Rustic Industrial Aesthetic

    Accessories play a vital role in refining the rustic industrial aesthetic. Metal wall art featuring geometric designs or industrial motifs adds a touch of sophistication. Large, ornate mirrors with distressed frames create a sense of spaciousness and reflect light, enhancing the room’s overall brightness. Textiles, such as thick, woven throws in natural fibers like wool or linen, introduce warmth and texture, softening the harder edges of the industrial elements.

    These textiles can be layered on the bed or draped over chairs, adding visual interest and comfort. The incorporation of vintage or antique elements, like repurposed industrial tools or metal containers, further reinforces the theme, adding unique character to the space.

    Incorporating Plants for a Biophilic Design

    The integration of plants into a rustic industrial bedroom introduces a biophilic element, blending the natural world with the man-made. Plants add life, color, and texture, contrasting beautifully with the often-stark lines of industrial design. Larger potted plants, such as snake plants or ZZ plants known for their resilience, can be placed in corners or on the floor, adding vertical interest.

    Smaller succulents or air plants can be displayed on shelves or windowsills, adding pops of green. The choice of planters should align with the overall aesthetic, with options ranging from galvanized metal containers to rustic wooden boxes. The inclusion of greenery softens the industrial elements and creates a more balanced and welcoming atmosphere. This reflects the growing understanding in interior design of the positive psychological effects of incorporating nature into living spaces.

    Wall Treatments and Flooring

    Rustic industrial bedroom decor ideas

    The successful execution of a rustic industrial bedroom design hinges on the careful selection of wall treatments and flooring materials. These elements establish the foundational aesthetic, influencing the overall ambiance and impacting the room’s acoustics and thermal properties. The interplay of textures and colors within these choices is crucial for achieving the desired balance of ruggedness and sophistication.

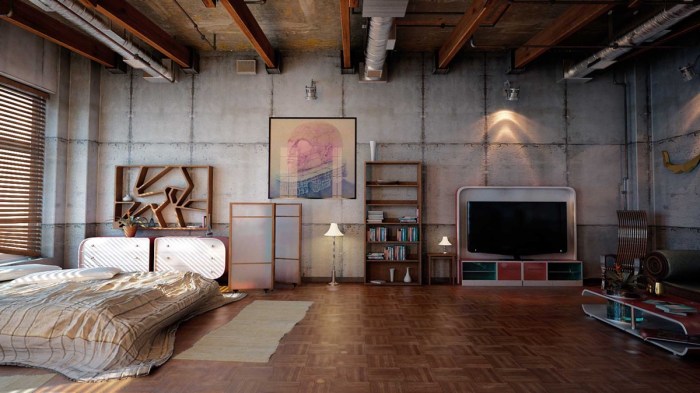
    The inherent textural contrasts inherent in rustic industrial style lend themselves to a variety of wall and floor treatments. The choice of materials impacts not only the visual appeal but also the room’s thermal performance and sound insulation. For example, exposed brick offers excellent thermal mass, regulating temperature fluctuations, while concrete flooring can enhance sound dampening. Conversely, wood paneling can create a warmer, more insulated environment, but may require more maintenance than other options.

    Wall Treatments in Rustic Industrial Bedrooms

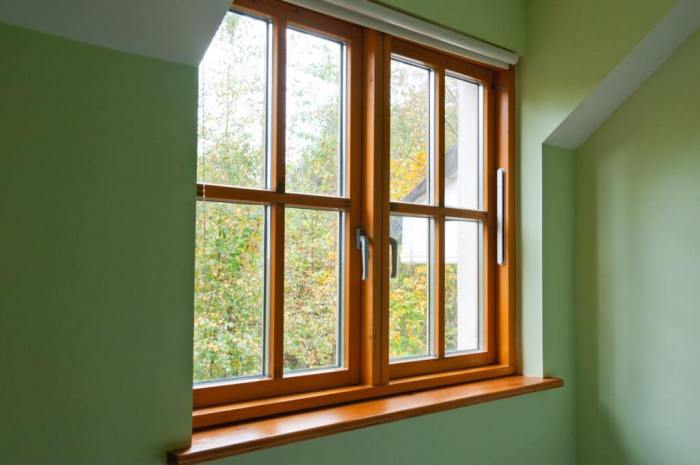
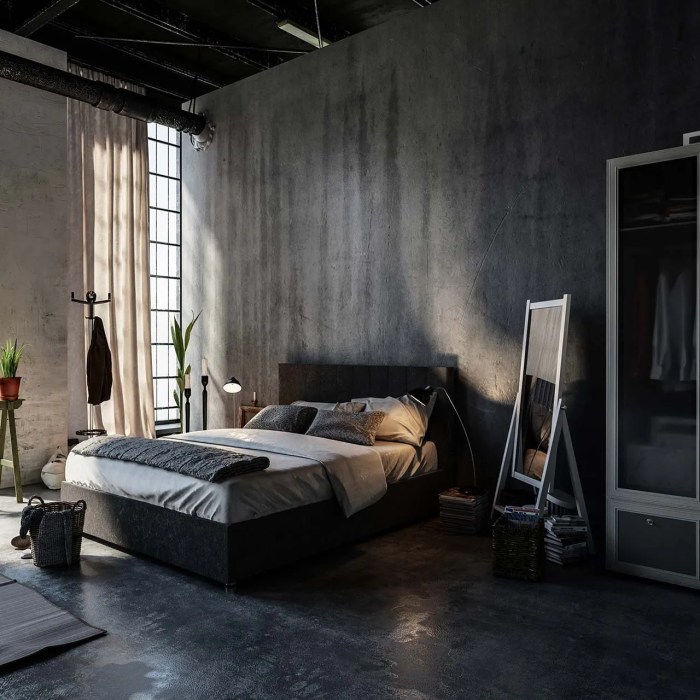
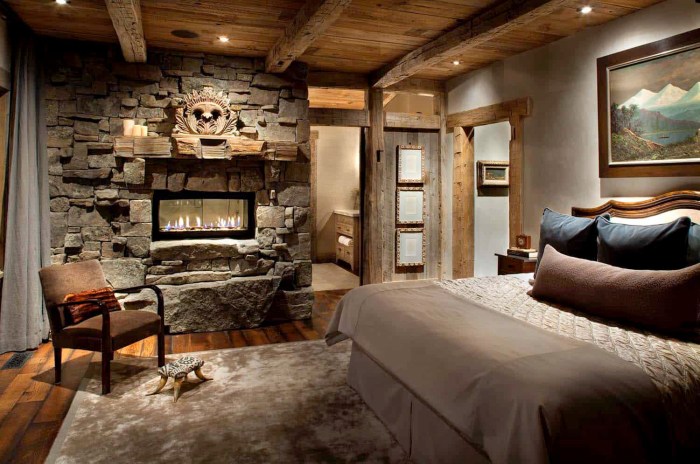
    A rustic industrial bedroom often showcases the inherent beauty of raw materials. Exposed brick walls, a hallmark of industrial design, provide a rich texture and historical character. The color variations within the brickwork itself contribute to the aesthetic, with shades ranging from deep reds and oranges to muted browns and greys. Alternatively, reclaimed wood paneling offers a warmer, more organic counterpoint to the coldness of brick or concrete.

    The variations in wood grain and color, reflecting the wood’s age and history, add a unique visual dimension. Painted wood walls, especially in deep, saturated hues like charcoal grey or deep navy, can also contribute to the desired aesthetic. The application of a matte finish enhances the sense of age and texture. Finally, metal accents, whether incorporated as decorative elements or integrated into the structural framework of the room, add to the industrial aesthetic.

    Flooring Options for Rustic Industrial Bedrooms

    The choice of flooring is equally important in establishing the desired atmosphere. Hardwood floors, particularly reclaimed or wide-plank options, introduce warmth and texture, complementing the industrial elements. The natural variations in color and grain create a visually appealing surface. Conversely, polished concrete floors offer a sleek, industrial counterpoint. Their durability and ease of maintenance make them a practical choice.

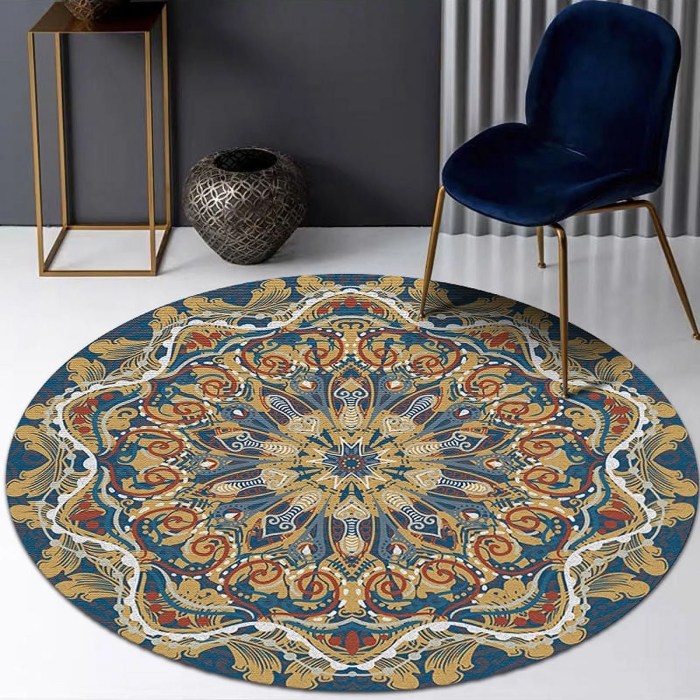
    However, the cold nature of concrete can be mitigated through the strategic use of area rugs. These rugs can introduce pattern, color, and texture, softening the overall feel of the room and adding layers of warmth. Rugs made from natural fibers, such as wool or jute, are particularly suitable for a rustic industrial aesthetic.

    Color Palettes and Their Impact

    The choice of wall color significantly influences the overall atmosphere of a rustic industrial bedroom. Darker shades, such as charcoal grey, deep navy, or even black, create a moody and sophisticated ambiance. These colors can highlight the texture of the walls and enhance the dramatic effect of lighting fixtures. Lighter colors, like warm greys or muted beige, can make the room feel more open and airy, providing a softer counterpoint to the industrial elements.

    The use of contrasting colors, such as pairing a dark wall with lighter flooring or vice versa, can add visual interest and depth. For instance, a dark grey wall paired with light oak flooring can provide a visually striking contrast. In contrast, a light beige wall with dark brown reclaimed wood accents will create a more balanced, warmer feel.

    Feature Wall: Reclaimed Wood and Metal Accents

    Imagine a feature wall constructed from reclaimed wood planks of varying widths and tones. The wood, showing signs of age and wear, displays a rich palette of browns, greys, and even hints of faded color. These planks are unevenly spaced, creating a visually appealing, slightly rustic pattern. Incorporated into this wood are strategically placed metal accents—perhaps strips of blackened steel or corrugated iron—which add linear elements and contrast the organic textures of the wood.

    The metal accents could be subtly integrated, acting as spacers between the wood planks, or more prominently displayed, creating a geometric pattern against the wood’s backdrop. This combination of textures and materials, with its mix of warmth (wood) and coolness (metal), exemplifies the essence of rustic industrial design. The uneven nature of the wood planks, coupled with the sharp lines of the metal, creates a dynamic and visually engaging feature wall.

    Storage Solutions

    Incorporating storage solutions within a rustic industrial bedroom necessitates a thoughtful approach that balances functionality with aesthetic appeal. The inherent charm of this design style lies in its ability to seamlessly blend the raw textures of industrial elements with the warmth of rustic materials. Effective storage, therefore, must contribute to, rather than detract from, this harmonious blend. This requires careful consideration of material choices, design elements, and spatial optimization techniques.The principles of efficient storage in a rustic industrial setting mirror those of any space; maximizing vertical space, utilizing hidden storage, and employing multi-functional furniture.

    However, the aesthetic demands a unique approach, emphasizing repurposed materials and a blend of textures that evoke a sense of history and craftsmanship.

    Repurposed Material Storage

    Repurposing materials offers a sustainable and aesthetically pleasing approach to storage within a rustic industrial bedroom. The inherent imperfections and patina of reclaimed materials perfectly complement the style’s emphasis on raw, unrefined beauty. For instance, old wooden crates, readily available at flea markets or antique shops, can be stacked to create a visually interesting shelving unit. Their natural wood grain and potential signs of wear add character and authenticity.

    Similarly, vintage suitcases, often found in a variety of sizes and colors, can be stacked or arranged on shelves, offering unique storage for clothing or accessories. Their aged leather or metal hardware further enhances the rustic industrial aesthetic. The inherent strength of these materials, often from denser hardwoods or robust metal framing, ensures longevity and stability, even under significant weight.

    Clothing and Accessory Organization

    Organizing clothing and accessories within a rustic industrial bedroom demands creative solutions that maintain both functionality and style. Metal shelving units with exposed pipes and rivets provide a visually striking way to store folded clothing. These units can be paired with fabric bins or baskets in neutral tones (like burlap or linen) to add a touch of rustic warmth and conceal items.

    For accessories, repurposed wooden drawers or vintage apothecary jars can be used to store jewelry, scarves, or other smaller items. These provide a sense of visual interest while neatly organizing the contents. Hanging clothes on industrial-style clothing racks, with exposed metal and wood components, adds to the overall aesthetic. The use of these materials reflects the style’s emphasis on raw, durable elements, while simultaneously offering a practical solution.

    Maximizing Storage in Small Bedrooms

    Optimizing storage space in a small rustic industrial bedroom requires a strategic approach. Utilizing vertical space is crucial; tall, narrow shelving units can maximize storage capacity without overwhelming the room. These can be constructed from reclaimed wood or metal, further enhancing the aesthetic. Built-in storage solutions, such as drawers incorporated into the bed frame or under-bed storage, can significantly increase storage capacity without sacrificing valuable floor space.

    Multi-functional furniture, such as ottomans with built-in storage or beds with lift-up mechanisms, also contributes to space optimization. These design choices adhere to the principle of functionality, ensuring efficient use of space while maintaining the integrity of the design style. For instance, a bed with drawers underneath not only provides storage but also keeps the floor clear, maximizing the sense of space in a small bedroom.

    Creating a Cohesive Look

    The successful integration of rustic and industrial elements in a bedroom hinges on achieving a harmonious balance. A jarring juxtaposition of styles can lead to visual chaos, undermining the intended aesthetic. Understanding the principles of visual weight, color theory, and texture interplay is crucial to creating a unified and inviting space. This involves carefully considering the proportion of each style’s features and ensuring they complement rather than compete with each other.The inherent contrast between the raw, often unfinished textures of rustic design and the sleek, metallic lines of industrial style presents a unique challenge.

    Overcoming this requires a deliberate approach to visual organization, ensuring that the space doesn’t feel cluttered or overwhelming. The key lies in establishing a clear visual hierarchy, guiding the eye through the space in a pleasing and logical manner. This can be achieved through careful placement of furniture, strategic use of color, and the thoughtful incorporation of accessories.

    Balancing Rustic and Industrial Elements

    Achieving equilibrium between rustic and industrial styles requires a nuanced understanding of their respective characteristics. Too much rustic can lead to a cluttered, farmhouse feel, while an overabundance of industrial elements might create a cold, sterile environment. The ideal balance involves strategically integrating elements from both styles to create a cohesive whole. For example, a reclaimed wood headboard (rustic) paired with a metal-framed bed (industrial) establishes a strong visual anchor.

    Subtle touches of both styles can be woven throughout the room through accessories like woven baskets (rustic) and metal pendant lights (industrial). The ratio of rustic to industrial elements should be adjusted based on personal preference and the overall size of the bedroom; a smaller space may benefit from a more restrained approach.

    Avoiding a Cluttered or Overwhelming Look

    The principles of negative space are paramount in preventing a cluttered appearance. Negative space, or the empty areas around objects, allows the eye to rest and prevents visual fatigue. In a rustic industrial bedroom, this can be achieved through strategic furniture placement, avoiding overcrowding. Consider using larger pieces of furniture that serve multiple purposes, minimizing the number of smaller items.

    For example, a large, repurposed chest can serve as both a storage solution and a bedside table. Similarly, carefully selected wall art can add visual interest without overwhelming the space. Maintaining a consistent color palette further contributes to a sense of order and avoids visual noise.

    Creating a Sense of Warmth and Comfort within the Industrial Aesthetic

    The inherent coolness of industrial design can be mitigated by strategically incorporating elements of warmth. Natural materials like wood, wool, and linen can offset the starkness of metal and concrete. Warm lighting, achieved through strategically placed lamps and warm-toned bulbs, plays a crucial role in creating a welcoming atmosphere. The inclusion of textiles, such as a plush rug, throws, and cushions, adds layers of texture and softness, contributing significantly to the overall comfort of the room.

    The use of earth tones and warm metallics, such as bronze or copper, further enhances the feeling of warmth and coziness.

    A Step-by-Step Guide for Designing a Rustic Industrial Bedroom

    1. Define the style balance: Determine the desired ratio of rustic and industrial elements. Consider the overall size and lighting of the room.
    2. Select a color palette: Choose a palette that incorporates both warm and cool tones. Earth tones, greys, and muted metallics are good starting points.
    3. Choose key furniture pieces: Select a bed, nightstands, and dresser that reflect the chosen style blend. Consider repurposed or vintage pieces for a more authentic feel.
    4. Incorporate lighting: Utilize a combination of ambient, task, and accent lighting to create a layered and inviting atmosphere. Warm-toned bulbs are recommended.
    5. Add texture and warmth: Introduce textiles such as rugs, throws, and cushions to soften the industrial elements. Consider incorporating natural materials like wood and wool.
    6. Accessorize thoughtfully: Select accessories that complement the chosen style and add personality to the space. Avoid overcrowding.
    7. Final Touches: Step back and assess the overall balance and flow of the room. Make any necessary adjustments to ensure a cohesive and inviting space.

    Summary

    By understanding the interplay of textures, the power of color palettes, and the strategic placement of furniture and lighting, you can successfully create a rustic industrial bedroom that is both stylish and functional. Remember, the key lies in the careful balance between the raw, industrial elements and the comforting warmth of rustic accents. This design approach invites personalization; it’s a canvas upon which you can express your individual style, resulting in a space that is uniquely yours – a sanctuary that is both aesthetically pleasing and deeply personal, a testament to the art of blending opposing aesthetics into a harmonious whole.

    The journey of designing your space should be as enjoyable as the result itself. Embrace the process, experiment with different elements, and most importantly, create a bedroom that truly reflects your vision.

    Query Resolution

    What are some budget-friendly ways to incorporate rustic industrial elements?

    Repurpose existing furniture with a fresh coat of paint or new hardware. Source affordable reclaimed wood from salvage yards or flea markets. Utilize inexpensive materials like metal pipes for shelving or lighting fixtures.

    How can I make a rustic industrial bedroom feel warmer and less cold?

    Incorporate warm-toned lighting, plush rugs, and textured fabrics like wool or linen. Add plants for a touch of life and warmth. Use warmer metal finishes like brushed bronze or copper instead of stark silver.

    Is rustic industrial suitable for small bedrooms?

    Yes, but careful planning is crucial. Opt for multifunctional furniture, maximize vertical space with shelving, and choose a lighter color palette to create an illusion of spaciousness. Avoid cluttering the space with too many accessories.

    How do I clean and maintain rustic industrial materials?

    Reclaimed wood may require occasional oiling or waxing to maintain its finish. Metal surfaces can be cleaned with mild soap and water. Regular dusting is essential for all surfaces to prevent the accumulation of dust and debris.

    Where can I find inspiration for rustic industrial bedroom designs?

    Browse home decor magazines, websites like Pinterest and Houzz, and explore Instagram hashtags such as #rusticindustrialbedroom or #industrialbedroomdecor for numerous design ideas and examples.

  • Industrial Bedroom with Wood and Metal Mix Design

    Industrial Bedroom with Wood and Metal Mix Design

    The marriage of raw industrial aesthetics and the warmth of natural wood creates a unique bedroom haven. This design style, characterized by exposed elements and a blend of textures, offers a captivating contrast. The interplay of robust metal and the organic grain of wood generates a space that is both visually striking and surprisingly inviting. We’ll delve into the scientific principles behind the successful integration of these materials, exploring how color palettes, lighting, and furniture selection contribute to the overall atmosphere.

    Understanding the inherent properties of different wood types—from the reclaimed rusticity of aged pine to the sleek sophistication of ebony—is crucial. Similarly, the choice of metal finish significantly alters the mood. The starkness of black metal contrasts sharply with the softer gleam of brushed steel or the warm patina of copper. This careful selection of materials, informed by principles of design and material science, transforms a simple bedroom into a carefully curated environment.

    Design Aesthetics: Industrial Bedroom Style

    The industrial bedroom style draws inspiration from the aesthetic of early 20th-century factories and warehouses, characterized by raw, unfinished elements and a focus on functionality. This style eschews ornate embellishments in favor of a utilitarian, yet stylish, approach to design. The juxtaposition of contrasting materials and textures is a key element in achieving this unique look.The strategic use of wood and metal is paramount in establishing the industrial aesthetic.

    These materials, often reclaimed or repurposed, contribute to the style’s inherent sense of history and authenticity. The raw, sometimes weathered appearance of these materials adds to the overall character of the design, reflecting the history embedded within the chosen elements.

    Wood Selection and its Impact

    The choice of wood significantly influences the overall feel of an industrial bedroom. Reclaimed wood, for example, often exhibits variations in color and texture, reflecting its previous life and adding a sense of history and character. Its imperfections, such as knots and nail holes, are embraced rather than hidden, contributing to the raw, authentic feel of the style. Darker woods, such as walnut or ebony, create a more dramatic and sophisticated atmosphere, contrasting effectively with the metal elements.

    Conversely, lighter woods, like bleached oak or pine, offer a brighter, more airy feel, softening the industrial edge. The grain and texture of the wood chosen also play a significant role in shaping the room’s visual appeal, influencing its warmth and overall ambiance.

    Metal Finishes and Their Contrasting Effects

    Various metal finishes contribute to the diverse range of expressions within the industrial style. Black metal, with its matte finish, lends a strong, almost austere feel, enhancing the industrial aesthetic’s inherent ruggedness. Brushed steel, on the other hand, provides a more refined, contemporary counterpoint, its subtle sheen softening the overall look. Copper, with its warm, reddish tones and propensity for patina development, introduces a touch of vintage charm and warmth, contrasting beautifully with the cooler tones of other metals and woods.

    The interplay between these different metal finishes, along with their interaction with the chosen wood, allows for a sophisticated level of customization and visual complexity.

    Mood Board: Industrial Bedroom Color Palette

    A typical industrial bedroom mood board would feature a muted color palette, primarily centered around neutral tones. Think charcoal grays, deep browns, and various shades of beige and off-white. These colors serve as a backdrop for the rich textures of the wood and metal elements. Accents of color might be introduced sparingly, perhaps through pops of deep teal, rusty orange, or even a muted mustard yellow, echoing the colors often found in aged metals and industrial machinery.

    The overall effect is one of understated elegance and refined ruggedness, a deliberate contrast between the rough and the refined. This controlled use of color allows the textures and materials to truly shine, maintaining the focus on the inherent beauty of the chosen elements.

    Furniture Selection

    Bedrooms oleg brick glamorous curatedinterior walls

    The successful execution of an industrial-style bedroom hinges on the careful selection of furniture. The inherent contrast between the robust nature of metal and the warmth of wood provides a unique aesthetic opportunity, demanding a considered approach to scale, proportion, and material choices. The following discussion explores the key elements of furniture selection within this design paradigm.

    The blend of wood and metal in furniture pieces creates a dynamic tension, reflecting the industrial aesthetic’s juxtaposition of raw materials and refined craftsmanship. This combination offers both visual interest and structural integrity, characteristics crucial for a bedroom setting that values both style and functionality. Properly chosen furniture can enhance the space’s overall feel, while poorly chosen pieces can disrupt the carefully cultivated atmosphere.

    Examples of Wood and Metal Furniture Combinations

    Effective wood and metal furniture pieces leverage the contrasting textures and colors of the materials. For example, a bed frame might feature a sturdy metal frame with a headboard crafted from reclaimed wood, showcasing the natural grain and patina. Nightstands could consist of metal legs supporting wooden shelves or drawers, creating a visually appealing balance. Dressers often incorporate metal drawer pulls and accents against a wooden frame, highlighting the interplay between the materials.

    A metal-framed mirror with a wooden backing further complements the aesthetic.

    Bedroom Layout Incorporating Wood and Metal Furniture

    Consider a layout where a metal bed frame with a dark wood headboard anchors the space. Two matching nightstands, each with a metal frame and a single wooden drawer, flank the bed. A dresser, featuring metal legs and handles against a light-colored wood frame, could be placed against an opposite wall. This arrangement balances the visual weight of the metal and wood elements, creating a cohesive and functional bedroom layout.

    The layout should also consider the flow of movement within the room and the placement of lighting.

    Integrating Vintage or Repurposed Industrial Furniture

    Incorporating vintage or repurposed furniture significantly enhances the authenticity of the industrial aesthetic. A repurposed metal factory cart can serve as a unique nightstand, its history adding character to the room. An old wooden crate, refinished and fitted with metal handles, can be transformed into a stylish bedside table. Similarly, an antique metal toolbox can be repurposed as a unique storage solution.

    The use of such pieces adds a layer of narrative and depth to the design, reflecting the industrial style’s appreciation for history and functionality.

    Importance of Scale and Proportion in Furniture Selection

    The scale and proportion of furniture are critical to maintaining visual balance and avoiding a cluttered or overwhelming effect. In an industrial-style bedroom, it’s essential to select furniture that is appropriately sized for the room. Oversized furniture can make a small room feel cramped, while undersized pieces can appear lost in a larger space. Maintaining a sense of proportion between the bed, nightstands, and dresser is crucial for a visually harmonious result.

    Consider the ceiling height and the overall dimensions of the room when making furniture selections. For instance, a tall, imposing headboard might suit a high-ceilinged room, while a smaller headboard would be more suitable for a room with lower ceilings.

    Suitable Furniture Materials

    The choice of wood and metal types significantly impacts the overall aesthetic.

    A range of wood types can complement the industrial style. Reclaimed wood, with its inherent imperfections and unique patina, perfectly embodies the aesthetic’s appreciation for history and authenticity. Other suitable wood types include oak, pine, and walnut, offering different levels of grain texture and color. The choice depends on the desired level of visual warmth and the overall color scheme of the room.

    Metal finishes also contribute significantly to the overall aesthetic. Raw steel, with its industrial feel, is a popular choice. Black powder-coated steel offers a more refined look, while brushed nickel provides a softer, more contemporary feel. The choice of metal finish should complement the wood type and the overall color palette of the room. The metal’s finish can influence the room’s ambiance significantly; a matte black finish will contrast sharply with the wood, whereas a brushed nickel will offer a smoother, less contrasting integration.

    Lighting and Decor

    Industrial bedroom with wood and metal mix

    The successful execution of an industrial bedroom design hinges not only on the structural elements and furniture choices but also on a carefully curated lighting and decor scheme. The interplay of light and shadow, combined with strategically selected decorative elements, is crucial in creating the desired atmosphere – a space that balances raw, utilitarian aesthetics with warmth and inviting comfort.

    This section will detail how lighting and decorative choices can enhance the industrial theme, transforming a simple room into a sophisticated and stylish haven.

    Ambient and Task Lighting in Industrial Bedrooms

    Effective lighting in an industrial-style bedroom necessitates a multi-layered approach, combining ambient, task, and accent lighting to achieve both functionality and aesthetic appeal. Ambient lighting provides overall illumination, setting the mood and illuminating the larger space. Task lighting, on the other hand, focuses on specific areas, such as the bedside table or a reading nook, ensuring adequate illumination for particular activities.

    The interplay between these two forms of lighting is critical in creating a dynamic and versatile space. For example, a combination of a central ceiling fixture (providing ambient light) with strategically placed bedside lamps (task lighting) would effectively illuminate the entire room while also providing focused light where needed. A dimmer switch on the ambient lighting would allow for mood adjustments, from bright daytime illumination to a soft, subdued glow for nighttime relaxation.

    Industrial Lighting Fixture Selection

    Industrial lighting fixtures are characterized by their raw, utilitarian aesthetic, often featuring exposed bulbs, metalwork, and a sense of unrefined elegance. Exposed filament bulbs, for instance, contribute to the raw, industrial feel by showcasing the inner workings of the light source. Metal pendants, particularly those made from materials like blackened steel or copper, are a hallmark of this style.

    Their inherent ruggedness adds a layer of visual texture and depth to the space. Consider incorporating cage-style pendant lights, which further emphasize the industrial aesthetic through their exposed metal framework. The strategic placement of these fixtures—perhaps a trio of pendants over the bed or a single statement piece above a vanity—can dramatically alter the visual perception of the room.

    Decorative Elements for Industrial Bedrooms

    The decorative elements chosen for an industrial bedroom should complement the existing aesthetic, enhancing the sense of raw, utilitarian charm while introducing elements of warmth and personality. Metal wall art, featuring abstract designs or geometric patterns, can add a modern touch to the industrial aesthetic. Textiles, such as distressed leather or heavy linen, can introduce a sense of tactile richness and warmth, softening the harder edges of the metal and wood.

    Rugs with a distressed or vintage appearance can further ground the space, adding a layer of visual and tactile interest. The careful selection of these elements is crucial in achieving a balanced aesthetic, preventing the space from feeling overly cold or sterile. For example, a distressed leather armchair, a thick wool rug, and a metal wall sculpture with geometric shapes could create a cohesive and stylish interior.

    Incorporating Plants to Soften the Industrial Aesthetic

    The incorporation of plants is an effective way to soften the industrial aesthetic, introducing a natural element that contrasts beautifully with the hard lines and metallic surfaces. Strategic placement of potted plants in various sizes and types can add a touch of life and vibrancy to the room. Consider placing larger plants in corners or along walls, and smaller plants on shelves or bedside tables.

    The contrast between the organic forms of the plants and the industrial elements of the room creates a visually engaging and balanced space. For example, a large fiddle-leaf fig in a simple metal pot would add a striking visual element, while smaller succulents in vintage metal containers could introduce additional pops of color and texture.

    Creating Visual Interest Through Texture and Material

    The strategic use of texture and material is paramount in creating a visually interesting and layered industrial bedroom. The inherent contrast between the rough texture of exposed brick or concrete walls and the smooth surfaces of metal fixtures creates a captivating visual dynamic. This contrast can be further enhanced by incorporating textiles with varying textures—a rough linen throw blanket paired with a smooth leather headboard, for instance.

    The combination of different materials—metal, wood, concrete, and textiles—creates a visually rich environment that prevents the space from feeling monotonous or one-dimensional. Careful consideration of these textural and material elements can significantly elevate the overall aesthetic appeal of the room.

    Structural Elements

    The juxtaposition of raw, industrial materials with the warmth of wood creates a unique aesthetic tension in bedroom design. This interplay of textures and colors, achieved through careful selection of structural elements, is key to achieving a successful industrial-style space. The inherent properties of each material – the strength and resilience of metal, the organic beauty and versatility of wood, and the stark honesty of exposed brick or concrete – all contribute to the overall design narrative.Exposed brick or concrete walls, often remnants of a building’s original structure, lend an undeniable authenticity to the industrial aesthetic.

    The inherent texture and irregularities of these materials speak to a history of use and wear, contrasting beautifully with the sleek lines of metal accents and the smooth surfaces of wood paneling. From a scientific perspective, the thermal mass of exposed brick or concrete can contribute to a more stable indoor temperature, reducing reliance on climate control systems.

    The porosity of brick, for instance, allows for a degree of moisture regulation, influencing humidity levels within the room.

    Exposed Brick and Concrete Walls

    The use of exposed brick or concrete walls in an industrial-style bedroom contributes significantly to the overall aesthetic. The inherent texture and color variations of these materials evoke a sense of history and authenticity, characteristics central to the industrial design philosophy. The raw, unfinished appearance contrasts with the smoother surfaces of wood and metal, creating visual interest and depth.

    Furthermore, the thermal mass of these materials can contribute to temperature regulation within the space, improving energy efficiency. For example, the exposed brick walls of a converted warehouse loft would retain heat during colder months and absorb heat during warmer months, reducing fluctuations in temperature.

    Metal Accents in Architectural Details

    Metal accents, such as exposed pipes, beams, and ductwork, are defining features of industrial design. These elements, often left visible rather than concealed, showcase the building’s underlying structure. The use of metal, particularly steel or iron, adds a sense of strength and durability, reinforcing the industrial aesthetic. The metallic sheen reflects light, adding brightness to the space, while the inherent texture and patina of aged metal contribute to a sense of history and character.

    For instance, a visible network of black iron pipes running along a ceiling can serve as a striking focal point, enhancing the room’s raw, industrial feel. From a structural standpoint, these exposed elements often contribute to the overall load-bearing capacity of the building.

    Wood Paneling and Flooring

    The incorporation of wood paneling or flooring introduces warmth and organic texture, counterbalancing the coolness of the metal and concrete. Wood, with its natural grain and variation in color, adds a sense of comfort and livability to the otherwise austere industrial space. The selection of wood type – reclaimed wood, for instance, further reinforces the industrial aesthetic – influences the overall tone.

    Hardwoods like oak or walnut offer durability and a rich, deep color, while softer woods like pine can provide a more rustic feel. The use of wood flooring, particularly wide plank flooring, contributes to a sense of spaciousness, while wood paneling on one wall can create a focal point or add visual interest to a particular area.

    Headboard Design Incorporating Wood and Metal

    A headboard incorporating both wood and metal elements can serve as a striking focal point in an industrial-style bedroom. A design featuring a reclaimed wood frame, perhaps with a slightly distressed finish, paired with metal accents – such as wrought iron brackets or a metal plate inset – would effectively combine the textures and materials. The metal could be left in its raw state or powder-coated for a more contemporary look.

    The contrast in texture and color between the wood and metal creates visual interest, while the overall design reflects the core principles of industrial style. For example, a headboard with a wide, rustic wood plank base and slender metal legs would offer both visual appeal and structural support.

    Ceiling Design Incorporating Wood and Metal

    The ceiling offers an opportunity to further integrate wood and metal elements, enhancing the overall industrial aesthetic.

    Design Element Wood Material Metal Material Description
    Exposed Beams Reclaimed wood beams Steel support brackets Original beams refinished and accented with metal supports.
    Suspended Ceiling Wood slats Metal grid system A grid of metal supports holds wood slats for a layered effect.
    Coffered Ceiling Wood panels Metal trim Wood panels form recessed squares, framed with metal trim.
    Accent Lighting Wood housing Metal pipes or conduits Industrial-style light fixtures housed in wood, with exposed metal conduit.

    Color Palettes and Textures

    Industrial bedroom with wood and metal mix

    The judicious selection of color palettes and textures is paramount in achieving a cohesive and aesthetically pleasing industrial bedroom design. Color psychology plays a significant role, influencing the mood and perceived spaciousness of the room. Textures, meanwhile, add depth and visual interest, complementing the raw, often unfinished aesthetic of industrial design. The interplay between these elements creates a harmonious balance, reflecting the style’s inherent blend of ruggedness and refinement.Color choices profoundly impact the atmosphere of a space.

    Cool tones, such as grays, blues, and greens, evoke a sense of calm and tranquility, while warmer tones, like browns, oranges, and reds, create a more inviting and energetic environment. The psychological effects of color are well-documented; for example, blues are often associated with relaxation and serenity, while reds can stimulate energy and excitement. The strategic use of color can significantly impact sleep quality and overall well-being within the bedroom.

    Suitable Color Palettes for Industrial Bedrooms

    Industrial design often utilizes a muted, neutral base, allowing for pops of color to create visual contrast and personality. A palette dominated by neutral tones like charcoal gray, deep browns, and muted greens provides a strong foundation. Accents of warmer colors, such as rusty oranges or deep reds, can be incorporated through textiles or artwork to add warmth and visual intrigue.

    Conversely, cooler tones like steel blue or slate gray can enhance the sense of spaciousness and modernity. The key is balance—avoiding an overwhelming sense of coldness or starkness. Examples include:

    • Charcoal gray walls, dark brown wood furniture, and pops of rusty orange in throw pillows and artwork.
    • A base of muted green walls, complemented by black metal accents and beige linen bedding.
    • Slate gray walls, light oak wood flooring, and accents of deep red in a statement rug.

    Texture Integration for Visual Interest

    The interplay of textures is crucial in enhancing the industrial aesthetic. The inherent contrast between rough and smooth surfaces is a defining characteristic of this style. The rough texture of exposed brick or reclaimed wood walls provides a tactile and visual counterpoint to the smooth surfaces of metal furniture or polished concrete floors. This contrast adds depth and visual richness, preventing the space from feeling monotonous.

    For instance, the coarse texture of a woven rug can contrast beautifully with the smooth, cold surface of a metal bed frame.

    Textile Choices Complementing Industrial Style

    The selection of textiles plays a crucial role in softening the industrial aesthetic’s inherent hardness. Materials like linen, cotton, and leather introduce warmth and tactility, balancing the cold metal and hard surfaces.

    • Linen: Its natural texture and slightly rumpled appearance add a touch of rustic charm, complementing the industrial aesthetic’s raw and unrefined character. Its breathability also makes it ideal for bedding.
    • Cotton: A versatile and durable choice, cotton offers a softer counterpoint to the hard surfaces of the room. It can be used in bedding, curtains, and throw pillows.
    • Leather: Leather accents, such as a leather headboard or armchair, add a touch of luxury and sophistication, contrasting with the room’s industrial elements. Its durability and aging qualities align with the industrial aesthetic’s appreciation for longevity.

    Detailed Bedroom Interior Description

    Imagine a bedroom with charcoal gray walls, punctuated by the exposed brick of one accent wall. The floor is polished concrete, its cool smoothness contrasting with the rough-hewn texture of a reclaimed wood nightstand. A metal bed frame, finished in a matte black, anchors the space, its sleek lines offset by the soft, rumpled texture of a linen duvet cover in a muted olive green.

    A large, woven jute rug adds warmth and texture underfoot. Touches of rusty orange are incorporated through throw pillows and a vintage industrial-style lamp, creating a visually stimulating yet cohesive space. The overall effect is one of sophisticated ruggedness, where the interplay of colors and textures creates a balanced and inviting atmosphere.

    Last Recap

    Industrial bedroom with wood and metal mix

    Ultimately, the industrial bedroom with a wood and metal mix is a testament to the power of contrasting elements. By understanding the interplay of texture, color, and material properties, one can craft a space that is both aesthetically pleasing and functionally sound. The careful consideration of lighting, furniture placement, and the strategic use of decorative elements elevates this design beyond mere aesthetics, creating a truly personalized and comfortable sanctuary.

    The success lies not just in the visual appeal, but in the careful orchestration of materials and their inherent qualities to achieve a harmonious and inviting atmosphere.

    FAQ Compilation

    What are some low-maintenance wood choices for an industrial bedroom?

    Hardwoods like oak and maple are naturally durable and resistant to scratches and dents, making them ideal for high-traffic areas. Engineered wood flooring also offers a low-maintenance alternative.

    How can I incorporate plants without compromising the industrial aesthetic?

    Choose plants in metal containers or planters with a minimalist design. Succulents and cacti, with their hardy nature, fit well within this style, requiring minimal care.

    Are there any specific safety considerations when using exposed metal?

    Ensure all exposed metal is properly grounded to prevent electrical hazards. Sharp edges should be sanded or covered to prevent injuries. Consider using powder-coated metals for enhanced durability and safety.

    How do I balance the coolness of metal with the warmth of wood?

    Use warmer-toned wood species like cherry or walnut to offset the coolness of the metal. Introduce textiles like wool or linen rugs and throws to add warmth and texture.

    What are some cost-effective ways to achieve an industrial look?

    Repurpose existing furniture by sanding and repainting it with industrial-style colors. Utilize affordable materials like plywood for shelving and headboards, and source vintage industrial finds from flea markets or online.

  • Industrial Bedroom with Minimalist Furniture A Design Guide

    Industrial Bedroom with Minimalist Furniture A Design Guide

    The marriage of industrial aesthetics and minimalist design principles creates a unique bedroom sanctuary. This style, characterized by a blend of raw, functional materials and clean lines, offers a captivating contrast. Imagine exposed brick walls subtly juxtaposed with sleek, metal-framed furniture, the rough texture of concrete balanced by the smooth surfaces of minimalist shelving. This design guide explores the key elements of this captivating style, from material selection and furniture placement to color palettes and thoughtful accessorizing, offering a blueprint for creating a space that is both visually striking and serenely calming.

    We will delve into the specific characteristics that define this hybrid style, differentiating it from purely industrial or modern minimalist approaches. The focus will be on creating a balanced aesthetic: one that celebrates the inherent beauty of raw materials while maintaining the clean, uncluttered feel of minimalism. We will examine practical aspects such as furniture selection, lighting strategies, and the strategic use of texture and color to achieve the desired mood and atmosphere.

    Defining the Style

    The industrial minimalist bedroom represents a fascinating synthesis of two seemingly disparate design philosophies: the raw, functional aesthetic of industrial design and the clean, uncluttered simplicity of minimalism. This style achieves a unique balance, embracing the honest materials and exposed elements of industrial spaces while maintaining a sense of order and tranquility characteristic of minimalist design. The result is a space that is both visually striking and remarkably calming.The core aesthetic hinges on a careful juxtaposition of contrasting elements.

    The inherent roughness of industrial materials—think exposed brick, metal piping, and aged wood—is deliberately tempered by the deliberate sparseness and geometric precision of minimalist principles. This interplay creates a dynamic tension that is both visually interesting and conceptually sophisticated. Instead of feeling cold or harsh, the industrial elements contribute to a sense of authenticity and history, while the minimalist approach prevents the space from feeling overwhelming or cluttered.

    Materials and Their Incorporation

    The material palette of an industrial minimalist bedroom is intentionally limited, emphasizing the inherent beauty of raw materials. Metal, particularly steel and iron, plays a significant role. We see this in the use of metal bed frames with simple, geometric lines, exposed metal piping incorporated into shelving units, or metal accents on nightstands. Wood, often reclaimed or with a distressed finish, adds warmth and texture.

    A reclaimed wood headboard, for instance, provides a striking contrast against a backdrop of exposed brick or concrete. Concrete, frequently used for flooring or accent walls, lends a sense of solidity and industrial authenticity. A polished concrete floor, for example, provides a smooth, durable surface that complements the other materials.

    Comparison with Other Styles

    The industrial minimalist bedroom distinguishes itself from other styles through its unique blend of elements. While sharing some similarities with modern minimalist bedrooms—both emphasize clean lines and a lack of clutter—the industrial style incorporates raw, unfinished materials that are absent in purely modern minimalist designs, which tend to favor sleek, polished surfaces and manufactured materials. In contrast to rustic industrial bedrooms, which often embrace a more heavily textured and overtly aged aesthetic, the industrial minimalist bedroom maintains a degree of restraint and simplicity.

    Rustic industrial spaces might feature more heavily distressed wood, ornate metalwork, and a greater density of decorative elements, whereas the industrial minimalist approach prioritizes a more streamlined and carefully curated selection of pieces.

    Furniture Selection and Placement

    Creating a functional and aesthetically pleasing industrial minimalist bedroom requires careful consideration of furniture selection and placement. The goal is to maximize space while maintaining a sense of openness and showcasing the raw, industrial elements within a clean, uncluttered design. This involves choosing pieces that are both visually striking and practical, emphasizing functionality and minimizing visual noise.The principles of ergonomics and spatial awareness play crucial roles in determining the optimal furniture layout.

    Strategic placement of furniture not only enhances the visual appeal but also ensures ease of movement and accessibility within the room. The following section details a sample layout and furniture descriptions to achieve this balance.

    Sample Furniture Layout and Descriptions

    The following table illustrates a sample furniture arrangement for an industrial minimalist bedroom. This layout prioritizes functionality and maximizes space, utilizing the principles of negative space to create a feeling of spaciousness. The arrangement is designed to be adaptable to various room sizes and shapes.

    Item Description Material Placement
    Bed Low-profile platform bed with a simple headboard. Steel frame with a natural wood or dark grey stained wood platform. Center of the room, against a wall.
    Nightstands Two small, identical nightstands with minimal design. Reclaimed wood or metal with a simple, geometric shape. One on each side of the bed.
    Dresser A long, low dresser with clean lines and minimal hardware. Metal or dark stained wood with a matte finish. Against the wall opposite the bed.
    Seating A simple armchair or a small bench. Leather or industrial-style fabric upholstery with a metal frame. In a corner or near a window.

    Lighting Fixture Selection and Placement

    Appropriate lighting is crucial for enhancing the industrial aesthetic while maintaining a minimalist feel. The use of directional lighting can highlight architectural features and create visual interest, while ambient lighting ensures a comfortable and functional space. The goal is to create a balanced illumination scheme that complements the overall design.Pendant lights, strategically placed above the bed or over a seating area, offer a strong focal point.

    These fixtures often feature exposed bulbs or industrial-style shades, adding to the overall aesthetic. Track lighting, which allows for adjustable light placement, can be used to illuminate specific areas, such as the dresser or a reading nook, without cluttering the space. Wall sconces, with their minimalist design and upward-directed light, provide soft ambient illumination, while maintaining a clean look.

    The use of LED bulbs is recommended for their energy efficiency and long lifespan. A combination of these lighting types ensures a functional and visually appealing environment.

    Color Palette and Textures

    Bedroom industrial design style ideas modern window dark panes wood metal light

    The successful execution of an industrial minimalist bedroom hinges on a carefully curated color palette and a thoughtful integration of textures. These elements work in synergy to establish the desired atmosphere, balancing the raw, utilitarian aspects of industrial design with the clean lines and simplicity of minimalism. The chosen colors and textures will directly impact the room’s perceived spaciousness, light levels, and overall emotional impact.The interplay between color and texture creates visual depth and interest, preventing the space from feeling sterile or monotonous.

    A monochromatic scheme, while appearing minimalist, can lack warmth and character. Conversely, an overabundance of colors and patterns clashes with the core principles of industrial minimalism. The key lies in finding a balance – incorporating enough visual stimulation to be engaging without sacrificing the inherent calmness and order of the style.

    Industrial Minimalist Color Palette

    A suitable palette for an industrial minimalist bedroom centers around a neutral base, punctuated by carefully chosen accent colors. The primary color should be a muted, slightly desaturated gray, reminiscent of aged concrete or weathered steel. This serves as a backdrop that evokes the industrial aesthetic without being overly harsh or cold. Neutrals such as off-white or warm beige can be introduced for softening the overall effect, reflecting light and creating a sense of spaciousness.

    Scientific studies on color psychology show that these neutral tones promote relaxation and calmness, crucial for a bedroom environment. As an accent, a deep charcoal gray or a dark, muted blue can add depth and sophistication, mimicking the shadows found in industrial spaces. These deeper tones can be incorporated through smaller elements, such as bedding or artwork. Finally, touches of warm metallics, such as brushed brass or copper, can be subtly introduced to add a touch of luxury and warmth, counterbalancing the coolness of the grays and blues.

    These metallic accents could be incorporated through lighting fixtures or small decorative pieces.

    Texture Integration for Visual Interest

    Texture plays a vital role in preventing the minimalist aesthetic from feeling overly stark. The raw, unrefined textures inherent in industrial design should be balanced with smoother, more refined textures to create a sense of harmony. The use of exposed brick or concrete walls, typical of industrial spaces, introduces a rough, tactile texture. This can be complemented by the smooth, cool surface of metal, perhaps in a bed frame or shelving unit.

    To counterbalance the hardness of concrete and metal, incorporating woven textiles, such as linen bedding or a jute rug, adds warmth and softness. The contrast between these textures – the rough and the smooth, the hard and the soft – creates visual interest and prevents the space from feeling monotonous. This principle is supported by Gestalt psychology, which emphasizes the human perception of patterns and relationships between elements.

    The juxtaposition of contrasting textures adds complexity and dynamism to the visual field. The inclusion of natural wood, perhaps in a bedside table or a headboard, introduces another layer of texture, adding warmth and organic character to the predominantly industrial materials.

    Sample Mood Board

    Imagine a mood board dominated by a soft, slightly grayed-out beige as the background. Against this backdrop, swatches of charcoal gray and a deep, slightly dusty blue are placed, representing the accent colors. A small sample of brushed brass shows the metallic accent. A textured sample of raw concrete, a smooth metal sheet, a piece of woven linen fabric, and a small piece of reclaimed wood are arranged to showcase the texture interplay.

    The overall feeling evoked is one of calm sophistication, blending the raw energy of industrial design with the serenity of a minimalist aesthetic. The muted color palette promotes relaxation, while the diverse textures create visual depth and prevent the space from feeling cold or sterile. The metallic accents add a touch of luxury and warmth, enhancing the overall atmosphere of quiet elegance and understated refinement.

    Incorporating Industrial Elements

    The marriage of industrial design’s raw aesthetic with minimalist principles’ clean lines presents a unique challenge: balancing the robust character of the former with the streamlined simplicity of the latter. Successfully integrating industrial elements requires careful selection and placement to avoid overwhelming the space. The key lies in employing these elements as accents, emphasizing texture and form rather than dominating the visual field.

    Five Key Industrial Design Elements for a Minimalist Bedroom

    The incorporation of industrial elements shouldn’t detract from the minimalist ethos; instead, it should enhance it by adding depth and character. Five key elements can achieve this subtle integration: exposed metal, aged wood, repurposed metal fixtures, concrete accents, and industrial-style lighting. These elements, used sparingly and strategically, can transform a minimalist bedroom into a sophisticated and uniquely styled space.

    Exposed Brick, Metal Piping, or Concrete Walls as Design Features

    Exposed brick, metal piping, or concrete walls are hallmarks of industrial design, offering a raw and textured backdrop. However, in a minimalist bedroom, these features must be carefully managed to avoid a cluttered or overwhelming effect. A single exposed brick wall, for instance, can serve as a striking focal point, its rough texture contrasting beautifully with the smooth surfaces of minimalist furniture.

    Similarly, strategically exposed metal piping, perhaps along one wall, can add a touch of industrial character without disrupting the overall sense of order. A concrete accent wall, polished to a smooth finish, can introduce a modern industrial touch while maintaining a clean aesthetic. The key is to select one or two such features, keeping the remaining walls clean and uncluttered.

    Overuse would negate the minimalist effect.

    Repurposed Industrial Items as Functional Decor

    Repurposing industrial items offers a sustainable and stylish way to integrate industrial elements into a minimalist bedroom. A vintage factory cart, for example, can be transformed into a unique and functional nightstand. Its metal frame, often featuring wheels and a weathered patina, provides a strong visual anchor, while its open design keeps the space feeling airy. Similarly, metal containers, originally designed for storage in factories or workshops, can be repurposed as bedside storage units or as decorative elements.

    A collection of these containers, perhaps in varying sizes and finishes, can add visual interest without compromising the minimalist aesthetic. Their functionality as storage solutions further contributes to the streamlined look of the room. Consider a repurposed metal toolbox as a stylish alternative to a traditional bedside table, its compartments offering discreet storage for personal items. The key is to select items that are both functional and visually appealing, adding to the overall design rather than detracting from it.

    Accessorizing and Styling

    Industrial bedroom with minimalist furniture

    Careful accessorizing is crucial in an industrial minimalist bedroom, balancing the inherent starkness of the style with warmth and personality. Over-accessorizing would negate the minimalist aesthetic, while under-accessorizing would leave the space feeling cold and impersonal. The key is strategic selection and placement, leveraging texture and color to create visual interest without overwhelming the space.The judicious use of accessories allows for the injection of personal style and the creation of a calming, yet stimulating, atmosphere.

    This involves understanding the interplay between form, function, and visual impact, choosing pieces that complement rather than compete with the existing industrial elements.

    Suitable Accessories for an Industrial Minimalist Bedroom

    The selection of accessories should reflect the overall aesthetic, maintaining a balance between functionality and visual appeal. Items should be chosen for their inherent quality and ability to enhance the space without cluttering it. Overly ornate or brightly colored pieces should be avoided in favor of items with clean lines and muted tones.

    • Metal Sculptures: Abstract metal sculptures in dark greys or blacks can add a textural element that complements the industrial feel. A small, geometric sculpture placed on a side table, for instance, provides a focal point without disrupting the minimalist aesthetic.
    • Textured Throw Blankets: A chunky knit throw in a neutral color like charcoal grey or cream can add warmth and texture to the bed, softening the hard lines of the industrial furniture. The tactile quality of the fabric offers a welcome contrast to the coldness of metal and concrete.
    • Black and White Photography: Large-scale black and white photographs in simple, minimalist frames can add visual interest to the walls without overwhelming the space. The stark contrast of the images complements the industrial palette and provides a sense of depth.
    • Industrial-Style Lamps: A task lamp with a metal shade and exposed bulb, or a minimalist pendant light, can provide functional lighting while adding to the industrial aesthetic. The exposed bulb creates a vintage feel, complementing the raw materials often used in industrial design.
    • Natural Fiber Rugs: A jute or sisal rug can add warmth and texture to the floor, softening the hard surfaces of the concrete or wood. The natural fibers create a calming contrast to the metallic elements of the room, adding a touch of organic texture.

    Incorporating Plants and Greenery

    Plants introduce a vital organic element, contrasting beautifully with the hard lines and metallic surfaces of an industrial space. They add a sense of life and vibrancy, softening the overall aesthetic and improving air quality. The selection of plants should consider their size, light requirements, and overall aesthetic compatibility with the existing design.

    • Snake Plants (Sansevieria trifasciata): These low-maintenance plants tolerate low light conditions and require minimal watering, making them ideal for industrial bedrooms which may lack ample natural light. Their upright, sword-like leaves add a sculptural element.
    • ZZ Plants (Zamioculcas zamiifolia): Another low-light tolerant option, ZZ plants are known for their resilience and ability to thrive in less-than-ideal conditions. Their dark green, glossy leaves add a touch of elegance.
    • Placement Strategy: Plants should be strategically placed to enhance the existing design. A tall plant in a simple pot can be placed in a corner to add height and visual interest. Smaller plants can be arranged on shelves or side tables to create mini-vignettes.

    Designing a Bedroom Corner Vignette

    Imagine a corner of the bedroom bathed in the soft glow of a minimalist floor lamp with a brushed steel base and a simple linen shade. On a small, reclaimed wood side table sits a terracotta pot containing a lush ZZ plant, its dark green leaves contrasting beautifully with the warm tones of the wood. Next to the plant, a small, geometric metal sculpture in matte black catches the light, adding a subtle touch of visual interest.

    A stack of art books with stark, graphic covers rests casually beside the sculpture, adding a touch of intellectual sophistication. The overall effect is one of quiet sophistication, a carefully curated space that balances the raw, industrial elements with organic textures and subtle pops of color. The scene evokes a feeling of calm and understated elegance, a sanctuary for relaxation and contemplation.

    The carefully chosen accessories work in harmony to create a space that is both functional and aesthetically pleasing.

    Final Thoughts

    Industrial bedroom with minimalist furniture

    Creating an industrial minimalist bedroom is a journey of balancing contrasting elements to achieve a harmonious and stylish space. By carefully selecting materials, furniture, and accessories, you can craft a bedroom that is both visually appealing and functionally efficient. The key lies in the thoughtful integration of raw, industrial elements with the clean lines and uncluttered simplicity of minimalist design.

    The result? A sanctuary that is both strikingly modern and uniquely personal, reflecting a sophisticated understanding of design and a commitment to creating a truly restful and inspiring environment. The careful consideration of texture, color, and lighting ultimately transforms a bedroom into a space that is as functional as it is aesthetically pleasing, reflecting a unique and refined personal style.

    FAQ Guide

    What are some sustainable materials I can use in an industrial minimalist bedroom?

    Reclaimed wood, recycled metal, and sustainably sourced concrete are excellent choices. Look for furniture made from these materials to minimize your environmental impact.

    How can I avoid making the space feel too cold or sterile?

    Incorporate warm-toned textiles like linen or wool throws, rugs, and cushions. Plants and natural wood elements can also add warmth and soften the industrial feel.

    What size rug is best for an industrial minimalist bedroom?

    The ideal rug size depends on the room’s dimensions. A large rug that extends beyond the bed on all sides creates a cohesive and luxurious feel, while a smaller rug can anchor the bed area.

    Can I use bright colors in an industrial minimalist bedroom?

    While a neutral palette is common, strategic use of accent colors can add personality. Choose one or two bold colors that complement the industrial elements and use them sparingly in textiles or artwork.

    Where can I find repurposed industrial items for décor?

    Antique shops, flea markets, and online marketplaces are great sources for unique repurposed items. Consider factory carts as nightstands, metal containers as storage, or vintage industrial lighting fixtures.

  • Industrial Bedroom Design with Metal Furniture

    Industrial Bedroom Design with Metal Furniture

    The raw, utilitarian aesthetic of industrial design is increasingly finding its way into the bedroom, a space traditionally associated with comfort and softness. This fusion of contrasting styles creates a unique and captivating atmosphere. The incorporation of metal furniture, with its inherent strength and sleek lines, is central to achieving this look. From the robust frame of a metal bed to the subtle gleam of a brushed steel nightstand, metal elements contribute a distinct character, balancing the inherent coldness of the material with carefully chosen complementary textures and warm lighting.

    This exploration delves into the core principles of industrial bedroom design, examining the strategic selection and placement of metal furniture, the integration of other materials to soften the overall aesthetic, and the crucial role of lighting and décor in creating a functional and inviting space. We’ll navigate the nuances of metal finishes, explore various furniture styles, and offer practical advice on maximizing storage and achieving a harmonious balance between ruggedness and comfort.

    The goal? To transform a bedroom into a sanctuary that reflects both style and practicality.

    Defining the Industrial Bedroom Aesthetic

    Industrial bedroom design with metal furniture

    The industrial bedroom aesthetic is a design style that draws inspiration from the raw, functional spaces of factories and warehouses. It embraces exposed elements and utilitarian materials, creating a unique blend of rustic charm and modern sophistication. This style eschews ornamentation in favor of clean lines and a focus on the inherent beauty of the materials themselves. The overall effect is a space that feels both lived-in and stylishly minimalist.The core elements of industrial bedroom design revolve around the strategic use of materials and a commitment to showcasing structural elements.

    This style prioritizes functionality and a sense of authenticity, rejecting overly polished or decorative finishes.

    Raw Material Usage in Industrial Bedrooms

    The industrial aesthetic thrives on the use of raw, unrefined materials. Metal, often in its unfinished or subtly distressed state, is a cornerstone. Think steel bed frames, metal shelving units, and exposed metal pipes—all contributing to the style’s signature ruggedness. Wood, frequently reclaimed or with a visible grain, provides a textural counterpoint to the cold hardness of the metal.

    The wood is often left untreated or finished with a clear sealant to preserve its natural appearance. Concrete, either as flooring or accent walls, adds a further layer of industrial grit and texture. The inherent strength and durability of these materials reinforce the aesthetic’s association with industrial spaces.

    Exposed Elements: Brick, Pipes, and Ductwork

    Exposed brick walls, a hallmark of industrial design, bring a sense of history and authenticity to the bedroom. The uneven texture and variations in color of the brick create visual interest and a lived-in feel. Similarly, exposed pipes and ductwork, instead of being hidden, become integral design elements. They contribute to the space’s raw, unadorned aesthetic, reinforcing the connection to industrial architecture.

    Rather than being viewed as flaws, these elements become focal points, adding character and depth to the room. The strategic highlighting of these structural components underscores the design philosophy’s embrace of authenticity and functionality.

    Color Palettes in Industrial Bedrooms

    Industrial bedroom color palettes often favor a muted and neutral base. Shades of gray, charcoal, and deep browns are frequently used, reflecting the tones found in factories and warehouses. These colors create a calming and sophisticated backdrop for the metallic and wooden accents. Accents of bolder colors, such as deep reds, rusty oranges, or even vibrant greens, can be introduced strategically to add visual interest and warmth without overwhelming the overall aesthetic.

    This measured use of color further emphasizes the clean lines and functional focus of the style. The color palette is chosen to complement the raw materials and enhance the sense of spaciousness and calm.

    Metal Furniture Selection and Placement

    Metal bed industrial bedroom black ideas furniture frame beds design

    The strategic selection and placement of metal furniture are paramount in achieving a truly authentic industrial bedroom aesthetic. The inherent strength and durability of metal, coupled with its versatility in design, allows for the creation of a space that is both stylish and functional. Understanding the properties of different metals and their finishes, alongside careful consideration of spatial arrangement, is crucial for maximizing the impact of this design choice.Metal furniture offers a unique blend of ruggedness and sophistication, perfectly complementing the raw, exposed elements characteristic of industrial design.

    The choice of metal type, finish, and style significantly influences the overall atmosphere of the bedroom.

    Types of Metal Furniture for Industrial Bedrooms

    The industrial style lends itself well to a range of metal furniture pieces. Beds, nightstands, and wardrobes are key elements that can be chosen to reflect the desired level of industrial aesthetic. For instance, a bed frame constructed from heavy-gauge steel with a black powder-coated finish evokes a sense of raw, utilitarian strength. Nightstands made from repurposed metal, such as vintage industrial shelving units, add a layer of unique character and history.

    Wardrobes can range from sleek, minimalist designs in brushed steel to more ornate pieces featuring intricate metalwork details. The versatility of metal allows for a spectrum of options to suit different tastes and space constraints.

    Metal Finishes and Their Design Impact

    The choice of metal finish significantly impacts the overall feel of the industrial bedroom. Black powder-coated finishes are popular for their ability to create a dramatic, almost gothic effect, enhancing the ruggedness of the metal. Brushed steel, on the other hand, offers a more contemporary and refined aesthetic, reflecting light and creating a sense of spaciousness. Copper, with its warm, aged tones, introduces a touch of vintage charm, complementing other industrial elements like exposed brick or aged wood.

    Each finish contributes a unique character, allowing for a customized industrial style. The reflectivity of polished steel, for instance, contrasts with the matte texture of a black powder-coated finish, providing opportunities for visual interest and textural play.

    Sample Industrial Bedroom Layout with Metal Furniture

    The following table illustrates a potential layout for an industrial bedroom featuring metal furniture. Dimensions are approximate and can be adjusted to suit individual room sizes and preferences. The layout prioritizes functionality while maintaining the aesthetic integrity of the industrial style.

    Item Dimensions (approx.) Placement Material/Finish
    Metal Bed Frame 6ft x 4ft Center of room Black powder-coated steel
    Metal Nightstands (2) 2ft x 1.5ft x 2ft Flanking the bed Brushed steel
    Metal Wardrobe 6ft x 2ft x 7ft Against one wall Dark grey powder-coated steel
    Metal Desk/Vanity 4ft x 2ft x 3ft Opposite the bed Reclaimed metal with copper accents

    Comparison of Minimalist and Ornate Metal Furniture Styles

    Minimalist metal furniture, characterized by clean lines and simple forms, emphasizes functionality and space optimization. This style typically features a single metal type and finish, creating a unified and uncluttered look. In contrast, ornate metal furniture incorporates intricate details, decorative elements, and potentially multiple metal types or finishes. This style adds visual complexity and a sense of history, drawing inspiration from vintage industrial designs or even Art Deco influences.

    The choice between minimalist and ornate depends on the desired level of visual impact and the overall design scheme of the bedroom. A minimalist approach fosters a sense of calm and order, while an ornate approach can create a more dramatic and visually engaging space.

    Integrating Other Materials and Textures

    The stark beauty of metal in an industrial bedroom design benefits significantly from the strategic integration of other materials and textures. This layering of materials not only enhances visual appeal but also contributes to a more comfortable and inviting atmosphere, counterbalancing the potentially cold feel of metal. The careful selection of complementary materials is crucial for achieving a balanced and sophisticated aesthetic.The introduction of contrasting textures and materials softens the industrial aesthetic, preventing it from feeling overly austere or harsh.

    This approach allows for the creation of a space that is both stylish and functional, incorporating elements of warmth and comfort without sacrificing the core industrial style. The interplay of materials creates visual interest and depth, enhancing the overall design.

    Wood’s Contribution to Industrial Bedroom Design

    Wood, with its inherent warmth and natural grain, provides a striking counterpoint to the cool, hard surfaces of metal. Dark, reclaimed wood, often seen in industrial settings, complements the metallic tones beautifully. A reclaimed wood headboard, for instance, adds a rustic charm, softening the metallic frame of a bed. Similarly, wooden nightstands or a floating wooden shelf introduce organic textures that contrast with the smooth surfaces of metal furniture.

    The juxtaposition of the rough texture of reclaimed wood against the smooth, polished surface of steel creates a visually appealing tension. The color contrast also plays a role; the darker tones of the wood complement the often dark or muted colors of industrial metal furniture.

    Leather’s Role in Enhancing the Industrial Aesthetic

    Leather, another natural material, introduces a touch of luxury and tactile richness to the industrial setting. Leather armchairs or a leather ottoman placed near a metal bed frame provide a comfortable and visually appealing contrast. The inherent durability of leather aligns well with the ruggedness of industrial design, and its aged patina adds a layer of character. Full-grain leather, with its visible imperfections and natural markings, particularly complements the honest, unpretentious nature of industrial style.

    A leather-bound journal or a leather-covered storage box can further enhance the room’s textural richness. The smooth, supple texture of the leather contrasts pleasingly with the hard, cold surfaces of the metal.

    Concrete’s Inclusion in Industrial Bedroom Design

    Concrete, a staple of industrial architecture, can be incorporated subtly and effectively. A concrete accent wall, for instance, provides a strong, textural backdrop for the metal furniture. Its cool, grey tones harmonize with the metal while providing a visual anchor. The porous nature of concrete offers a textural contrast to the smooth surfaces of the metal, adding visual depth and interest.

    A concrete bedside table or a concrete lamp base further reinforces the industrial theme, creating a cohesive design. The use of polished concrete can create a smoother, more refined look, while exposed aggregate concrete offers a rougher, more rustic feel.

    Textiles: Adding Warmth and Texture Through Fabrics

    The introduction of textiles is crucial for creating a welcoming atmosphere. Linen bedding, with its natural wrinkles and slightly coarse texture, introduces warmth and softness, contrasting with the cool, hard surfaces of the metal. Cotton throws and rugs in neutral tones further enhance the sense of comfort and invite relaxation. The use of textured fabrics, such as chunky knit throws or velvet cushions, adds visual interest and tactile appeal.

    These textiles, in muted tones, complement the overall industrial aesthetic without overwhelming it. For example, a linen duvet cover on a metal bed frame or a chunky knit throw draped over a metal chair introduces a soft counterpoint to the hard metal.

    Mood Board: Visualizing the Material Combination

    Material Texture Example in Bedroom
    Metal (Steel) Smooth, cold, hard Bed frame, nightstands, desk
    Wood (Reclaimed) Rough, warm, textured Headboard, nightstand, floating shelf
    Leather Smooth, supple, warm Armchair, ottoman, storage box
    Concrete Rough, cool, porous Accent wall, bedside table
    Linen Slightly coarse, textured, warm Bedding, curtains
    Cotton Soft, smooth Throws, rugs

    Materials and Textures for Industrial Bedroom Design

    The following table summarizes materials and their corresponding textures suitable for an industrial bedroom setting:

    Material Texture Visual Description
    Metal (Steel, Iron) Smooth, Cold, Hard Sleek, polished surfaces or raw, unfinished textures.
    Wood (Reclaimed, Dark Stained) Rough, Warm, Textured Visible grain, knots, and imperfections; matte finish.
    Leather (Full-grain, Distressed) Smooth, Supple, Warm Natural markings and variations in color; aged patina.
    Concrete (Polished, Exposed Aggregate) Smooth/Rough, Cool, Porous Smooth, polished surface or a rough, textured finish.
    Textiles (Linen, Cotton, Wool) Soft, Warm, Textured Natural fibers; varying degrees of softness and texture.
    Glass Smooth, Transparent, Cold Clear or frosted glass surfaces.

    Lighting and Decor in an Industrial Bedroom

    The successful execution of an industrial bedroom design hinges not only on the robust metal furniture but also on the careful orchestration of lighting and decorative elements. These components work in synergy to cultivate the desired atmosphere – a blend of raw, functional aesthetics with personalized touches of warmth and character. The interplay of light and shadow, coupled with strategically chosen décor, transforms a simple space into a sophisticated and inviting retreat.Lighting choices are crucial in defining the industrial aesthetic.

    Incorrect lighting can easily undermine the carefully constructed atmosphere, while the right lighting can dramatically enhance the space’s overall feel.

    Industrial Lighting Fixtures

    The selection of lighting fixtures should directly reflect the raw, functional nature of the industrial style. This means favoring fixtures with exposed elements, metallic finishes, and a distinctly utilitarian design. Edison-style bulbs, with their warm, glowing filaments, are a staple, instantly adding character and a vintage industrial feel. Their warm light, approximating the color temperature of incandescent bulbs (around 2700K), creates a cozy ambiance.

    Pendant lights, particularly those with cage-like shades or exposed wiring, offer both functional illumination and a strong visual statement, mimicking the exposed piping and wiring found in old factories. Track lighting, with its adjustable heads, provides versatile illumination, allowing for targeted lighting of specific areas, such as a reading nook or a vanity. These adjustable spotlights can also highlight specific decorative elements, further enhancing the visual impact of the room.

    The use of multiple light sources, such as a combination of pendant lights and bedside lamps, is crucial for achieving layered illumination and preventing harsh shadows.

    Decorative Elements for Industrial Bedrooms

    Decorative elements play a vital role in personalizing the industrial aesthetic and preventing the space from feeling cold or sterile. Vintage posters, featuring imagery related to industrial themes (e.g., factory scenes, vintage machinery, or classic movie posters), add a layer of historical context and visual interest. Industrial-style clocks, often featuring large numerals and metallic finishes, are both functional and aesthetically pleasing, further reinforcing the industrial theme.

    Metallic accents, in the form of copper or brass fixtures, decorative trays, or even strategically placed metal sculptures, add subtle touches of warmth and sophistication, counterbalancing the cool tones of the metal furniture. The strategic use of these decorative elements helps to soften the raw, utilitarian aspects of the industrial design and create a more welcoming and personalized environment.

    A Specific Lighting Scheme and its Atmospheric Effect

    Consider a bedroom featuring a dark-grey metal bed frame and exposed brick walls. A central pendant light with three Edison bulbs above the bed provides a warm, ambient glow. Two adjustable track lights, mounted on the ceiling, illuminate the bedside tables, allowing for focused reading light. A vintage metal floor lamp in the corner adds a touch of character and provides a softer, diffused light.

    This combination creates a layered lighting scheme, offering both general illumination and targeted lighting for specific tasks. The warm light of the Edison bulbs creates a cozy and inviting atmosphere, while the track lights provide functional illumination. The overall effect is a sophisticated blend of warmth and functionality, reflecting the best aspects of industrial design.

    Incorporating Artwork and Accessories

    Artwork and accessories are key to personalizing an industrial bedroom. Consider displaying black and white photographs of industrial landscapes or machinery on the walls, or incorporating abstract metal sculptures to complement the existing metal furniture. A vintage toolbox, repurposed as a bedside table or storage unit, adds a touch of unique character and functional storage. Textiles, such as a chunky knit throw blanket or a distressed leather armchair, add texture and warmth, softening the industrial aesthetic.

    These elements inject personality and individuality into the space, transforming it from a generic industrial-style bedroom into a truly personal sanctuary. The carefully chosen accessories serve as visual anchors, grounding the design and creating a space that reflects the occupant’s personal taste and style.

    Creating a Functional and Comfortable Space

    Industrial bedroom design with metal furniture

    The success of any industrial bedroom design hinges on the delicate balance between its inherent rugged aesthetic and the need for a comfortable, functional living space. While exposed brick and metal accents contribute to the industrial charm, neglecting practicality can render the room less than inviting. Functionality isn’t merely about having enough space; it’s about intelligent design that enhances both the visual appeal and the user experience.The inherent nature of industrial design, with its emphasis on raw materials and exposed elements, often presents challenges in terms of storage and organization.

    However, these challenges can be transformed into opportunities to showcase the style’s unique character. The incorporation of practical storage solutions that complement the aesthetic is crucial for creating a truly functional and enjoyable space.

    Maximizing Storage Space in an Industrial Bedroom

    Strategic storage is paramount in an industrial bedroom. The inherent openness of the style can be countered by incorporating storage solutions that blend seamlessly with the overall design. Metal shelving units, for instance, not only provide ample storage but also reinforce the industrial theme. These can be customized with varying heights and depths to accommodate different items, from clothing to books.

    Industrial-style rolling carts, often made of metal and wood, are another excellent option for mobile storage, ideal for bedside tables or for holding accessories. Furthermore, repurposed items, such as vintage metal trunks or industrial lockers, can serve as unique and functional storage solutions, adding character and a sense of history to the room. The key is to choose pieces that reflect the aesthetic while efficiently utilizing space.

    Balancing Ruggedness with Comfort and Coziness

    The industrial style, while aesthetically striking, can sometimes feel cold and impersonal if not carefully balanced with elements of warmth and comfort. The juxtaposition of hard surfaces and raw materials with soft textiles and warm lighting is key to achieving this balance. A plush, oversized rug can soften the hard flooring, while layered bedding in rich textures like velvet or linen can add a sense of luxurious comfort to the bed.

    Introducing natural elements like wood in the form of a bedside table or a headboard can further enhance the warmth. The strategic use of lighting, as discussed previously, plays a crucial role in creating a cozy ambiance. Warm-toned lighting, such as incandescent bulbs or strategically placed lamps, can dramatically soften the overall feel of the space. The goal is to create a space that is both stylishly industrial and invitingly comfortable.

    Common Design Mistakes to Avoid

    Overlooking functionality in favor of aesthetics is a frequent mistake. While the industrial aesthetic is undeniably appealing, it should not come at the expense of practicality. For instance, relying solely on exposed metal shelving without sufficient storage capacity or using only hard surfaces without incorporating softer elements can lead to a visually stunning but ultimately uncomfortable and unfunctional space.

    Another common error is neglecting proper lighting. Industrial spaces often lack sufficient natural light, so incorporating a well-planned lighting scheme is crucial. Poorly chosen lighting can exacerbate the coldness of the style, making the room feel stark and uninviting. Finally, ignoring the importance of scale and proportion can also lead to design failures. Overly large or small furniture pieces can disrupt the visual balance of the room, rendering it cluttered or sparsely furnished.

    Careful planning and attention to detail are essential for avoiding these common pitfalls and creating a successful industrial bedroom design.

    Ultimate Conclusion

    Ultimately, designing an industrial bedroom with metal furniture is a balancing act. The inherent strength and visual impact of metal must be carefully considered and complemented with warmer materials and thoughtful lighting to avoid a cold or sterile feel. By understanding the interplay of materials, textures, and lighting, one can create a space that is both visually striking and incredibly comfortable, a haven where the rugged charm of industrial design meets the intimacy of a personal sanctuary.

    The key lies in mindful selection and a keen eye for detail, resulting in a space that is both aesthetically pleasing and functionally efficient.

    FAQ Compilation

    What are some affordable metal furniture options for an industrial bedroom?

    Repurposed metal pieces from flea markets or antique stores can be surprisingly affordable. Alternatively, many online retailers offer budget-friendly metal bed frames and shelving units.

    How can I prevent metal furniture from looking too cold or harsh?

    Incorporate warm textures like wood, leather, or wool rugs and throws. Use warm lighting, such as Edison bulbs, and add soft textiles like linen or cotton bedding.

    Is metal furniture durable enough for a bedroom?

    Yes, metal furniture is generally very durable and long-lasting, particularly when made from high-quality materials. However, some finishes may be more prone to scratches than others.

    How do I clean and maintain metal furniture?

    Regular dusting is usually sufficient. For more thorough cleaning, use a damp cloth and mild soap. Avoid abrasive cleaners, which can damage the finish.

    What are some common mistakes to avoid when designing an industrial bedroom?

    Overdoing the industrial elements, neglecting comfort, and insufficient lighting are common pitfalls. A balanced approach is key.

  • Neon Home Decor Lights A Glowing Guide

    Neon Home Decor Lights A Glowing Guide

    From subtle mood lighting to vibrant statement pieces, neon home decor lights have exploded in popularity, transforming interior design trends. This illuminating journey explores the science and artistry behind these captivating lights, delving into their diverse styles, installation techniques, and the captivating ambiance they create. We’ll examine the various types available, from classic glass tubes to energy-efficient LEDs, considering factors such as lifespan, cost, and aesthetic impact.

    Prepare to be inspired by the versatility and transformative power of neon in your home.

    The surge in popularity of neon home decor reflects a broader shift towards personalized and expressive interior design. No longer confined to retro diners or urban nightlife, neon’s vibrant glow now graces bedrooms, living rooms, and even kitchens, adding a touch of playful modernity or sophisticated elegance depending on the chosen style and color. This guide aims to provide a comprehensive overview, covering everything from choosing the perfect design to ensuring safe installation and long-term maintenance.

    Popularity and Trends in Neon Home Decor Lights

    Led saturn

    The resurgence of neon lighting in home décor signifies a fascinating intersection of technological advancement and nostalgic design aesthetics. No longer confined to retro diners and arcade games, neon’s vibrant glow has infiltrated contemporary interior design, offering a unique way to express personality and create captivating ambiances. This shift is driven by several factors, including the development of more energy-efficient LED neon alternatives and a growing consumer desire for personalized, expressive home environments.

    Current Trends in Neon Home Decor Lighting Styles

    Current trends reveal a move beyond simple, single-color signs towards more intricate and artistic designs. Geometric patterns, custom lettering (often incorporating inspirational quotes or personal mottos), and the integration of neon into larger art installations are increasingly popular. The use of neon to highlight architectural features, such as staircases or alcoves, is also gaining traction. Furthermore, there’s a notable trend towards incorporating neon into more minimalist and modern design schemes, demonstrating its versatility.

    This contrasts with the solely retro aesthetic that once defined neon’s application in home décor. The style is adapting and becoming more sophisticated and integrated into broader design trends.

    Popular Colors and Designs in Neon Home Decor

    While classic neon colors like bright pink, electric blue, and vibrant orange remain popular choices, a broader palette is emerging. Pastel neons, offering a softer, more subdued glow, are gaining in popularity, appealing to those seeking a less intense visual impact. Metallic finishes, such as rose gold and copper, are also becoming increasingly prevalent, adding a touch of luxury and sophistication.

    Popular designs frequently include stylized lettering (names, quotes, or brand logos), geometric shapes, and depictions of flora and fauna, demonstrating the breadth of creative expression neon allows. The adaptability of neon allows it to fit a wide array of interior design styles, from bohemian to minimalist.

    Demographics Likely to Purchase Neon Home Decor Lights

    Neon home décor lights appeal to a broad demographic, but certain groups show a stronger inclination towards purchasing them. Younger adults (Millennials and Gen Z) are a key demographic, drawn to neon’s vibrant aesthetic and its potential for self-expression and personalization. Homeowners seeking to create a unique and memorable atmosphere in their living spaces also constitute a significant portion of the market.

    Furthermore, individuals with a penchant for retro or vintage design styles are likely to incorporate neon lighting into their homes. The ease of installation and relatively affordable pricing of LED neon lights also expands the potential consumer base beyond those with extensive design budgets.

    Comparison of Different Types of Neon Lights

    The following table compares different types of neon lights commonly used in home décor, considering cost, lifespan, and aesthetic appeal:

    Type Cost Lifespan (hours) Aesthetic
    LED Neon Moderate 50,000+ Versatile, customizable colors and shapes; energy-efficient.
    Glass Neon (traditional) High 10,000-15,000 Classic, vibrant, but fragile and requires specialized installation.
    Flexible Neon Low to Moderate 20,000-30,000 Easy to install, adaptable to various shapes and curves; slightly less bright than glass neon.

    Design and Aesthetics of Neon Home Decor Lights

    Neon lights, once confined to bustling city streets and retro diners, have experienced a remarkable resurgence, transforming homes into vibrant and personalized spaces. Their unique ability to blend bold colors with customizable designs makes them a versatile addition to various interior styles, offering a captivating interplay of light and form. The inherent flexibility of neon’s glowing lines allows for both subtle accents and dramatic focal points, enhancing the atmosphere and mood of any room.

    Neon Lights in Different Room Settings

    The versatility of neon lighting extends across diverse room settings, each benefiting from its unique visual properties. In bedrooms, soft, warm-toned neon lights can create a relaxing and intimate atmosphere, perhaps spelling out a favorite quote or forming a gentle, ambient glow around the bed. Living rooms can be energized with brighter, more dynamic neon designs, acting as conversation starters or highlighting architectural features.

    Kitchens, surprisingly, also benefit; subtle neon accents under cabinets or integrated into backsplashes add a modern, stylish touch without being overwhelming. Bathrooms can transform with water-resistant neon strips, adding a touch of playful luxury to the space, especially around mirrors or shower areas. The key is to consider the function and ambiance of each room when selecting color and design.

    Installation and Safety of Neon Home Decor Lights

    Neon home decor lights

    Neon home decor lights, while visually striking, require careful handling and installation to ensure both their longevity and user safety. Improper installation can lead to electrical hazards, damage to the lights themselves, and even injury. Understanding the various installation methods and adhering to safety precautions are paramount.

    Neon Light Installation Methods

    Several methods exist for installing neon home decor lights, each suited to different applications and aesthetic preferences. Adhesive strips provide a simple, non-invasive solution for temporary or easily repositionable installations. These strips, typically composed of a pressure-sensitive adhesive, allow for quick attachment to smooth surfaces like walls or mirrors. Wall mounting offers a more permanent and secure solution, ideal for heavier or larger neon signs.

    This typically involves using screws or specialized mounting brackets that are designed to support the weight and shape of the neon piece. Free-standing neon lights, often designed with a base or stand, offer versatility and portability, allowing placement anywhere without modification to existing structures. The choice of method depends on factors such as the size and weight of the neon light, the surface material, and the desired permanence of the installation.

    Safety Precautions During Neon Light Handling and Installation

    Working with electricity always presents inherent risks. Before commencing any installation, it is crucial to disconnect the power supply to the circuit. This prevents accidental shocks and short circuits. Neon lights, even low-voltage ones, should be handled with care to avoid damage to the delicate glass tubing. Always wear appropriate safety glasses to protect your eyes from potential glass shards or sparks.

    When using adhesive strips, ensure the surface is clean and dry for optimal adhesion. Avoid touching the neon tubing itself excessively as oils from your skin may affect its lifespan. Never attempt to repair a damaged neon light yourself; instead, contact a qualified electrician or the manufacturer for assistance. Always check the power supply and wiring before connecting the neon light to ensure proper functionality and safety.

    Step-by-Step Guide: Installing Neon Light Strip Behind Headboard

    Proper installation is crucial for safety and aesthetic appeal. Here’s a guide for safely installing a neon light strip behind a headboard:

    1. Power Down: Turn off the power to the electrical outlet that will supply power to the neon strip. This is a critical first step to prevent electrical shock.
    2. Plan Placement: Carefully measure and plan the exact placement of the neon strip behind the headboard, ensuring adequate clearance from any flammable materials.
    3. Prepare Surface: Clean the back of the headboard thoroughly with a mild cleaner to ensure the adhesive strips have a strong, clean surface to adhere to.
    4. Adhesive Application: Carefully peel the protective backing from the adhesive strips on the neon light strip, following the manufacturer’s instructions. Avoid touching the adhesive surface.
    5. Secure Placement: Firmly press the neon strip onto the headboard, ensuring even contact along its entire length. Allow the adhesive to fully set according to the manufacturer’s recommendations.
    6. Wire Connection: Carefully connect the power supply to the neon strip, ensuring a secure and proper connection. Refer to the manufacturer’s instructions for specific wiring details.
    7. Power Up: Turn the power back on to the outlet and test the neon light strip. Check for proper function and ensure there are no visible signs of damage or overheating.

    Importance of Appropriately Rated Power Supplies

    Using the correct power supply is paramount for the safe and effective operation of neon lights. Neon lights operate at specific voltages, typically ranging from 12V to 24V DC. Using a power supply with an incorrect voltage can damage the neon light, potentially causing it to overheat, malfunction, or even pose a fire hazard. The power supply should also have a sufficient amperage rating to handle the current draw of the neon light.

    A power supply with an insufficient amperage rating may overheat and fail, potentially leading to a fire hazard. Always consult the neon light’s specifications to determine the appropriate voltage and amperage requirements for the power supply. Using a power supply with a higher voltage than specified is far more dangerous than using one with a slightly lower voltage.

    The higher voltage will almost certainly damage the light and pose a significant fire risk.

    Maintenance and Care of Neon Home Decor Lights

    Neon home decor lights, while visually striking, require careful maintenance to ensure their longevity and continued brilliance. Neglecting proper care can lead to premature failure, diminishing the aesthetic appeal and requiring costly replacements. Understanding the specific needs of your neon lights, whether glass tube, LED flex, or other varieties, is crucial for extending their lifespan and maintaining their vibrant glow.

    Cleaning Neon Lights

    Regular cleaning is essential to prevent dust and grime accumulation, which can affect light transmission and potentially damage the delicate components. For glass neon tubes, a soft, slightly damp cloth is usually sufficient. Avoid abrasive cleaners or harsh chemicals, which can scratch the glass or damage the protective coatings. For LED flex neon, a similar approach applies, but extra care should be taken to avoid getting moisture into the internal circuitry.

    Gentle wiping with a microfiber cloth is recommended. Always ensure the power is completely switched off before cleaning any type of neon light. For hard-to-reach areas, a soft-bristled brush can be used to dislodge dust particles.

    Troubleshooting Common Neon Light Problems

    Several issues can arise with neon lights. Flickering or dimming can indicate a failing transformer or power supply. A qualified electrician should be consulted for repairs or replacements. If sections of the light are not illuminating, this could point to a break in the neon tube (glass neon) or a fault in the LED strip (LED flex neon).

    These often require professional repair or replacement. Discoloration or fading of the neon glow might be due to age or exposure to excessive heat. Protecting the lights from direct sunlight and high temperatures can help mitigate this issue. Loose connections can also lead to malfunction; checking and tightening connections (if accessible) might resolve the problem.

    Maintenance Requirements of Different Neon Light Types

    Glass neon tubes, the classic type, require more delicate handling and professional repair in case of breakage. Their lifespan is typically longer than LED flex neon, but repairs can be expensive. LED flex neon lights, on the other hand, are more durable and easier to replace individual segments if damaged. They are also more energy-efficient and generally require less maintenance.

    The specific cleaning methods, as discussed above, should be adapted based on the type of neon light. Regular visual inspection is crucial for all types to detect potential problems early.

    Neon Light Maintenance Checklist

    A regular maintenance schedule can significantly extend the life of your neon lights. The following checklist summarizes the key steps:

    • Monthly Inspection: Visually inspect the lights for any signs of damage, flickering, or dimming.
    • Quarterly Cleaning: Gently clean the lights with a soft, damp cloth, ensuring the power is off.
    • Annual Professional Check: For glass neon tubes, consider an annual check-up by a qualified electrician to assess the condition of the transformer and wiring.
    • Immediate Attention: Address any flickering, dimming, or sections not illuminating promptly to prevent further damage.

    Cost and Availability of Neon Home Decor Lights

    The cost of neon home decor lights varies significantly depending on several interconnected factors, making it crucial for consumers to understand the pricing landscape before making a purchase. These factors influence not only the initial outlay but also the long-term cost-effectiveness of the chosen lighting solution. Understanding these variables allows for informed decision-making, ensuring the chosen neon light aligns with both aesthetic preferences and budgetary constraints.

    Several key variables dictate the price of neon home decor lights. Size, a primary factor, directly impacts material usage and manufacturing time. Larger signs require more neon tubing, increasing material costs. Similarly, intricate designs necessitate more labor-intensive crafting, leading to higher prices. The material itself, whether glass neon tubing or LED neon flex, also plays a significant role.

    Traditional glass neon is generally more expensive due to its handcrafted nature and the specialized skills required for its fabrication. LED neon flex, a more recent alternative, tends to be more affordable, but the price can still vary depending on the quality of the LEDs and the flexibility of the tubing. Finally, customization options, such as unique colors, lettering, or intricate designs, further increase the cost.

    Price Ranges of Neon Home Decor Lights

    Neon home decor lights span a wide price range, from approximately $20 for small, simple LED flex designs to several hundred dollars or more for large, custom-made glass neon signs. A small, pre-made LED neon sign featuring a simple design might cost between $20 and $50. Mid-range options, perhaps incorporating more complex designs or larger sizes using LED flex, can range from $50 to $200.

    High-end, custom-designed glass neon signs, often requiring specialized fabrication and intricate detailing, can easily exceed $200, potentially reaching several thousand dollars for extremely large or complex pieces. These prices are estimates and may vary depending on retailer, location, and specific design features.

    Retailers of Neon Home Decor Lights

    Neon home decor lights are readily available through various online and offline retailers. Online marketplaces such as Amazon, Etsy, and specialized lighting websites offer a vast selection, allowing for convenient browsing and price comparisons. Many smaller businesses and independent artists also sell their unique neon creations online, often through platforms like Etsy. Offline, specialty lighting stores, home decor boutiques, and even some larger department stores may carry a selection of neon lights.

    The availability and range of options vary considerably depending on the retailer and their focus.

    Cost-Effectiveness of Different Neon Light Options

    Comparing the cost-effectiveness of different neon light options requires considering both the initial purchase price and the long-term operational costs. While traditional glass neon lights might have a higher upfront cost, their lifespan is typically longer than LED neon flex. However, glass neon lights consume more energy, leading to higher electricity bills over time. LED neon flex, on the other hand, offers a lower initial investment but may require replacement more frequently, offsetting some of the initial cost savings.

    The most cost-effective option depends on individual needs and priorities; a long lifespan might outweigh higher energy consumption for some, while others might prioritize the lower upfront cost of LED neon flex.

    Calculating the Total Cost of a Neon Light Installation Project

    Calculating the total cost of a neon light installation project involves several steps. First, determine the cost of the neon light itself, factoring in size, design complexity, and material. Next, factor in any additional materials needed, such as mounting hardware, power supplies, and wiring. Finally, consider labor costs if hiring a professional for installation. For example, a custom glass neon sign costing $500 might require an additional $100 for mounting hardware and a professional electrician’s fee of $200 for installation, bringing the total project cost to $ For smaller, simpler LED neon flex lights, installation might be DIY, reducing labor costs significantly.

    The formula for calculating the total cost is:

    Total Cost = Cost of Neon Light + Cost of Materials + Labor Costs

    Closure

    Neon home decor lights offer a unique blend of form and function, capable of dramatically altering a space’s mood and atmosphere. By understanding the different types, installation methods, and maintenance requirements, homeowners can harness the transformative power of neon to create truly personalized and captivating living spaces. Whether opting for a minimalist aesthetic or a bold, maximalist design, the versatility of neon ensures a perfect fit for any interior style, offering a radiant and long-lasting addition to the home.

    Clarifying Questions

    Are neon lights energy efficient?

    Modern LED neon lights are significantly more energy-efficient than traditional glass neon tubes, consuming far less electricity while producing comparable brightness.

    Can I use neon lights in a bathroom?

    Yes, but ensure the lights have an appropriate IP rating (Ingress Protection) for damp environments to prevent electrical hazards. Always follow manufacturer instructions.

    How long do neon lights typically last?

    The lifespan varies greatly depending on the type of neon light. LED neon lights generally boast a much longer lifespan (often exceeding 50,000 hours) compared to traditional glass neon (which may last 10,000-20,000 hours).

    What happens if a neon light breaks?

    Traditional glass neon tubes contain inert gases; while not toxic, broken glass should be handled carefully and disposed of properly. LED neon lights pose less of a hazard but should still be handled with care.

    Can I customize the length or shape of a neon light?

    Many retailers offer custom neon light designs, allowing you to specify the desired length, shape, and text. However, this often increases the cost.

  • Home Decor on a Budget Stylish Spaces, Smart Spending

    Home Decor on a Budget Stylish Spaces, Smart Spending

    The allure of a beautifully decorated home is undeniable, a sanctuary reflecting personal style and comfort. However, the cost of achieving this aesthetic ideal often proves prohibitive. This exploration delves into the science of stylish living on a budget, demonstrating that creating a stunning home environment doesn’t necessitate a hefty price tag. We’ll uncover the principles of design, the psychology of space, and the practical strategies for transforming your living space into a haven of beauty without breaking the bank.

    We’ll move beyond simple cost-cutting measures and delve into creative solutions that leverage ingenuity and resourcefulness.

    Through a blend of practical DIY projects, savvy shopping techniques, and creative repurposing, we’ll demonstrate how to maximize impact while minimizing expenses. We will analyze the cost-effectiveness of different approaches, using data to illustrate the tangible savings achievable through strategic planning and resourcefulness. The journey will involve exploring the psychological aspects of interior design, revealing how small changes can significantly impact the overall feel of a space.

    This journey isn’t just about saving money; it’s about unlocking the potential of your creativity and transforming your home into a personalized reflection of your unique style.

    Affordable DIY Home Decor Projects

    Transforming your living space needn’t break the bank. With a little creativity and readily available materials, you can achieve stunning results through DIY home decor projects. This approach not only saves money but also allows for personalized expression, reflecting your unique style and preferences. The following projects demonstrate how simple, inexpensive materials can be transformed into beautiful and functional home decor.

    Five DIY Home Decor Projects

    The following tutorials detail five distinct projects, each emphasizing simplicity and affordability. The use of readily available materials minimizes cost and environmental impact. Each project is designed to be achievable for individuals with varying levels of DIY experience.

    • Mason Jar Pendant Lights:
      1. Materials: Mason jars (various sizes), battery-operated tea lights or LED fairy lights, twine or jute rope, drill with a small bit (if using a glass jar lid for hanging).
      2. Steps: Clean the mason jars thoroughly. If using a glass lid for hanging, carefully drill a small hole in the lid. Insert the lights into the jars. Wrap the twine or rope around the jar neck or lid and tie securely to create a hanging loop. Hang from the ceiling or a hook.

    • Repurposed Pallet Wall Art:
      1. Materials: Reclaimed wooden pallet, sandpaper, paint (optional), stencils (optional), hooks or nails.
      2. Steps: Sand the pallet to remove splinters and rough edges. Paint the pallet (optional) to match your decor. Use stencils to create patterns or designs (optional). Attach hooks or nails to hang photos, keys, or other small items.
    • Fabric Scrap Rug:
      1. Materials: Fabric scraps (various colors and textures), a sturdy fabric backing (old sheet or canvas), needle and thread, scissors.
      2. Steps: Cut fabric scraps into various shapes and sizes. Arrange the scraps on the backing fabric to create your desired pattern. Sew the scraps onto the backing using a running stitch or other suitable technique. For extra durability, consider using a sewing machine.
    • Upcycled Tin Can Planters:
      1. Materials: Empty tin cans (cleaned and dried), acrylic paint, sealant (optional), potting soil, small plants.
      2. Steps: Clean and dry the tin cans thoroughly. Paint the cans with acrylic paint and let them dry completely. Apply a sealant (optional) for added protection. Add drainage holes (optional, but recommended). Fill with potting soil and plant your chosen plants.

    • Wine Cork Trivet:
      1. Materials: Wine corks (approximately 50-75), strong adhesive (hot glue gun recommended), a flat, circular base (such as a piece of plywood or corkboard).
      2. Steps: Clean and dry the wine corks. Arrange the corks on the base to create a desired pattern. Apply a generous amount of adhesive to each cork and attach firmly to the base. Allow the adhesive to dry completely before use.

    Cost Comparison: DIY vs. Store-Bought

    This table compares the approximate cost of three popular home decor items when made using DIY methods versus purchasing pre-made equivalents. Prices are estimates and may vary depending on location and materials used.

    Item DIY Cost (USD) Store-Bought Cost (USD) Savings (USD)
    Mason Jar Pendant Lights $5 – $10 $20 – $40 $10 – $35
    Fabric Scrap Rug $10 – $20 $50 – $100 $30 – $90
    Upcycled Tin Can Planters $2 – $5 $10 – $20 $5 – $15

    Benefits of Recycled and Repurposed Materials

    Utilizing recycled or repurposed materials in DIY home decor offers significant environmental and economic advantages. By giving new life to discarded items, we reduce waste sent to landfills, conserving natural resources and minimizing the environmental impact of manufacturing new products. Furthermore, repurposing materials often leads to significant cost savings, making stylish home decor accessible to a wider range of budgets.

    For example, using reclaimed wood pallets for wall art reduces the demand for newly harvested timber, thereby contributing to sustainable forestry practices. Similarly, transforming old tin cans into planters reduces the demand for new materials, minimizing the carbon footprint associated with manufacturing new planters. The economic benefits are equally compelling; using discarded materials significantly lowers project costs, allowing for more creative projects within a limited budget.

    Finding Budget-Friendly Furniture

    Affordable myers gillette feature

    Furnishing a home can be a significant expense, often representing a substantial portion of a household’s budget. However, achieving a stylish and comfortable living space doesn’t necessitate breaking the bank. By employing strategic resourcefulness and a keen eye for value, individuals can acquire high-quality furniture at significantly reduced costs, transforming their homes without compromising their financial well-being. This involves understanding the diverse avenues available for sourcing affordable furniture and employing effective negotiation techniques.Finding gently used furniture presents a compelling alternative to purchasing new pieces, offering significant cost savings and a reduced environmental impact.

    The longevity and inherent quality of well-maintained used furniture often surpass mass-produced, inexpensive alternatives. This approach aligns with the growing consumer preference for sustainable and ethical consumption patterns.

    Creative Strategies for Finding Gently Used Furniture

    Three primary avenues stand out for acquiring gently used furniture at affordable prices: thrift stores, online marketplaces, and consignment shops. Thrift stores, operated by charitable organizations, offer a wide array of furniture at deeply discounted prices. Online marketplaces, such as Craigslist, Facebook Marketplace, and OfferUp, provide a vast selection of furniture from individual sellers, often with competitive pricing and direct negotiation opportunities.

    Consignment shops specialize in curated collections of used furniture, frequently offering higher-quality pieces at moderate price points. Each source offers unique advantages and disadvantages, as discussed below.

    Comparison of Budget-Friendly Furniture Sources

    The choice of furniture source significantly impacts both cost and quality. Consider the following comparative analysis:

    • Thrift Stores:
      • Pros: Extremely low prices, support charitable causes, often unexpected finds.
      • Cons: Limited selection, potential for damage or wear, requires time and effort to find suitable pieces.
    • Online Marketplaces:
      • Pros: Wide selection, competitive pricing, opportunity for negotiation, convenient browsing.
      • Cons: Requires online research and communication, potential for scams or misrepresentation, transportation and pickup responsibilities.
    • Consignment Shops:
      • Pros: Higher quality furniture, curated selection, often professionally cleaned and inspected.
      • Cons: Higher prices compared to thrift stores, limited selection compared to online marketplaces.

    Tips for Negotiating Prices on Used Furniture

    Successful negotiation requires a strategic approach, combining knowledge, politeness, and a willingness to compromise. The following five tips can significantly improve your chances of securing a favorable price:

    1. Research comparable prices: Before engaging in negotiations, research the market value of the furniture item to establish a reasonable offer. Websites and apps dedicated to furniture pricing can provide valuable benchmarks.
    2. Point out flaws or imperfections: Respectfully highlight any minor flaws or imperfections in the furniture to justify a lower price. This demonstrates your attentiveness and provides leverage for negotiation.
    3. Offer cash: Sellers often prefer cash transactions, as they avoid processing fees associated with electronic payments. Offering cash can incentivize them to accept a lower price.
    4. Negotiate a bundle deal: If purchasing multiple items, negotiate a bundled price. This often leads to a more significant discount than negotiating each item individually.
    5. Be polite and respectful: Maintain a courteous and respectful demeanor throughout the negotiation process. A positive interaction increases the likelihood of a successful outcome, even if the initial offer is rejected.

    Budget-Conscious Shopping Strategies

    Transforming your home into a haven of style doesn’t necessitate depleting your bank account. Strategic shopping, leveraging sales cycles and understanding retailer pricing models, allows for significant savings without compromising on aesthetic appeal. This section details proven methods for maximizing your budget when decorating your living space.

    The principles of behavioral economics, such as anchoring bias and loss aversion, significantly influence consumer spending. Understanding these principles allows us to make more rational purchasing decisions. Anchoring bias, for instance, suggests that the first price we see for an item heavily influences our perception of its value. By researching prices across multiple retailers, we can counteract this bias and identify truly affordable options.

    Maximizing Savings at Big Box Stores

    Big box stores, while often associated with higher volumes and potentially lower unit prices, require a strategic approach to avoid impulse buys. Effective shopping techniques are essential to navigate the vast selection and maximize savings.

    The following strategies are based on the principles of supply and demand, as well as understanding the typical sales cycles of these retailers.

    • Shop the Clearance Section Religiously: Big box stores frequently mark down items nearing the end of their seasonal cycle or those with minor imperfections. Thorough examination of these sections can unearth hidden gems at drastically reduced prices. Imagine finding a slightly scuffed end table for 75% off – a small imperfection easily remedied with a can of spray paint.
    • Utilize Price Matching Policies: Many large retailers offer price-matching guarantees, allowing you to match a competitor’s advertised price. This requires diligent price comparison across various online and brick-and-mortar stores, but the potential savings are substantial. For example, if one store advertises a sofa for $300 less than another, price matching could save you hundreds.
    • Take Advantage of Seasonal Sales: Big box stores frequently hold significant sales during holidays and seasonal changeovers (e.g., after-Christmas sales, end-of-summer clearances). Planning purchases around these periods can lead to significant discounts on furniture and decor. For instance, purchasing holiday-themed decor after the holiday season typically results in significant markdowns.
    • Join the Retailer’s Loyalty Program: Many big box stores offer loyalty programs that provide exclusive discounts, early access to sales, and reward points that can be redeemed for future purchases. These programs are often free to join and offer considerable long-term savings. The accumulated points can be equivalent to a significant percentage off a future purchase.
    • Check for In-Store Demonstrators or Floor Models: Slightly used or floor models are often sold at significantly reduced prices. These items may have minor cosmetic imperfections, but are functionally identical to their brand-new counterparts. The savings can be substantial, especially for larger items like sofas or dining tables.

    Affordable Home Decor Retailers

    Several retailers consistently provide budget-friendly options without sacrificing style or quality. Their business models often leverage high-volume sales, efficient supply chains, or a focus on specific price points.

    Selecting the right retailer depends on your specific needs and aesthetic preferences. Consider factors such as product range, shipping costs, and return policies before making a purchase.

    • IKEA: Known for its flat-pack furniture and affordable home decor items.
    • Target: Offers a wide range of home decor styles and price points, often including collaborations with designers.
    • Walmart: Provides a vast selection of budget-friendly home goods, from basic essentials to more stylish pieces.
    • HomeGoods: Specializes in discounted home decor items, often featuring overstock and clearance items from various brands.
    • Amazon: Offers a massive online marketplace with a wide selection of affordable home decor from various sellers and brands.

    Utilizing Coupons, Discounts, and Sales

    Coupons, discounts, and sales represent significant opportunities to reduce home decor expenses. Strategic utilization of these tools requires a combination of planning and resourcefulness.

    These savings opportunities are often time-sensitive, requiring proactive searching and planning. Combining these strategies with those mentioned above can yield maximum savings.

    • Utilize Coupon Websites and Apps: Websites and apps such as RetailMeNot and Coupons.com aggregate coupons and deals from various retailers, simplifying the search for discounts.
    • Sign Up for Email Newsletters: Retailers often send exclusive discounts and promotions to their email subscribers. Subscribing to the newsletters of your favorite home decor stores can provide access to early-bird deals and special offers.
    • Look for Stackable Coupons and Discounts: Some retailers allow you to combine multiple coupons or discounts, maximizing your savings. For instance, you might be able to combine a percentage-off coupon with a storewide sale.
    • Check for Student or Military Discounts: Many retailers offer special discounts to students and military personnel. If eligible, take advantage of these programs for added savings.
    • Negotiate Prices, Especially for Larger Purchases: For significant purchases, such as furniture, don’t hesitate to politely negotiate the price, especially if you’re buying multiple items or are willing to pay in cash.

    Transforming Spaces with Minimal Spending

    Home decor on a budget

    The principle of Gestalt psychology, specifically the law of proximity, highlights how our brains perceive objects grouped together as a unit. Applying this to home decor, even a slight rearrangement of existing furniture can dramatically alter the perceived space and create a fresh, new feel. By strategically repositioning items and employing a few simple techniques, you can achieve a significant transformation without the expense of new purchases.

    This approach leverages the power of visual perception to maximize the impact of your existing possessions.The human visual system is highly sensitive to changes in color and contrast. Strategic use of paint and existing items can significantly influence the mood and atmosphere of a room. Subtle shifts in arrangement, coupled with the right color accents, can redefine the space entirely, making it feel larger, brighter, or more intimate, depending on the desired effect.

    Inexpensive Ways to Add Personality and Style

    The following examples demonstrate how a limited budget can yield significant aesthetic improvements using readily available resources. These methods rely on simple techniques that maximize the impact of existing items and strategically employ color to create visual interest.

    • Reimagine Existing Textiles: Instead of buying new curtains or throw pillows, repurpose existing fabrics. A simple change like switching out throw pillows from the sofa to the armchair, or using a tablecloth as a wall hanging, can drastically change the room’s aesthetic. This technique relies on the principle of visual variety to create a dynamic visual landscape, enhancing the overall visual appeal without adding to the overall cost.

      The color and texture of the fabrics can be selected to create a specific mood, such as calmness (using soft blues and greens) or energy (using bright yellows and oranges). For instance, a plain white tablecloth, when used as a wall hanging in a room with dark furniture, immediately creates a bright focal point.

    • Strategic Use of Paint: A single accent wall painted a bold, contrasting color can redefine the entire space. This technique uses the principles of visual hierarchy to draw the eye and create a focal point. The choice of color can drastically change the perceived size and feel of the room. For example, painting a small wall in a dark, rich color can make a small room feel cozier and more intimate, while painting a large wall in a light, airy color can make a large room feel more spacious.

      Consider using existing art pieces or photographs to complement the accent wall’s color scheme.

    • Repurpose Existing Items: An old ladder can become a unique bookshelf, a vintage suitcase can serve as a coffee table, or old picture frames can be used to create a gallery wall. This involves creative problem-solving and repurposing items that would otherwise be discarded. This technique leverages the principles of creativity and resourcefulness to transform ordinary objects into functional and visually appealing elements.

      For example, a collection of old family photos placed in repurposed picture frames creates a personalized gallery wall that tells a story, adding a unique and personal touch to the room.

    Creating a Mood Board for Budget-Friendly Room Makeover

    A mood board serves as a visual blueprint for your room makeover. It allows you to experiment with different color palettes, styles, and textures before committing to any changes. The process is iterative and allows for adjustments based on available resources and desired aesthetic outcomes.

    1. Gather Inspiration: Collect images from magazines, websites, or even your own photos that reflect your desired style. Consider the overall mood you want to create (e.g., calm, energetic, sophisticated). This stage involves identifying and collecting visual representations of the desired aesthetic.
    2. Choose a Medium: You can create a digital mood board using software like Canva or Pinterest, or a physical one using a large piece of cardboard or corkboard. The choice depends on personal preference and available resources.
    3. Arrange and Organize: Arrange the images and fabric swatches on your chosen medium. Group similar elements together to identify patterns and potential color palettes. This stage involves arranging the collected visual elements to identify patterns and themes, facilitating a cohesive design.
    4. Refine and Refocus: Step back and evaluate your mood board. Does it reflect your desired style and mood? Make adjustments as needed until you have a cohesive and inspiring vision. This iterative process ensures that the final design accurately reflects the desired aesthetic and functional requirements.
    5. Implement the Plan: Use your mood board as a guide when rearranging furniture and decor. This stage involves using the mood board as a reference for making changes to the existing space, guided by the established aesthetic.

    Decorating with Free or Low-Cost Elements

    Transforming your living space into a visually stunning haven doesn’t necessitate a hefty budget. The principles of biophilic design, which incorporates natural elements to enhance well-being, can be effectively implemented using readily available, free, or extremely inexpensive materials. This approach not only saves money but also fosters a unique and personalized aesthetic, reflecting your creativity and connection to the natural world.

    Natural Elements for Cost-Effective Home Decor

    The incorporation of natural elements into interior design offers a multitude of benefits. Studies have shown that exposure to natural elements can reduce stress and improve mood. Moreover, these elements provide a textural and visual richness that elevates the overall aesthetic appeal of a space, creating a sense of calm and tranquility. The following examples illustrate the versatility and beauty of these readily accessible resources.

    • Branches: Foraged branches, especially those with interesting shapes or textures, can be arranged in vases (even repurposed jars will do) to create striking focal points. Consider carefully cleaning and perhaps lightly sanding them for a smoother finish. The natural variations in color and form add a unique, organic touch to any room. Think of a minimalist arrangement of bleached driftwood branches in a glass vase on a side table, offering a sophisticated coastal feel.

    • Stones: Smooth river stones or interesting rocks gathered from nature can be used in various ways. They can form a beautiful base for candles, creating a serene atmosphere. Alternatively, a collection of varying sizes and colors can be arranged in a shallow bowl to serve as a unique centerpiece or decorative element on a shelf. The weight and texture of the stones add a grounded and calming element to the space.

    • Flowers: While purchasing cut flowers can be costly, utilizing wildflowers or blooms from your own garden offers a sustainable and budget-friendly alternative. These can be arranged in simple vases or even repurposed containers to add splashes of vibrant color and natural fragrance. The ephemeral nature of flowers also lends a sense of impermanence and appreciation for the beauty of the moment.

    • Pinecones: Pinecones, readily available in autumn, provide a rustic charm. Their unique shapes and textures offer an interesting contrast to other elements. They can be arranged in bowls, used as part of a garland, or even painted and used as ornaments. The warm, earthy tones of pinecones bring a touch of nature’s artistry indoors.
    • Leaves: Pressed leaves, particularly those with vibrant autumnal colors, can be incorporated into various decorative projects. They can be framed to create unique artwork, or incorporated into resin crafts for a more modern feel. The delicate veins and varied shapes of leaves offer intricate details and visual interest. A pressed leaf collection arranged in a shadow box can be both beautiful and evocative of a specific season or memory.

    Creative Uses for Free Printable Artwork

    The internet offers a wealth of free printable artwork, ranging from intricate line drawings to vibrant photographs. Utilizing these resources allows for the creation of personalized wall art without the expense of purchasing prints.

    • Wallpaper Murals: Multiple prints can be pieced together to create a large-scale wallpaper mural. This requires careful planning and alignment but can transform a plain wall into a stunning feature. Imagine transforming a small hallway with a series of free botanical prints to create a vibrant, nature-inspired space.
    • Framed Prints: Simple prints can be downloaded, printed on quality paper, and framed using inexpensive frames found at thrift stores or repurposed from existing frames. This is a straightforward method for creating a gallery wall or individual statement pieces.
    • Decoupage: Prints can be decoupaged onto various surfaces, such as wooden boxes, trays, or even lampshades, to add a personalized touch. This technique involves adhering the printed paper to the surface and sealing it with a protective layer.
    • Stenciling: Prints can be used as stencils to create repeated patterns on walls or furniture. This involves carefully cutting out the design and using it to apply paint or other media to the surface. This approach offers a high impact design that is completely unique.
    • DIY Canvas Art: Prints can be transferred onto canvases using various methods, such as gel medium or Mod Podge, to create textured and visually appealing artwork. This method allows for greater creative control and personalization, transforming a simple print into a unique canvas piece.

    Creating a Gallery Wall with Repurposed Frames

    Gallery walls are a popular way to showcase artwork and add personality to a room. By using repurposed picture frames and free or low-cost prints, this can be achieved without significant expense. The process involves collecting frames of varying sizes and styles from thrift stores, flea markets, or even your own home. Once cleaned and repaired as needed, the frames can be arranged on the wall in a visually pleasing pattern, with the free prints or other found items providing the artwork.

    The variety of frames and styles contributes to a dynamic and unique display, reflecting a curated collection of personal memories and artistic expressions. Consider using a variety of frame colors and sizes to create visual interest. The asymmetrical arrangement adds to the casual and collected feel of a truly personalized gallery wall.

    Creating a Cohesive Look on a Budget

    Achieving a unified and stylish home doesn’t require a limitless budget. By strategically employing color theory, thoughtfully selecting textiles, and understanding the power of lighting, a cohesive and inviting atmosphere can be created even with limited financial resources. This involves understanding the psychological impact of design elements on our perception of space and well-being.Color Palette Selection and its Influence on Space PerceptionThe foundation of a cohesive look lies in a well-chosen color palette.

    Color psychology demonstrates the significant influence of color on mood and perception. Warm colors like reds and oranges create a sense of energy and intimacy, while cool colors such as blues and greens evoke calmness and spaciousness. Choosing a palette that complements your existing furniture is crucial. For instance, if you have brown wooden furniture, earthy tones like beige, olive green, and terracotta will create a harmonious and natural feel.

    If you prefer a more modern aesthetic with grey furniture, consider incorporating shades of grey, white, and pops of a vibrant accent color like mustard yellow or teal. The 60-30-10 rule – 60% dominant color, 30% secondary color, 10% accent color – can be a helpful guideline in balancing your palette.

    Textile Selection for Budget-Friendly Design Enhancement

    Textiles, such as throw pillows, blankets, and rugs, are remarkably effective in transforming a room’s aesthetic without breaking the bank. They add texture, warmth, and visual interest. For example, a simple, neutral-colored sofa can be dramatically altered with the addition of colorful throw pillows in coordinating patterns or textures. Using affordable fabrics like cotton, linen, or even repurposed materials can significantly reduce costs.

    Furthermore, strategically placed rugs can define spaces and add visual depth, making a room feel more complete and intentional. Consider layering rugs of different textures and colors for added visual complexity and warmth.

    Budget-Friendly Lighting Solutions for Enhanced Ambiance

    Lighting plays a vital role in setting the mood and highlighting architectural features. Replacing existing light fixtures with more energy-efficient LED bulbs is a cost-effective way to improve lighting quality while reducing energy consumption. The warm, soft glow of LED bulbs is often preferred over the harshness of incandescent bulbs. Secondly, incorporating affordable table lamps or floor lamps adds ambient lighting and creates a cozy atmosphere.

    Strategic placement of lamps can also highlight artwork or architectural details, adding visual interest. Finally, using strategically placed mirrors can enhance the effect of existing light sources, making a room appear brighter and larger without the need for additional lighting fixtures. This effect is based on the principles of light reflection and refraction.

    Epilogue

    Sweetyhomee

    Ultimately, achieving a stylish and inviting home on a budget is less about financial limitations and more about creative problem-solving and strategic planning. By embracing DIY projects, repurposing existing items, and employing smart shopping strategies, we’ve seen how even modest budgets can yield extraordinary results. Remember, the key lies in understanding the fundamental principles of design, harnessing the power of resourcefulness, and letting your personal style shine through.

    The transformation of your home isn’t just a visual upgrade; it’s a testament to your ingenuity and a reflection of your unique personality. So, embark on this creative adventure, and let your home become a beautiful expression of your style and resourcefulness.

    Answers to Common Questions

    What are some quick, low-cost ways to update a room’s look?

    Rearrange furniture, add throw pillows or a new blanket, change out light fixtures (inexpensive options are widely available), or add a fresh coat of paint to an accent wall.

    Where can I find inspiration for budget-friendly decor?

    Pinterest, Instagram, home decor blogs, and even magazines (library access is a great option!) offer endless inspiration. Focus on images that use readily available materials or simple techniques.

    How can I avoid impulse buys when decorating?

    Create a detailed budget and stick to it. Make a shopping list before going to stores and prioritize essential items. Wait 24 hours before purchasing anything non-essential to avoid impulse buys.

    What if I don’t have DIY skills?

    Start with simpler projects. There are countless tutorials online for all skill levels. Focus on projects that use minimal tools and materials. Don’t be afraid to ask for help from friends or family.

    How do I create a cohesive look without spending a fortune?

    Choose a limited color palette and stick to it throughout the room and even the house. Use similar textures and materials in your decor to create a sense of unity. Focus on a consistent style – whether it’s minimalist, bohemian, or traditional.

  • Farmhouse Wall Art Styles, Subjects, and Design

    Farmhouse Wall Art Styles, Subjects, and Design

    Farmhouse wall art, a captivating blend of rustic charm and modern aesthetics, has emerged as a dominant force in interior design. Its enduring appeal stems from its ability to evoke feelings of warmth, nostalgia, and comfort, transforming ordinary spaces into inviting havens. This exploration delves into the multifaceted world of farmhouse wall art, examining its diverse styles, popular subjects, creation techniques, display strategies, and its role in crafting a cohesive interior design narrative.

    We’ll uncover the historical context influencing its evolution and the cultural significance embedded within its motifs.

    From the selection of materials – reclaimed wood, distressed metals, and natural fibers – to the careful consideration of color palettes – muted earth tones, crisp whites, and pops of vibrant accents – each element contributes to the overall aesthetic. The journey through farmhouse wall art styles reveals a fascinating interplay between tradition and contemporary trends, demonstrating its remarkable adaptability across various interior design schemes.

    Understanding the emotional impact of chosen subjects, along with mastering display techniques, unlocks the potential to create truly personalized and aesthetically pleasing spaces.

    Farmhouse Wall Art Styles

    Farmhouse wall art

    Farmhouse wall art, a reflection of rustic charm and simple elegance, has evolved significantly over the past two decades, incorporating various design elements and material choices. Understanding these styles provides insight into the aesthetic preferences driving this popular interior design trend. This exploration details five distinct farmhouse wall art styles, analyzes the rustic appeal of three, and traces the stylistic evolution of the past twenty years.

    Five Distinct Farmhouse Wall Art Styles

    The diverse nature of farmhouse style allows for a wide range of artistic expressions. Five distinct styles, each with its own unique characteristics, are detailed below.

    • Shabby Chic Farmhouse: This style embraces the worn and aged look. Distressed wood frames, muted pastel color palettes (think soft blues, creams, and lavenders), and floral or botanical motifs are characteristic. Common materials include reclaimed wood, distressed metal, and vintage fabrics. The overall effect is one of romantic, gentle rusticity.
    • Modern Farmhouse: A cleaner, more minimalist approach to farmhouse style, this variation utilizes a neutral color palette (whites, grays, blacks) with pops of color in accent pieces. Clean lines and geometric shapes are preferred over overly ornate designs. Materials include sleek metal, smooth painted wood, and simple canvas prints.
    • Rustic Farmhouse: This style leans heavily into the raw, natural elements of farmhouse design. Expect rough-hewn wood, exposed textures, and earthy color palettes (browns, greens, creams). Common materials include reclaimed barn wood, burlap, and natural fibers like jute. The overall aesthetic is rugged and unrefined.
    • French Country Farmhouse: This style blends the rustic charm of farmhouse with the elegance of French country design. Expect soft, muted tones (pale yellows, greens, blues), delicate floral patterns, and antique-inspired details. Materials include aged wood, wrought iron, and linen fabrics.
    • Industrial Farmhouse: This style combines the rustic elements of farmhouse with the raw, industrial aesthetic. Expect a blend of metals (black iron, galvanized steel), exposed brick or concrete, and a neutral color palette with pops of bold color. Reclaimed wood and metal piping are common materials.

    Comparative Analysis of Rustic Charm in Three Farmhouse Wall Art Styles

    Three styles—Rustic Farmhouse, Shabby Chic Farmhouse, and French Country Farmhouse—exemplify the spectrum of rustic charm within farmhouse wall art. The Rustic Farmhouse style prioritizes raw, natural materials and textures, creating a rugged and unrefined aesthetic. In contrast, the Shabby Chic Farmhouse style embraces a more romantic and delicate interpretation of rusticity, using distressed materials and muted pastel colors.

    The French Country Farmhouse style offers a refined take on rusticity, blending the charm of farmhouse with the elegance of French country design, using softer colors and more delicate details. Each style captures the essence of rusticity but expresses it through a distinct lens.

    Evolution of Farmhouse Wall Art Styles Over Two Decades

    Over the past two decades, farmhouse wall art has seen a significant shift. The early 2000s were dominated by a more traditional, overtly rustic aesthetic. This evolved in the mid-2010s to incorporate cleaner lines and a more modern interpretation, resulting in the popular modern farmhouse style. The influence of social media platforms like Pinterest and Instagram has played a crucial role in disseminating trends and driving the incorporation of diverse styles, including industrial and French country influences, creating the varied landscape of farmhouse wall art seen today.

    The current trend shows a continued embrace of personalization and a blending of styles to create unique and individual expressions of farmhouse aesthetic.

    Popular Farmhouse Wall Art Subjects

    Farmhouse wall art, a blend of rustic charm and modern aesthetics, draws inspiration from the simplicity and functionality of rural life. The subjects depicted often reflect a deep connection to nature, family, and the comforting atmosphere of a traditional farmhouse. Understanding the popular themes allows for a deeper appreciation of the artistic choices and the emotions they evoke.

    Subject Description Suitable Room Example Materials
    Floral Arrangements Depictions of wildflowers, herbs, or cultivated blooms, often in vintage-inspired arrangements. Kitchen, Dining Room, Bedroom Oil on canvas, watercolor prints, embroidered fabric
    Farm Animals Images of cows, chickens, horses, sheep, or other livestock, often depicted in a pastoral setting. Kitchen, Mudroom, Children’s Room Wood carving, metalwork, painted wood signs
    Vintage Signs Replicated or stylized signs with inspirational quotes, family names, or advertising slogans from a bygone era. Kitchen, Living Room, Entryway Reclaimed wood, metal, painted tin
    Galvanized Metal Decor Items crafted from galvanized metal, such as wall-mounted containers, trays, or decorative shapes, showcasing the rustic texture of the material. Kitchen, Laundry Room, Bathroom Galvanized steel, repurposed metal containers
    Family Portraits Photographs or paintings of families, often in a candid or nostalgic style, emphasizing familial bonds. Living Room, Hallway, Bedroom Framed photographs, oil paintings, sepia-toned prints
    Scripture or Inspirational Quotes Verses from the Bible or other inspirational sayings, often hand-lettered or presented in a rustic typeface. Living Room, Bedroom, Home Office Wood signs, framed prints, painted canvas
    Landscape Scenes Paintings or prints of rural landscapes, featuring fields, barns, or rolling hills, often evoking a sense of peace and tranquility. Living Room, Bedroom, Office Oil on canvas, watercolor prints, photography
    Kitchen Utensils Stylized depictions or actual vintage kitchen utensils, such as whisks, rolling pins, or colanders, highlighting the functionality and charm of farmhouse kitchens. Kitchen, Dining Area Metal wall sculptures, wood carvings, repurposed utensils

    Detailed Descriptions of Popular Farmhouse Wall Art Subjects

    The subjects chosen for farmhouse wall art often carry symbolic weight and emotional resonance. For example, floral arrangements, frequently depicting wildflowers, symbolize simplicity, natural beauty, and the fleeting nature of time, invoking feelings of nostalgia and contentment. The vibrant colors and delicate forms can create a sense of calm and renewal. Farm animals, such as cows or horses, represent hard work, resilience, and the cyclical rhythms of nature.

    Their depiction evokes feelings of peace and connection to the land. Vintage signs, with their aged appearance and often inspirational messages, symbolize the passage of time, resilience, and the enduring values of family and community. These pieces can bring a sense of history and warmth to a space. Family portraits, often presented in a candid style, emphasize the importance of familial bonds and shared memories.

    These create a feeling of belonging and connection to one’s heritage. Finally, landscape scenes, often featuring pastoral settings, evoke a sense of tranquility, peace, and connection to nature. The open spaces and natural beauty depicted can foster a feeling of escape and relaxation.

    Cultural Significance of Common Farmhouse Wall Art Subjects

    Floral arrangements have held symbolic meaning across cultures for centuries. In many societies, flowers represent beauty, life, and rebirth. Their inclusion in farmhouse art reflects a connection to nature’s cyclical rhythms and the importance of appreciating simple pleasures. The use of farm animals in art reflects the historical significance of agriculture in rural communities. The depiction of livestock in farmhouse wall art symbolizes the hard work, resilience, and self-sufficiency associated with farming.

    Modern interpretations often emphasize the connection between humans and nature, promoting a more sustainable and environmentally conscious lifestyle. Finally, the use of scripture or inspirational quotes reflects the deep-seated religious and spiritual beliefs that have historically shaped rural communities. Modern interpretations often focus on the themes of faith, hope, and perseverance, offering messages of comfort and inspiration in daily life.

    Creating Farmhouse Wall Art

    Farmhouse wall art

    The allure of farmhouse style lies in its rustic charm and handcrafted aesthetic. Creating your own farmhouse wall art allows for personalization and the expression of individual creativity, transforming reclaimed materials into unique pieces that tell a story. This process combines artistic expression with an appreciation for sustainable practices, breathing new life into old materials. The following steps will guide you through the creation of a beautiful and unique piece.

    DIY Farmhouse Wall Art Using Reclaimed Wood and Paint

    This project utilizes the inherent beauty of reclaimed wood, highlighting its natural imperfections and texture. The process involves careful selection of the wood, preparation, and application of paint to achieve a desired farmhouse aesthetic.

    1. Material Selection: Choose reclaimed wood planks of varying widths and lengths. Look for wood with interesting knots, grain patterns, and a weathered appearance. The wood should be relatively flat and free of significant warping. Consider the overall dimensions of your desired art piece to determine the quantity of wood needed.
    2. Wood Preparation: Clean the wood thoroughly using a stiff brush to remove dirt and debris. Sand any rough edges or splinters using medium-grit sandpaper, followed by fine-grit sandpaper for a smoother finish. This step is crucial for ensuring even paint application and a professional look.
    3. Paint Application: Choose a paint color that complements your farmhouse décor. Popular choices include creamy whites, soft grays, and muted blues. Apply a base coat of paint, allowing it to dry completely. You can then apply a second coat for better coverage. Consider distressing the paint by lightly sanding certain areas to reveal the wood grain beneath, adding to the rustic charm.

    4. Assembly: Once the paint is dry, arrange the wood planks to create your desired design. Use wood glue and clamps to secure the pieces together, allowing the glue to dry completely. You can optionally add a decorative element, such as a stencil or hand-painted design.

    Textured Farmhouse Wall Art Techniques

    Texture is a key element in achieving an authentic farmhouse look. Three distinct techniques can add depth and visual interest to your wall art.

    1. Crackle Paint Technique: This method creates a vintage, aged effect. Apply a base coat of paint, followed by a crackle medium. Then, apply a contrasting top coat of paint. As the top coat dries, it will crack, revealing the base coat underneath, creating a textured, antique appearance. Materials needed include crackle medium, two contrasting colors of paint, and brushes.

    2. Sponge Painting Technique: This technique adds a subtle, uneven texture. Use a sea sponge to dab paint onto the surface of your wood. Vary the pressure to create different shades and textures. This technique is ideal for creating a softly distressed look. Materials include a sea sponge, paint, and a tray.

    3. Dry Brush Technique: This method creates a slightly textured, weathered effect. Dip a stiff-bristled brush into paint, then wipe off most of the paint onto a paper towel. Lightly brush the paint onto the wood, allowing some of the wood grain to show through. This technique works well with lighter colors to highlight the wood’s natural grain. Materials needed include a stiff-bristled brush, paint, and paper towels.

    Incorporating Natural Elements into Farmhouse Wall Art

    The integration of natural elements enhances the rustic appeal of farmhouse wall art, creating a sense of connection with nature.Dried flowers and branches, carefully arranged and secured, can add a touch of elegance and organic texture. For instance, a grouping of dried lavender sprigs meticulously arranged on a piece of reclaimed wood, secured with a thin coat of decoupage glue, creates a visually appealing and fragrant wall art piece.

    The delicate purple hues of the lavender contrast beautifully against a light-colored wooden background. Alternatively, a collection of slender, bleached branches, artfully positioned and glued onto a dark-stained wooden panel, offers a stark, minimalist contrast. The varying lengths and angles of the branches create a dynamic visual effect, further enhanced by the natural texture and color variations of the wood.

    The branches’ delicate structure offers a sophisticated yet rustic touch to the overall composition.

    Displaying Farmhouse Wall Art

    The strategic placement of farmhouse wall art is crucial to achieving a cohesive and aesthetically pleasing interior. Understanding the principles of visual weight, color harmony, and spatial relationships allows for the creation of captivating displays that enhance the overall ambiance of a room. Careful consideration of the art’s size, color palette, and style, alongside the room’s lighting and dimensions, transforms a simple decorative element into a powerful design statement.

    Arranging Multiple Farmhouse Wall Art Pieces in a Living Room

    Effective arrangement of multiple pieces requires a nuanced approach. The interplay of size, color, and style dictates the overall visual impact. Consider the following strategies:

    • Symmetrical Arrangement: A balanced arrangement, using similarly sized pieces flanking a central, larger piece, creates a sense of order and formality. Imagine two smaller framed botanical prints flanking a larger, more ornate mirror with a distressed wooden frame, all hung at consistent heights. This approach is ideal for living rooms with formal seating arrangements.
    • Asymmetrical Arrangement: This approach offers more dynamism and visual interest. Varying sizes and shapes create a more relaxed, casual feel. For instance, a collection of varying-sized framed photographs, some black and white, some sepia-toned, and some with pops of color, hung at different heights and distances, creates a visually engaging focal point.
    • Gallery Wall Approach: A gallery wall allows for a diverse collection of pieces. This strategy requires careful planning to avoid a cluttered look. Consider a grid pattern or a more organic arrangement, grouping pieces by color or subject matter. A cohesive color palette, for example, primarily featuring muted greens, creams, and whites, would unite a diverse collection of framed prints, small canvases, and even vintage plates.

    • Thematic Grouping: Grouping pieces by subject matter, such as a collection of vintage farm implements, creates a strong narrative. For instance, a grouping of three or four smaller prints depicting chickens, combined with a larger framed image of a rustic barn, tells a cohesive story, creating a strong visual anchor in the room.
    • Focal Point Creation: Use a larger, statement piece as a focal point, surrounded by smaller, complementary pieces. This could involve a large, rustic clock above a fireplace, surrounded by smaller framed botanical prints or family photographs. The larger piece draws the eye, while the smaller pieces provide visual interest and balance.

    Incorporating Farmhouse Wall Art into Various Room Types

    The successful integration of farmhouse wall art extends beyond the living room. Room-specific considerations include lighting, space constraints, and the overall function of the room.

    • Kitchen: In kitchens, smaller pieces are often preferable due to limited wall space. Open shelving can also showcase smaller items. Consider light-colored, easy-to-clean frames. Well-lit areas are ideal for showcasing artwork, such as above the kitchen table or on a backsplash.
    • Bedroom: Bedrooms lend themselves to softer, more calming pieces. Consider using pastel colors or muted tones. A single, large piece above the bed, or a smaller gallery wall above a dresser, can create a relaxing atmosphere. Avoid overly busy or bright pieces.
    • Bathroom: Bathrooms require moisture-resistant materials. Smaller framed prints or decorative mirrors are suitable choices. Consider the lighting – well-lit areas highlight the artwork effectively. Choose artwork with calming colors and themes to create a spa-like atmosphere.

    Visual Description of a Farmhouse Gallery Wall

    Imagine a gallery wall showcasing a curated collection of farmhouse-style art. The wall is painted a soft, creamy white, providing a neutral backdrop. The arrangement is asymmetrical, with a mix of sizes and shapes. A large, framed print depicting a field of wildflowers anchors one side. To its left, a series of smaller, framed botanical prints are arranged in a loose, vertical stack.

    To the right, a distressed wooden sign with a simple, hand-painted saying sits alongside a vintage metal watering can mounted on the wall. The overall effect is a relaxed, yet sophisticated, display. The color palette is consistent, featuring muted greens, creams, and browns, creating a cohesive and visually appealing gallery wall that evokes the rustic charm of a farmhouse.

    Farmhouse Wall Art and Interior Design

    Farmhouse wall art

    Farmhouse wall art, with its inherent charm and rustic appeal, acts as a powerful tool in shaping the overall aesthetic and atmosphere of a room. Its success, however, hinges on its harmonious integration with other interior design elements. A thoughtful approach to this integration ensures a cohesive and visually pleasing space, reflecting the desired mood and functionality.

    The visual weight and style of farmhouse wall art directly influence the perceived mood and atmosphere of a room. Light, airy pieces featuring pastel colors and floral motifs contribute to a sense of calm and serenity. Conversely, bolder pieces incorporating darker tones and more robust textures can inject a sense of warmth and rustic character, even a touch of drama, depending on the specific design.

    The psychological impact of color and texture is well-documented, and this principle applies directly to the selection of farmhouse wall art.

    Key Interior Design Elements Complementing Farmhouse Wall Art

    Farmhouse style thrives on a balance of rustic charm and modern functionality. Five key elements significantly enhance the impact of farmhouse wall art: natural materials, neutral color palettes, vintage or antique accents, textured surfaces, and strategic lighting. The interplay of these elements creates a visually rich yet unified space.

    Natural materials, such as wood, stone, and linen, provide a grounding element that complements the inherent earthiness of farmhouse wall art. Neutral color palettes, incorporating creams, whites, grays, and muted earth tones, create a backdrop that allows the wall art to stand out without overwhelming the space. Vintage or antique accents, like distressed furniture or repurposed items, add layers of history and character, resonating with the nostalgic appeal of farmhouse aesthetics.

    Textured surfaces, including woven rugs, exposed brick, or subtly patterned wallpaper, add depth and visual interest, enhancing the tactile quality of the overall design. Finally, strategic lighting, utilizing a combination of ambient, task, and accent lighting, highlights the wall art and creates a warm, inviting atmosphere.

    Influence of Farmhouse Wall Art on Room Mood and Atmosphere

    The choice of farmhouse wall art significantly impacts the overall feeling of a room. A gallery wall displaying a collection of smaller, varied pieces can create a vibrant and lively atmosphere, while a single, large statement piece can lend a sense of quiet elegance or rustic grandeur. The subject matter of the art also plays a crucial role; images of blooming wildflowers evoke a sense of tranquility, while depictions of farm animals or rustic landscapes create a more grounded and comforting feeling.

    This aligns with established principles of environmental psychology, which demonstrates the impact of visual stimuli on mood and emotional responses.

    Creating a Focal Point with Farmhouse Wall Art

    Farmhouse wall art can be strategically used to establish a focal point in a room, drawing the eye and anchoring the overall design. A large, visually striking piece above a fireplace or a substantial piece of furniture instantly commands attention. Alternatively, a gallery wall, carefully curated with a mix of sizes, frames, and subject matter, can serve as a dynamic focal point, adding visual interest and personality.

    The use of contrasting colors or textures within the art itself, or between the art and its surrounding environment, further enhances its ability to attract the eye. For example, a collection of brightly colored framed prints on a neutral-toned wall creates a strong visual contrast and acts as a clear focal point.

    Last Recap

    Farmhouse printable wall market cottage

    In conclusion, the world of farmhouse wall art offers a rich tapestry of styles, subjects, and creative possibilities. By understanding the historical influences, mastering various creation techniques, and strategically employing display methods, one can effectively harness its power to transform any space. Whether embracing the rustic simplicity of reclaimed wood or the vibrant energy of floral motifs, the careful selection and arrangement of farmhouse wall art allows for the creation of a personalized and aesthetically pleasing environment, reflecting individual taste and adding a unique touch to any home.

    Essential FAQs

    What are the most common color palettes used in farmhouse wall art?

    Common palettes include muted earth tones (browns, greens, creams), crisp whites, and subtle pops of blue, red, or yellow. These colors evoke a sense of rustic tranquility.

    How can I incorporate farmhouse wall art into a modern minimalist space?

    Choose simpler designs with clean lines and a limited color palette. Opt for pieces with a neutral color scheme to avoid clashing with the minimalist aesthetic. Consider a single, impactful piece rather than a gallery wall.

    Where can I find reclaimed wood for DIY farmhouse wall art projects?

    Reclaimed wood can often be sourced from salvage yards, demolition sites, or even local construction companies. Online marketplaces and antique shops may also offer suitable options.

    How do I clean farmhouse wall art made from natural materials?

    The cleaning method depends on the material. Dust regularly with a soft cloth or brush. For more stubborn dirt, consider using a slightly damp cloth and mild soap, ensuring it’s thoroughly dried afterwards to prevent damage.

    What are some affordable alternatives to expensive farmhouse wall art?

    DIY projects using reclaimed wood, repurposed materials, or simple painting techniques offer cost-effective solutions. Printing high-quality images onto canvas and framing them is another budget-friendly option.

  • Minimalist Home Decor A Design Guide

    Minimalist Home Decor A Design Guide

    The allure of minimalist home decor lies in its ability to transform living spaces into havens of tranquility and functionality. Far from being stark or cold, minimalist design prioritizes intentionality, selecting only items that serve a purpose or bring genuine joy. This approach, rooted in the philosophy of “less is more,” leverages clean lines, carefully chosen color palettes, and thoughtfully curated accessories to create an atmosphere of calm and sophistication.

    Understanding the principles of minimalist design is key to unlocking its potential for creating a home that is both beautiful and deeply personal.

    This exploration delves into the core tenets of minimalist home decor, examining the interplay of color, furniture selection, texture, lighting, and accessories. We’ll unpack the differences between minimalist, maximalist, and modern styles, providing practical guidance on creating a space that reflects your unique personality while embracing the simplicity and elegance of the minimalist aesthetic. Through detailed examples and practical advice, we aim to equip you with the knowledge and inspiration to design a minimalist home that resonates with your individual needs and preferences.

    Defining Minimalist Home Decor

    Minimalist home decor is a design philosophy that prioritizes simplicity, functionality, and intentionality. It’s not merely about owning less; it’s about curating a living space that fosters calm, clarity, and a sense of well-being through deliberate choices in furniture, decor, and overall aesthetic. The core principles revolve around reducing visual clutter and maximizing the impact of carefully selected elements.The key characteristics differentiating minimalist design from other styles lie in its emphasis on negative space, clean lines, and a neutral color palette.

    Unlike maximalist styles, which embrace abundance and layered textures, minimalism champions a sense of spaciousness and openness. In contrast to modern design, which often incorporates bolder colors and more complex forms, minimalism favors simplicity and functionality above all else. It’s a style characterized by its restraint and deliberate avoidance of excess.

    Distinguishing Characteristics of Minimalist Home Decor

    Minimalist home decor is characterized by a deliberate reduction of visual stimuli. This involves carefully selecting furniture and decorative items, prioritizing functionality and quality over quantity. A neutral color palette, typically featuring shades of white, beige, gray, and black, forms the foundation. Clean lines and geometric shapes are preferred, creating a sense of order and harmony. The use of natural materials like wood and stone further enhances the feeling of serenity and connection to nature.

    The overall effect is a space that feels uncluttered, calming, and effortlessly stylish. This contrasts sharply with maximalist styles, which often incorporate a wide array of colors, textures, and patterns, creating a visually busy and stimulating environment.

    Comparison with Maximalist and Modern Styles

    Minimalism’s stark contrast to maximalism is evident in its approach to decoration. Maximalism embraces abundance, layering textures and patterns to create a rich and stimulating environment. A maximalist living room might feature ornate furniture, numerous decorative objects, and a vibrant color palette, while a minimalist living room would prioritize a few carefully selected pieces of furniture, a neutral color palette, and ample negative space.

    In essence, maximalism celebrates excess while minimalism champions restraint.Compared to modern design, minimalism shares a focus on functionality and clean lines. However, modern design often incorporates more diverse color palettes and bolder shapes than minimalism. Modern design might include bright accent colors or sleek, metallic accents, while minimalism typically sticks to a neutral palette and avoids overly ornate details.

    While both styles value functionality, minimalism prioritizes a sense of calm and simplicity above all else, whereas modern design often incorporates a more eclectic range of influences. Think of a modern kitchen with stainless steel appliances and colorful cabinetry versus a minimalist kitchen with simple, light-colored cabinets and a focus on clean surfaces.

    Color Palettes in Minimalist Design

    Minimalist design, characterized by its simplicity and functionality, relies heavily on carefully chosen color palettes to create the desired atmosphere. The strategic use of color, or rather, the strategicabsence* of excessive color, is crucial in achieving a sense of calm and spaciousness. Understanding the psychological effects of color and their interaction within a space is key to successful minimalist interior design.

    Monochromatic Harmony: Shades of Gray

    A monochromatic palette, using various shades and tints of a single color, offers a sophisticated and calming effect. In minimalist design, a grayscale palette, ranging from pale greige to charcoal gray, provides a neutral backdrop that allows textures and forms to take center stage. The subtle variations in tone create visual interest without overwhelming the space. For example, imagine a living room with walls painted in a light gray, a mid-gray sofa, and charcoal gray throw pillows.

    The different shades of gray create a cohesive and restful environment, enhancing the sense of spaciousness often associated with minimalist aesthetics. This approach aligns with the principles of Gestalt psychology, where the brain perceives similar elements as a group, creating visual unity.

    Natural Neutrals: Earthy Tones and White

    This palette incorporates the calming effects of nature, using a base of white or off-white walls and incorporating warm, earthy tones like beige, taupe, and muted greens. These colors evoke a sense of serenity and connection to the natural world. The inclusion of natural materials like wood and stone further enhances this effect. Consider a bedroom with crisp white walls, a light beige linen bedspread, and a wooden nightstand.

    The warmth of the wood contrasts beautifully with the cool white, creating a balanced and inviting space. This approach leverages the biophilic design principle, which suggests that incorporating natural elements into the built environment improves well-being. The use of these colors is scientifically linked to reduced stress and improved mood.

    Accentuated Neutrals: Muted Blues and Warm Whites

    This palette combines the serenity of neutral tones with the subtle drama of a carefully chosen accent color. A muted blue, such as a dusty blue or a soft teal, acts as a calming and sophisticated accent against a backdrop of warm white walls and off-white furnishings. This palette is visually appealing and psychologically restorative. For instance, a kitchen with warm white cabinets, a dusty blue island, and white marble countertops provides a clean and inviting atmosphere.

    The blue acts as a visual anchor, drawing the eye without being overpowering. This strategy employs the principles of color theory, where complementary colors (in this case, blue and warm white) create visual harmony and balance. The subtle contrast between the warm and cool tones adds depth and interest to the minimalist space.

    The Impact of Neutral Colors versus Bold Accent Colors

    Neutral colors, such as whites, grays, and beiges, create a sense of spaciousness and calm in minimalist interiors. They act as a blank canvas, allowing other elements, like textures and furnishings, to stand out. Bold accent colors, used sparingly, can add personality and visual interest. However, the key is moderation. Too many bold colors can disrupt the minimalist aesthetic and create a cluttered feeling.

    The use of neutral colors allows for flexibility in introducing bold accents – a vibrant piece of art, a colorful throw pillow, or a statement rug – without compromising the overall minimalist design. This balance is crucial; the accent colors should complement the neutral backdrop, not compete with it. Research suggests that exposure to calming neutral colors reduces stress hormones, while the strategic use of accent colors can stimulate creativity and positive emotions, providing a balanced and effective interior design strategy.

    Furniture Selection for Minimalist Spaces

    Minimalist home decor

    Minimalist design prioritizes functionality and visual clarity. Furniture selection in this context isn’t about acquiring the least amount of pieces, but rather curating essential items that maximize utility and aesthetic impact within a limited footprint. The principle of “less is more” translates to carefully choosing pieces that serve multiple purposes and contribute to a serene, uncluttered environment. This involves considering not only the furniture’s form and function but also its material composition and placement within the space.

    The selection of furniture for a minimalist home hinges on the principle of functionality and visual harmony. Each piece should serve a clear purpose and contribute to the overall aesthetic, avoiding clutter and maximizing space. This approach, informed by principles of ergonomics and spatial psychology, leads to a more efficient and aesthetically pleasing living environment.

    Essential Furniture Pieces for Minimalist Living Spaces

    The following table Artikels essential furniture pieces for minimalist living rooms, bedrooms, and kitchens. The choices emphasize versatility and high-quality materials for longevity and aesthetic appeal. The focus remains on pieces that are both functional and visually appealing, contributing to a calm and uncluttered atmosphere.

    Item Description Material Suggestions Space Considerations
    Sofa A comfortable seating area for relaxation and socializing. Consider a modular sofa for flexibility. High-quality linen, durable cotton, or sustainably sourced wood Choose a size appropriate for the room, allowing ample walking space.
    Coffee Table A central piece for placing drinks, books, or decorative items. Consider a nesting table set for space-saving. Solid wood, marble, or sleek metal Ensure it doesn’t overwhelm the seating area.
    Media Console/Storage Unit Holds entertainment equipment and other items, providing concealed storage. Wood, metal, or a combination Select a unit that complements the sofa and coffee table.
    Bed Frame Provides a supportive structure for the mattress. Consider a platform bed for additional storage. Solid wood, metal, or upholstered Choose a size that fits the room comfortably, leaving sufficient space for movement.
    Nightstand A small table for bedside essentials. Wood, metal, or simple design Select a size that is functional without being bulky.
    Dresser/Wardrobe Storage for clothing and personal items. Consider a minimalist wardrobe with built-in shelving. Wood, metal, or a combination Choose a size and style that complements the bed frame and nightstand.
    Kitchen Island/Cart Provides additional counter space and storage. Solid wood, butcher block, or stainless steel Ensure it doesn’t impede movement in the kitchen.
    Dining Table (optional) If space allows, a simple dining table for meals. Consider a drop-leaf or extending table for flexibility. Wood or a durable material Choose a size that fits the space and accommodates the number of occupants.

    The Importance of Multifunctional Furniture in Minimalist Design

    Multifunctional furniture is paramount in minimalist design. It allows for maximizing space utilization and minimizing the number of individual pieces. A storage ottoman, for instance, provides seating while simultaneously offering concealed storage. A sofa bed combines seating and sleeping functions, ideal for smaller spaces or guest rooms. These pieces are designed to perform multiple roles, enhancing both efficiency and visual simplicity.

    Furniture Placement and its Influence on Minimalist Room Ambiance

    Strategic furniture placement significantly impacts the overall feel of a minimalist room. Careful arrangement creates a sense of spaciousness, flow, and visual harmony. Leaving ample space between furniture pieces prevents a cluttered look. Symmetrical arrangements can create a sense of balance and tranquility, while asymmetrical arrangements can introduce a dynamic and unexpected element. The positioning of furniture in relation to natural light sources also influences the overall ambiance, creating a sense of openness and brightness.

    Incorporating Textures and Materials

    Minimalist design, while prioritizing simplicity, doesn’t necessitate a visually monotonous space. The strategic introduction of textures and materials is crucial for adding depth and visual interest without compromising the core principles of minimalism. By carefully selecting tactile elements, a sense of warmth, sophistication, and even dynamism can be achieved, enriching the overall aesthetic experience.The careful selection of textures and materials significantly impacts the perceived spaciousness and ambiance of a minimalist interior.

    The interplay of light and shadow on different surfaces, the subtle variations in grain, and the inherent qualities of each material contribute to a richer sensory experience. This contrasts with the potential sterility of an overly simplistic approach, enhancing the overall appeal of the space.

    Key Textures for Visual Interest

    Three key textures that effectively add visual interest to a minimalist space without overwhelming it are linen, natural stone, and smooth, brushed metal. Linen, with its subtle weave and soft drape, introduces a sense of warmth and tactility. Natural stone, such as marble or slate, brings a grounding element and visual weight, while its inherent variations in color and veining prevent monotony.

    Finally, smooth, brushed metal, such as brushed stainless steel or brass, offers a sleek, modern contrast and reflects light beautifully, adding a sense of sophistication. These materials, when used judiciously, create a visually engaging yet uncluttered environment.

    Material Contributions to Minimalist Aesthetics

    Different materials contribute unique qualities to a minimalist aesthetic. Wood, with its natural grain and warmth, brings a sense of organic, understated elegance. Its versatility allows for various finishes, from light and airy to dark and dramatic, accommodating diverse design styles within the minimalist framework. Metal, particularly in brushed or matte finishes, introduces a contemporary edge and can be used for structural elements or accent pieces.

    Stone, especially in its natural, unpolished state, provides a sense of permanence and grounding, adding a touch of rustic sophistication. The careful selection and combination of these materials are key to creating a balanced and visually stimulating minimalist space. For instance, a wooden coffee table paired with a brushed steel side table and a stone fireplace surround creates a harmonious interplay of textures and materials.

    Visual Impact of Textures and Materials

    Material Texture Visual Impact Suitable Room
    Wood (Oak) Smooth, Grained Warmth, Natural Elegance Living Room, Bedroom
    Concrete Rough, Textured Industrial Chic, Modern Kitchen, Bathroom
    Marble Smooth, Veined Luxury, Sophistication Bathroom, Entryway
    Brushed Steel Smooth, Metallic Modern, Sleek Kitchen, Office

    Lighting in Minimalist Interiors

    Light, in its various forms, is a fundamental element in achieving the serene and functional atmosphere characteristic of minimalist design. Its strategic implementation goes beyond mere illumination; it shapes the perception of space, influences mood, and directly impacts the overall aesthetic. A well-designed lighting plan is crucial for a successful minimalist interior, enhancing both the visual appeal and the usability of the space.The interplay of light and shadow is a key component of minimalist design, often emphasizing clean lines and uncluttered surfaces.

    The absence of excessive visual clutter allows the light to become a defining feature, highlighting architectural details and creating a sense of spaciousness. Scientific studies have shown that appropriate lighting can significantly improve mood and productivity, making it a crucial aspect of interior design, especially in spaces dedicated to relaxation and rest, such as bedrooms.

    Lighting Plan for a Minimalist Bedroom

    A minimalist bedroom benefits from a layered lighting approach, combining ambient, task, and accent lighting to create a versatile and functional space. Ambient lighting, the foundational layer, provides overall illumination. This could be achieved with a recessed ceiling fixture emitting a soft, diffused white light (around 4000K color temperature, mimicking natural daylight), minimizing shadows and creating a sense of calm.

    Task lighting, positioned near the bedside tables, serves a practical purpose. Sleek, minimalist table lamps with adjustable brightness settings offer personalized illumination for reading or other activities. These lamps could use warm-white LED bulbs (around 2700K) to create a cozy and inviting atmosphere. Finally, accent lighting, strategically placed, adds depth and visual interest. This could involve small, hidden LED strip lights under the bed or behind furniture, providing a subtle glow that enhances the overall ambiance without being intrusive.

    The avoidance of harsh, direct light is crucial, maintaining a sense of tranquility.

    The Role of Natural Light in Minimalist Aesthetics

    Natural light is an invaluable asset in minimalist design. Its inherent variability, shifting throughout the day, adds a dynamic element that static artificial lighting cannot replicate. Large windows, strategically positioned to maximize sunlight exposure, are a hallmark of minimalist architecture. This not only provides ample illumination but also connects the interior space to the external environment, creating a sense of openness and spaciousness.

    Studies on circadian rhythms have shown that exposure to natural light regulates our sleep-wake cycles, positively impacting our well-being, making it especially beneficial in bedrooms. The interplay of natural light and shadow on minimalist surfaces – clean walls, unadorned floors – enhances their textural qualities, creating subtle visual interest. Furthermore, minimizing the reliance on artificial light during the day reduces energy consumption, aligning with the environmentally conscious principles often associated with minimalist lifestyles.

    Impact of Lighting Options on Mood and Functionality

    Different lighting options significantly affect the mood and functionality of a minimalist space. Warm-toned lighting (lower color temperature) fosters a sense of relaxation and intimacy, ideal for bedrooms and living areas designed for rest and socializing. Cooler-toned lighting (higher color temperature), on the other hand, enhances focus and alertness, making it suitable for home offices or study areas.

    The intensity of light also plays a crucial role. Dimmable lights offer the flexibility to adjust the ambiance according to the time of day and the desired mood, seamlessly transitioning from bright, functional lighting during the day to soft, calming light in the evening. Furthermore, the choice of lighting fixtures – sleek, minimalist designs versus more ornate options – directly impacts the overall aesthetic, reinforcing the clean lines and uncluttered feel of the space.

    The strategic use of light and shadow can also create a sense of depth and visual interest, even within a minimalist setting.

    Accessorizing a Minimalist Home

    Engagement ideas decorations wedding party decoration stage unique small house backdrop simple indian marriage decor flower cosy aghd sofra visit

    The allure of minimalist design lies in its ability to create a sense of calm and spaciousness. However, a truly successful minimalist space isn’t devoid of personality; it’s carefully curated. Accessorizing plays a crucial role in injecting individuality without disrupting the clean lines and uncluttered aesthetic that define the style. The key lies in thoughtful selection and strategic placement, transforming simple additions into powerful design statements.The principle of subtraction—removing unnecessary items—is fundamental to minimalist design.

    This principle extends to accessorizing. Instead of accumulating numerous decorative objects, the focus shifts to a few carefully chosen pieces that add depth and visual interest. Each accessory should serve a purpose, be it functional or aesthetically pleasing, contributing to the overall harmony of the space. The psychological impact of this curated approach is significant, reducing visual clutter and promoting a sense of serenity.

    Studies show that environments free from visual distractions lead to improved focus and reduced stress.

    Five Minimalist Accessories and Their Impact

    The following accessories exemplify how carefully chosen items can add personality to a minimalist space without overwhelming it. The effectiveness of each lies in its simplicity, high-quality materials, and intentional placement. The visual weight of each piece is carefully considered to maintain balance and visual harmony.

    • A single, large-scale piece of art: A striking photograph, a minimalist painting, or a sculptural piece can become a focal point, adding personality and visual interest without cluttering the wall. Imagine a large, black and white photograph of a stark landscape dominating one wall, its powerful simplicity drawing the eye and adding a sense of drama.
    • A handcrafted ceramic vase with a single stem of dried flowers: The natural texture of the vase, combined with the delicate simplicity of the dried flowers, introduces a touch of organic elegance. The subtle color and texture contrast can add visual depth without competing with the overall minimalist aesthetic. The natural elements bring a sense of calmness and grounding to the space.

    • A high-quality throw blanket with a simple texture: A chunky knit throw draped over a sofa or chair introduces warmth and texture without sacrificing minimalism. The tactile appeal of the blanket adds a layer of comfort and visual interest, inviting relaxation and interaction. The choice of neutral color palette ensures it complements the space without dominating it.
    • A well-designed coffee table book: A beautifully designed book on photography, architecture, or art serves as both a decorative object and a source of inspiration. The book’s cover acts as a visual accent, while its contents offer a quiet moment of contemplation. Its size and design must be carefully chosen to fit the surrounding environment and maintain a harmonious aesthetic.

    • A simple, elegant sculptural object: A small, abstract sculpture made from wood, metal, or stone can add a touch of sophistication and artistic flair. Its form and material can subtly interact with the surrounding environment, adding depth and visual complexity without detracting from the minimalist aesthetic. The sculpture’s placement is critical to its effectiveness; consider using negative space to highlight its form.

    The Importance of Thoughtful Curation

    Thoughtful curation is paramount in minimalist accessorizing. It’s not simply about choosing a few items; it’s about selecting pieces that resonate with the homeowner’s personality and enhance the overall design. This involves a rigorous selection process, considering factors such as color, texture, material, and scale. Each item should be chosen intentionally, reflecting a deliberate aesthetic decision, rather than a random accumulation of objects.

    The absence of unnecessary items creates space for contemplation and enhances the feeling of serenity. A space carefully curated with a few meaningful items is more impactful than a room filled with numerous items that lack coherence.

    Incorporating Personal Items into a Minimalist Setting

    Personal items can be successfully integrated into a minimalist space without compromising its aesthetic. The key is to maintain a sense of balance and avoid overwhelming the space. Consider using display methods that are both functional and aesthetically pleasing. For example, a collection of favorite photographs could be displayed in a simple, minimalist frame on a single wall. Or, cherished mementos can be stored in elegant, clear glass containers, allowing them to be viewed without creating visual clutter.

    The careful selection and presentation of personal items are crucial for achieving harmony between personal expression and minimalist design. The goal is to create a space that is both aesthetically pleasing and emotionally resonant.

    Illustrative Examples of Minimalist Home Decor

    Minimalist home decor

    Minimalist interior design, while seemingly simple, encompasses a diverse range of styles, each reflecting a unique cultural and philosophical approach to space and functionality. Understanding these variations reveals the depth and adaptability of minimalist principles. The following examples showcase three distinct minimalist styles, highlighting their characteristic color palettes, materials, and furniture choices.

    Scandinavian Minimalist Design

    Scandinavian minimalism, born from the Nordic countries’ long winters and emphasis on functionality, prioritizes natural light and a sense of calm. The style emphasizes clean lines, practicality, and a connection to nature. This is achieved through a thoughtful selection of materials and a restrained color palette.The color palette typically features muted, cool tones. Think soft whites, light greys, and pale blues, punctuated by occasional accents of natural wood tones or deep greens.

    These colors reflect the natural environment and maximize the impact of natural light, a crucial element in Scandinavian design. The overall effect is one of airy spaciousness and serenity.Materials are predominantly natural and sustainable. Light-colored wood, such as birch or pine, is frequently used in furniture and flooring. Natural textiles, like linen and wool, add warmth and texture without overwhelming the space.

    Metal accents, often in brushed steel or brass, provide subtle contrast and a touch of industrial chic.Furniture is characterized by its simplicity and functionality. Clean lines, simple forms, and minimal ornamentation are key. Pieces are often multi-functional, serving multiple purposes to maximize space efficiency. Think simple, comfortable sofas, sleek dining tables, and unadorned shelving units. The furniture’s inherent functionality contributes to the overall sense of order and calm.

    Japanese Minimalist Design

    Japanese minimalism, rooted in Zen Buddhism and the philosophy of “Ma” (negative space), emphasizes simplicity, tranquility, and a deep connection with nature. It differs from Scandinavian minimalism in its more contemplative and spiritual approach.The color palette is typically more subdued, often featuring natural tones such as beige, cream, and grey. Black can be used as an accent color, adding a touch of sophistication.

    The overall effect is one of understated elegance and serenity. Bright colors are generally avoided, maintaining a peaceful and meditative ambiance.Materials are chosen for their natural beauty and durability. Natural wood, bamboo, paper, and stone are commonly used. These materials emphasize a connection to the natural world, reflecting the philosophy underlying Japanese minimalist design. The use of these materials promotes a sense of calmness and timelessness.Furniture is low-profile and functional, often incorporating natural materials.

    Simple, unadorned pieces are favored, with a focus on clean lines and functionality. Low seating arrangements and tatami mats are common features, creating a feeling of closeness to the floor and a sense of grounding. The furniture’s understated elegance contributes to the overall peaceful and serene atmosphere.

    Industrial Minimalist Design

    Industrial minimalism draws inspiration from the aesthetic of factories and warehouses, combining raw, exposed elements with a minimalist approach to furniture and decoration. This style celebrates the beauty of unfinished surfaces and functional design.The color palette is typically neutral and monochromatic, with greys, blacks, and whites dominating. Metal accents, in raw steel or dark iron, are frequently used to enhance the industrial feel.

    The overall effect is a sophisticated yet raw aesthetic. Pops of color are sparingly used, maintaining the industrial character.Materials are predominantly raw and industrial. Exposed brick, concrete, and metal are frequently featured, showcasing the inherent beauty of these materials. Reclaimed wood adds a touch of warmth and texture, balancing the coldness of the other materials. The use of these materials creates a sense of history and authenticity.Furniture is functional and often incorporates metal and reclaimed wood.

    Simple, unadorned pieces are favored, with a focus on clean lines and practicality. Metal shelving units, industrial-style chairs, and simple wooden tables are common features. The furniture’s robust nature reflects the style’s industrial heritage, enhancing the overall aesthetic.

    Maintaining a Minimalist Lifestyle

    Minimalist home decor

    Embracing minimalism extends beyond mere aesthetics; it’s a lifestyle choice impacting mental well-being and overall quality of life. By intentionally reducing possessions and simplifying routines, individuals can experience a profound shift in their perception of space, time, and personal fulfillment. This section details a practical approach to establishing and sustaining a minimalist lifestyle, focusing on decluttering, organization, and the long-term benefits.

    Decluttering and Organizing a Minimalist Home

    The process of decluttering and organizing is crucial for establishing a minimalist aesthetic. It’s not merely about discarding items; it’s about consciously evaluating each possession’s value and purpose. A methodical approach maximizes efficiency and minimizes emotional attachment to items that no longer serve a function.

    1. Categorization and Assessment: Begin by sorting possessions into broad categories (clothing, books, kitchenware, etc.). For each item within a category, ask: Does this item serve a purpose? Does it bring me joy or value? Is it in good condition and functional? Discard, donate, or sell items that fail to meet these criteria.

    2. Strategic Purging: The “one-in, one-out” rule is a powerful tool. For every new item acquired, an equivalent item must be removed. This prevents the accumulation of unnecessary possessions. Regular purging sessions (e.g., quarterly) are essential to prevent clutter buildup.
    3. Organized Storage: Efficient storage solutions are key. Utilize vertical space, transparent containers, and labeled shelves to maximize organization and visibility. This ensures that items are easily accessible and prevents the feeling of overwhelm associated with cluttered spaces. Consider utilizing under-bed storage, wall-mounted shelves, and drawer dividers.

    Maintaining a Minimalist Lifestyle and Preventing Clutter Accumulation

    Sustaining a minimalist lifestyle requires ongoing effort and mindful decision-making. The following strategies help prevent clutter accumulation and maintain a sense of order.

    • Mindful Consumption: Before purchasing any item, ask yourself if it is truly necessary and aligns with your values and lifestyle. Avoid impulse purchases. Research thoroughly before buying expensive items.
    • Digital Decluttering: Digital clutter (unused apps, overflowing inboxes, unnecessary files) also contributes to mental overload. Regularly delete unused apps, unsubscribe from unwanted emails, and organize digital files into clearly labeled folders.
    • Regular Maintenance: Dedicate short periods each day or week to tidying up. This prevents small messes from accumulating into larger problems. A quick 15-minute tidy-up session can significantly impact the overall appearance and feel of a space.

    Benefits of Minimalism Beyond Home Decor

    The positive effects of minimalism extend far beyond the aesthetic appeal of a tidy home. Scientific research supports the connection between minimalist living and improved mental well-being.

    Reduced stress and anxiety: Minimalist living reduces the cognitive load associated with managing possessions, leading to lower levels of stress and anxiety. Studies show that a cluttered environment can trigger the release of cortisol, a stress hormone.

    Improved focus and productivity: A clean and organized space promotes better focus and concentration. By reducing visual distractions, minimalism facilitates a more productive work environment and improved cognitive function. Research suggests that a tidy workspace leads to enhanced efficiency and creativity.

    Increased sense of peace and contentment: Minimalism fosters a sense of control and intentionality, promoting feelings of peace and contentment. By focusing on experiences rather than material possessions, individuals can experience greater life satisfaction. Numerous studies correlate mindfulness and reduced materialism with increased happiness.

    Final Thoughts

    Ultimately, minimalist home decor is not about deprivation but about mindful curation. By consciously selecting items that serve a purpose and bring you joy, you create a space that fosters calm, reduces stress, and allows your personality to shine through in a refined and intentional way. The journey towards a minimalist home is a process of discovery—a journey of decluttering not just your space, but also your mind.

    By embracing the principles of simplicity and intentionality, you can create a home that is both aesthetically pleasing and deeply restorative, a sanctuary reflecting your personal style and promoting a sense of peace and well-being.

    FAQ Summary

    What is the difference between minimalist and modern decor?

    While both prioritize clean lines, modern decor often incorporates bolder colors and more complex shapes than minimalist design, which emphasizes simplicity and functionality above all else.

    How can I incorporate personal items into a minimalist space?

    Choose a few meaningful items that evoke strong positive emotions. Display them thoughtfully, ensuring they don’t overwhelm the space’s overall aesthetic. Quality over quantity is key.

    Is minimalist decor expensive?

    Not necessarily. Minimalism focuses on quality over quantity. Investing in a few high-quality, durable pieces can be more cost-effective in the long run than constantly replacing cheaper, trendier items.

    Can minimalist decor work in small spaces?

    Absolutely! Minimalism’s focus on functionality and decluttering makes it ideal for small spaces, maximizing the feeling of openness and spaciousness.

    How do I declutter effectively for a minimalist home?

    Start by identifying items you haven’t used in a year. Donate, sell, or discard these items. Focus on functionality and emotional connection when deciding what to keep.

  • Wooden Window Frames A Comprehensive Guide

    Wooden Window Frames A Comprehensive Guide

    From stately mansions to cozy cottages, wooden window frames have graced homes for centuries, a testament to their enduring appeal and inherent warmth. Their craftsmanship, a blend of art and engineering, speaks volumes about the connection between human ingenuity and the natural world. But beyond aesthetics, the choice of wood, the construction techniques, and the maintenance practices all significantly influence the longevity, performance, and environmental impact of these architectural elements.

    This exploration delves into the science and artistry behind wooden window frames, examining their diverse types, manufacturing processes, design aesthetics, installation, maintenance, and environmental considerations.

    The journey begins with an examination of the various wood species employed, each possessing unique properties affecting durability, cost, and visual impact. We’ll then dissect the intricate manufacturing process, from lumber selection to the precise joinery techniques that hold the frame together. A discussion of design aesthetics, including traditional, modern, and rustic styles, will showcase the versatility of wood as a building material.

    Finally, we’ll address crucial aspects like installation, maintenance, and the environmental implications of choosing wooden window frames, providing a holistic perspective on this timeless architectural feature.

    Types of Wooden Window Frames

    Wooden window frames offer a timeless blend of aesthetic appeal and durability, but the choice of wood significantly impacts the longevity and maintenance of these windows. Different species possess unique properties influencing their suitability for exterior applications. Understanding these properties is crucial for making an informed decision.

    Wood Species and Their Properties

    The selection of wood for window frames is a critical factor determining their performance and lifespan. Several factors, including durability, cost, and aesthetic appeal, must be considered. The following table summarizes the characteristics of some popular wood types.

    Wood Type Durability Cost Aesthetic Appeal
    Pine Moderate; susceptible to rot and insect damage if not properly treated. Low to Moderate Versatile; readily accepts paint and stain; offers a classic, clean look.
    Oak High; naturally resistant to decay and insects; very strong and durable. High Rich, warm tones; prominent grain pattern; lends a sense of sophistication and elegance.
    Mahogany High; naturally resistant to decay and insects; very strong and durable; excellent weather resistance. High Deep red-brown hues; fine, even grain; luxurious appearance; highly prized for its beauty.
    Cedar High; naturally resistant to decay and insects; contains natural oils that repel moisture. Moderate to High Rich reddish-brown tones; pleasant aroma; often used for its natural beauty and weather resistance.
    Douglas Fir High; strong and durable; relatively resistant to decay and insects with proper treatment. Moderate Straight grain; can be stained or painted; offers a more rustic appearance than pine.

    Weather Resistance and Maintenance

    The weather resistance of wooden window frames is directly related to the wood species and the application of protective finishes. Woods like mahogany and cedar naturally contain oils and resins that offer inherent resistance to moisture and decay. However, even these species benefit from regular maintenance, including repainting or restaining every few years to prevent weathering and prolong their lifespan.

    Pine, while less naturally resistant, can achieve comparable durability with proper treatment and regular maintenance. Untreated pine, however, is prone to warping, cracking, and insect infestation. Regular inspections for signs of damage are crucial for all wood types, enabling timely repairs and preventing significant deterioration. Properly maintained wooden windows, regardless of the wood species, can provide decades of reliable service.

    Manufacturing Processes

    The creation of a high-quality wooden window frame is a meticulous process, blending traditional craftsmanship with modern manufacturing techniques. From the careful selection of timber to the precise application of finishes, each step contributes to the final product’s durability, aesthetics, and performance. Understanding these processes allows for a deeper appreciation of the artistry and engineering involved in creating these essential components of a building’s structure.The journey begins with sourcing the lumber.

    Species like oak, pine, and mahogany are commonly used, each offering unique properties in terms of strength, durability, and grain pattern. The wood is carefully inspected for defects, ensuring only the highest quality timber is used. This initial selection significantly impacts the final window frame’s quality and longevity. The chosen lumber then undergoes a drying process to reduce moisture content, preventing warping and cracking during and after manufacturing.

    This process typically involves kiln drying, which controls temperature and humidity to achieve the optimal moisture level.

    Wood Preparation and Cutting

    Once dried, the lumber is precisely cut to the dimensions required for the window frame components. This involves using specialized saws and cutting equipment, ensuring accuracy and minimizing waste. The cutting process is crucial, as even slight inaccuracies can compromise the final assembly and the structural integrity of the frame. This stage also involves shaping the wood to create the necessary profiles for the window frame, including rabbets (recesses) to accommodate the glass.

    Joinery Techniques

    The strength and longevity of a wooden window frame depend heavily on the joinery techniques used to connect its components. Several methods exist, each offering distinct advantages and disadvantages.

    Mortise and Tenon Joints

    Imagine a sturdy, interlocking connection. A mortise is a precisely cut hole, while a tenon is a projecting piece of wood shaped to fit snugly within the mortise. When assembled, these create a strong, rigid joint that can withstand significant stress. The visual is of two pieces of wood, one with a rectangular hole (mortise) and the other with a corresponding rectangular projection (tenon) fitting perfectly into the hole.

    Glue is often used to further enhance the bond, resulting in a highly durable and aesthetically pleasing joint.

    Miter Joints

    A miter joint involves cutting two pieces of wood at an angle, typically 45 degrees, so that they meet at a perfect corner. While visually appealing, miter joints alone are not as strong as mortise and tenon joints. Therefore, they often require additional support, such as biscuits (thin, oval-shaped pieces of wood inserted into both pieces before joining) or reinforcing dowels, or strong adhesive to ensure structural integrity.

    The visual is of two pieces of wood, each cut at a 45-degree angle, meeting to form a clean, sharp 90-degree corner.

    Assembly and Finishing

    After the components are cut and joined, the window frame is assembled. This process requires precision and careful attention to detail to ensure a perfectly square and plumb frame. Any discrepancies at this stage can compromise the window’s functionality and aesthetics. Once assembled, the frame undergoes a finishing process. This often includes sanding to achieve a smooth surface, priming to protect the wood and provide a better surface for paint adherence, and then painting or staining to provide a protective and aesthetically pleasing finish.

    The choice of finish depends on the desired look and the environmental conditions the window will be exposed to.

    Quality Control Checkpoints

    A flowchart illustrating the manufacturing process would show a series of quality control checkpoints at each stage. For example, after lumber selection, a quality control inspector would verify that the wood meets the required standards for moisture content and freedom from defects. After cutting, checks would ensure dimensional accuracy. Following assembly, a final inspection would confirm that the frame is square, plumb, and free from any defects.

    This multi-stage quality control ensures that only the highest quality window frames leave the manufacturing facility.

    Design and Aesthetics

    Window wooden design windows house frames designs wood door arch doors glass room chokhat ideas tips iron google sri photoshop

    The aesthetic appeal of wooden window frames is a crucial factor in both the overall architectural style of a building and its interior design. The inherent beauty of wood, its versatility in design, and the possibility of diverse finishes contribute significantly to the visual impact of a structure. Understanding the historical context and technical aspects of different design styles is key to appreciating their unique contributions.

    Wooden Window Frame Design Styles

    Wooden window frames have evolved alongside architectural trends, reflecting the stylistic preferences of various eras. Traditional designs, often characterized by intricate detailing and ornate carvings, are reminiscent of historical periods such as the Victorian era and the Georgian period. Modern designs, in contrast, emphasize clean lines, minimalist aesthetics, and a focus on functionality. Rustic styles evoke a sense of natural charm and often feature more irregular shapes and less refined finishes.

    The choice of design style significantly impacts the overall impression of a building.

    Visual Representations of Three Distinct Window Frame Designs

    Traditional Design: Imagine a window frame crafted from richly stained mahogany. Intricate moldings, including ogee curves and dentils, adorn the frame’s perimeter. The muntins, the smaller bars dividing the panes of glass, are arranged in a classic grid pattern, further enhancing the sense of elegance. The overall impression is one of refined sophistication, typical of a Victorian-era townhouse.

    The technique employed would involve hand-carved moldings and mortise-and-tenon joinery for superior strength and durability.

    Modern Design: This design features a sleek, rectangular frame made from light-colored oak. The frame is characterized by its clean lines and lack of ornamentation. The glass panes are large and uninterrupted, maximizing natural light. The finish is a clear varnish, highlighting the natural grain of the wood. The joinery would likely utilize advanced techniques like finger joints or dowel joints, ensuring precision and strength.

    The overall impression is one of minimalist elegance and contemporary sophistication, fitting for a modern architectural style.

    Rustic Design: This frame is constructed from reclaimed barn wood, showcasing the wood’s natural imperfections, knots, and variations in color. The frame is thicker and less refined than the previous examples. The joinery is visible, emphasizing the handcrafted nature of the piece. A natural oil finish is used, allowing the wood’s character to shine through. The overall impression is one of warmth, character, and a connection to nature, suitable for a farmhouse or a rustic-style home.

    The techniques used would reflect traditional methods, possibly incorporating pegs or wooden dowels for joinery.

    Impact of Finishes on Appearance and Longevity

    The choice of finish significantly impacts both the aesthetic and the longevity of wooden window frames. Paint provides a protective barrier against the elements and allows for a wide range of colors and styles. However, it obscures the natural grain of the wood. Stain, on the other hand, penetrates the wood, enhancing its natural color and grain pattern while offering some protection.

    Varnish provides a clear, protective coating that highlights the wood’s texture and color without altering its appearance. Each finish has different properties regarding UV resistance, water resistance, and maintenance requirements, affecting the long-term durability and appearance of the frames. For instance, exterior frames exposed to harsh weather conditions might benefit from a durable, weather-resistant paint, while interior frames could be enhanced with a subtle stain or varnish, allowing the wood’s natural beauty to take center stage.

    Installation and Maintenance

    Wooden window frames

    The successful installation and diligent maintenance of wooden window frames are crucial for ensuring their longevity, aesthetic appeal, and energy efficiency. Proper installation minimizes drafts and water ingress, while regular maintenance prevents rot, insect infestation, and premature deterioration. This section details the processes involved in both.

    Wooden Window Frame Installation

    Installing a wooden window frame requires precision and careful attention to detail. The process typically involves several steps, beginning with accurate measurements and ending with a secure and weathertight seal. Improper installation can lead to significant problems, including air leakage, water damage, and structural instability. Safety is paramount throughout the entire process.

    1. Preparation: Before commencing installation, carefully check the window opening for accurate dimensions. Ensure the opening is plumb, level, and square. Any necessary adjustments to the opening should be made before proceeding. Protective eyewear and gloves are essential safety precautions.
    2. Framing and Shimming: The window frame is carefully positioned within the opening. Shims are used to ensure the frame is perfectly plumb and level in all directions. This is critical for proper alignment and to prevent future problems. Precise shimming ensures a secure and stable fit.
    3. Securing the Frame: The frame is secured to the rough opening using appropriate fasteners, such as screws or nails. The type and number of fasteners will depend on the frame’s size and the building material. Over-tightening should be avoided to prevent cracking the frame.
    4. Flashing and Caulking: A flashing system is installed to prevent water penetration behind the frame. This typically involves using waterproof membrane and sealant. Caulking is then applied to seal any gaps between the frame and the surrounding structure, creating a weathertight seal. This prevents water damage and air infiltration.
    5. Installation of the Window Sash: The window sash, or the moving part of the window, is then carefully installed into the frame. This usually involves attaching the sash to the frame’s tracks and ensuring smooth operation. Proper lubrication may be required for smooth operation.

    Maintenance of Wooden Window Frames

    Regular maintenance is key to extending the lifespan of wooden window frames. Neglecting maintenance can lead to costly repairs or premature replacement. A proactive approach involving routine inspections and timely interventions will protect your investment and maintain the aesthetic integrity of your windows.

    • Annual Inspection (Spring/Autumn): Inspect all frames for cracks, rot, insect damage, and loose joints. Pay close attention to areas prone to water accumulation, such as the sill and bottom corners.
    • Semi-Annual Cleaning (Spring/Autumn): Clean the frames with a mild detergent and water solution. Use a soft brush to remove dirt and debris. Avoid harsh chemicals or abrasive cleaners that could damage the wood’s finish.
    • Every 2-3 Years: Re-caulk around the window frame to ensure a continuous weather seal. Inspect and replace any damaged or deteriorated caulking. This prevents water ingress and air leakage.
    • Every 5-7 Years: Repaint or refinish the window frames to protect the wood from the elements and maintain their aesthetic appeal. Choose a high-quality exterior-grade paint or stain designed for wood. Proper preparation, including sanding and priming, is essential for a long-lasting finish.
    • As Needed: Address any signs of insect infestation immediately. Consult a pest control professional for effective treatment and prevention. Early detection and treatment are crucial to prevent significant damage.

    Environmental Impact

    Wooden window frames

    The environmental footprint of wooden window frames is a complex issue, interwoven with the sourcing of the wood, the manufacturing process, and the eventual disposal or repurposing of the frames. While wood is a renewable resource, its extraction and processing can have significant ecological consequences if not managed sustainably. Conversely, the production of alternative materials like aluminum and vinyl also carries substantial environmental burdens.

    A comprehensive assessment requires careful consideration of the entire life cycle of the window frame.

    The environmental impact of wooden window frames is primarily determined by deforestation and carbon sequestration. Unsustainable logging practices contribute to habitat loss, biodiversity reduction, and soil erosion. Conversely, wood acts as a carbon sink, absorbing atmospheric carbon dioxide during its growth. The net environmental impact depends on a delicate balance between these opposing forces. Furthermore, the energy consumed in manufacturing, transporting, and installing the frames also contributes to the overall carbon footprint.

    The type of wood, its origin, and the manufacturing processes employed all play a significant role in determining the final environmental impact.

    Sustainable Wood Sourcing and its Environmental Benefits

    Sustainably sourced wood, certified by organizations like the Forest Stewardship Council (FSC), ensures that timber is harvested responsibly, minimizing deforestation and maximizing environmental protection. FSC certification involves strict criteria covering forest management, biodiversity conservation, and the rights of workers and local communities. Using FSC-certified wood significantly reduces the negative environmental impacts associated with window frame production. For example, a study by the University of British Columbia found that FSC-certified forests had significantly higher levels of biodiversity compared to uncertified forests.

    This highlights the crucial role of certification in mitigating the environmental consequences of wood harvesting.

    Comparison with Alternative Window Frame Materials

    Aluminum window frames require significant energy for smelting and manufacturing, resulting in high greenhouse gas emissions. The extraction of bauxite ore, the primary source of aluminum, also leads to environmental damage. Vinyl, or polyvinyl chloride (PVC), is derived from petroleum, a non-renewable resource. Its production releases harmful pollutants into the atmosphere, and vinyl frames are not easily recyclable, contributing to landfill waste.

    While the initial manufacturing costs of vinyl may be lower, its long-term environmental impact is substantial compared to sustainably sourced wood. A life cycle assessment conducted by the European Commission demonstrated that sustainably sourced wooden window frames often have a lower overall carbon footprint than both aluminum and vinyl alternatives, particularly when considering the durability and potential for reuse or recycling of the wood.

    Minimizing the Environmental Impact of Wooden Window Frames

    Several strategies can mitigate the environmental impact of wooden window frames. Prioritizing sustainably sourced wood, certified by organizations like the FSC, is paramount. Selecting locally sourced wood reduces transportation emissions and supports local economies. Employing energy-efficient manufacturing processes and utilizing reclaimed or recycled wood can further reduce the carbon footprint. Proper installation and maintenance prolong the lifespan of the frames, delaying the need for replacement and minimizing waste.

    Finally, at the end of their life cycle, wooden window frames can be reused, repurposed, or responsibly disposed of through biomass energy generation, minimizing landfill waste. For instance, some manufacturers are now developing innovative bio-based coatings and treatments that extend the lifespan of wooden windows while reducing the need for harmful chemicals. This holistic approach ensures a lower environmental impact throughout the entire life cycle of the wooden window frame.

    Cost Considerations

    The cost of wooden window frames is a multifaceted issue, influenced by a complex interplay of factors. Understanding these variables is crucial for both homeowners planning renovations and builders estimating project budgets. Failing to account for all contributing elements can lead to significant cost overruns and project delays.

    Several key elements determine the final price. The type of wood chosen significantly impacts cost, with hardwoods like oak and mahogany commanding higher prices than softwoods such as pine or fir due to their density, durability, and aesthetic appeal. The dimensions of the windows, particularly height and width, directly influence the amount of material needed, and thus the overall expense.

    Intricate designs, including multiple panes, decorative mouldings, or custom shapes, increase both material and labor costs. Finally, labor costs vary geographically and are dependent on the installer’s experience and the complexity of the installation itself.

    Factors Influencing the Cost of Wooden Window Frames

    The price of wooden window frames is not a fixed value; it’s a dynamic figure determined by a range of interacting factors. Understanding these allows for more accurate budgeting and informed decision-making.

    • Wood Type: Hardwoods (oak, mahogany) are more expensive than softwoods (pine, fir). Exotic woods command premium prices.
    • Window Size and Dimensions: Larger windows require more material, increasing costs proportionally.
    • Design Complexity: Intricate designs, multiple panes, and custom shapes increase both material and labor costs.
    • Labor Costs: Installation costs vary by region, installer experience, and project complexity. Custom installations are more expensive.
    • Finishing and Hardware: The type of paint, stain, or sealant used, as well as the quality of hardware (hinges, locks), influences the overall cost.

    Cost Comparison with Other Window Frame Materials

    Comparing the cost of wooden window frames to alternatives like vinyl, aluminum, and fiberglass provides a broader perspective for informed material selection. This comparison considers not only the initial purchase price but also the lifespan and long-term maintenance costs.

    Material Average Cost (per window) Lifespan (years) Average Annual Maintenance Cost
    Wood $500 – $2000+ 50+ $25 – $100
    Vinyl $200 – $800 20-30 $10 – $25
    Aluminum $150 – $500 15-25 $10 – $30
    Fiberglass $400 – $1500 30-50 $15 – $50

    Note: These are average costs and can vary significantly based on location, size, style, and installer.

    Estimating Total Cost of a Wooden Window Frame Installation Project

    Accurately estimating the total cost requires a methodical approach, incorporating all relevant expenses. This includes not only the cost of the frames themselves but also labor, permits, and any necessary preparatory work.

    For example, let’s consider a project involving the replacement of five windows. Assume an average cost of $750 per window for the frames (including materials like wood, glass, and hardware), and $200 per window for labor. Additional costs might include $500 for permits and $250 for preparatory work (e.g., removing old frames). The total estimated cost would be: (5 windows
    – $750/window) + (5 windows
    – $200/window) + $500 + $250 = $5750.

    This is a simplified example; actual costs will vary significantly based on project specifics.

    Last Word

    Arched frames panes

    Wooden window frames represent a fascinating intersection of natural materials, skilled craftsmanship, and architectural design. The choice of wood species significantly influences the frame’s durability, cost, and aesthetic appeal, while the manufacturing process, including joinery techniques, dictates its structural integrity. Proper installation and diligent maintenance are key to extending the lifespan of these frames, mitigating potential damage from weather and pests.

    Moreover, the environmental impact of using wood, particularly sustainably sourced lumber, needs careful consideration. By understanding these factors, homeowners and builders can make informed decisions, selecting the perfect wooden window frames to enhance the beauty and longevity of their homes while minimizing their environmental footprint.

    FAQ Insights

    What are the common problems with wooden window frames?

    Common problems include rot due to moisture damage, warping from exposure to sunlight and temperature fluctuations, and pest infestation (e.g., termites).

    How often should I repaint or restain my wooden window frames?

    Repainting or restaining is typically recommended every 3-5 years, depending on the climate and the type of finish used. Regular inspections are crucial to catch and address any signs of deterioration early.

    Can I repair damaged wooden window frames myself?

    Minor repairs, such as filling small cracks or scratches, can often be handled by homeowners. However, significant damage, like rot or structural weakness, requires professional intervention.

    How do I choose the right wood type for my climate?

    Hardwoods like oak and mahogany offer superior weather resistance compared to softwoods like pine. In humid climates, selecting a rot-resistant wood or applying a high-quality sealant is crucial.

    What is the average lifespan of a well-maintained wooden window frame?

    With proper care and maintenance, a well-constructed wooden window frame can last for 50 years or more.

  • Wooden Beams in Home A Comprehensive Guide

    Wooden Beams in Home A Comprehensive Guide

    From rustic charm to modern minimalism, wooden beams have graced homes for centuries, adding both structural integrity and aesthetic appeal. Their inherent strength, coupled with the versatility of their appearance, makes them a popular choice for homeowners seeking to enhance the character and value of their properties. But the journey from selecting the right timber to ensuring its longevity involves careful consideration of various factors – from the type of wood and its structural properties to the intricacies of installation, maintenance, and adherence to building codes.

    This guide delves into the multifaceted world of wooden beams, providing a comprehensive overview for anyone contemplating their use in a home construction or renovation project.

    The journey begins with understanding the diverse range of wood species available, each boasting unique characteristics in terms of strength, durability, cost, and visual appeal. We’ll explore the engineering principles behind proper beam placement and support, illustrating how different beam arrangements can transform the ambiance of a space. From installation techniques and finishing options to preventative maintenance and repair strategies, we’ll cover the entire lifecycle of wooden beams, equipping you with the knowledge to make informed decisions.

    Types of Wooden Beams

    Ceiling beams decorative wood kitchen room lighting look ceilings vaulted faux living high board ft real structure log foot using

    The choice of wood for structural beams in a home is a crucial decision impacting both the building’s longevity and aesthetic appeal. Several factors, including strength-to-weight ratio, durability, cost, and visual characteristics, influence this selection. Understanding the properties of different wood species is essential for ensuring a safe and visually pleasing structure.

    Commonly Used Wood Types for Beams

    Several wood species are frequently employed in residential construction for beams due to their inherent strength, workability, and aesthetic qualities. These include, but are not limited to, oak, pine, and Douglas fir. Each offers a unique combination of properties.

    Oak Beam Properties

    Oak, prized for its exceptional strength and durability, boasts a high density and hardness. This translates to a significant load-bearing capacity, making it suitable for supporting substantial weight. However, oak is also a relatively expensive option compared to other softwoods. Its rich, warm tones and distinct grain pattern contribute to a classic, elegant aesthetic, often preferred in traditional or rustic designs.

    The durability of oak makes it resistant to decay and insect infestation, further justifying its higher cost. Its hardness can, however, make it more challenging to work with than some softer woods.

    Pine Beam Properties

    Pine, a softer wood than oak, is more readily available and significantly less expensive. Its lighter color and more uniform grain pattern provide a cleaner, more contemporary look. While not as strong as oak, pine still offers adequate strength for many residential applications, particularly in situations where load requirements are less demanding. Pine’s relative softness makes it easier to work with, reducing labor costs.

    However, it is less resistant to decay and insect damage compared to oak, requiring proper treatment for long-term durability.

    Douglas Fir Beam Properties

    Douglas fir occupies a middle ground between oak and pine in terms of both cost and properties. It possesses considerable strength and stiffness, making it a popular choice for load-bearing applications. Its reddish-brown color and prominent grain pattern offer a visually appealing contrast to the lighter pine and darker oak. Douglas fir’s strength-to-weight ratio is excellent, allowing for larger spans with less material.

    Like pine, it may require treatment to protect against decay and insect infestation.

    Comparative Table of Wood Beam Properties

    The following table summarizes the key properties of these three wood types:

    Wood Type Appearance Strength Cost
    Oak Rich, warm tones; distinct grain pattern High; excellent load-bearing capacity High
    Pine Light color; uniform grain pattern Moderate; suitable for lighter loads Low
    Douglas Fir Reddish-brown; prominent grain pattern High; excellent strength-to-weight ratio Moderate

    Beam Design and Placement

    The structural integrity and aesthetic appeal of a home are significantly influenced by the design and placement of its wooden beams. Understanding the engineering principles behind beam support is crucial for ensuring a safe and visually pleasing structure. Properly designed and placed beams distribute weight effectively, preventing sagging, cracking, and ultimately, structural failure. This section will explore these principles and illustrate their application through various design examples.The fundamental principle governing beam placement and design is the efficient transfer of loads.

    Loads, encompassing the weight of the structure itself, furniture, and occupants, are transmitted from the roof, floors, and walls to the supporting beams, and then to the foundation. The strength and stability of a beam are determined by its size (cross-sectional area), material properties (strength of the wood), and the span (distance between supports). Larger beams can support heavier loads over longer spans, while smaller beams are suitable for lighter loads and shorter spans.

    The spacing between beams also impacts the overall load distribution; closer spacing allows for the distribution of weight over more support points, reducing stress on individual beams. Incorrect beam placement or inadequate sizing can lead to structural weakness and potential collapse. Furthermore, the type of support (e.g., simple support, cantilever) significantly affects the beam’s load-carrying capacity and deflection.

    Living Room Beam Arrangements: Three Architectural Styles

    The following examples demonstrate how different beam arrangements can achieve distinct architectural styles while maintaining structural integrity. These designs assume a standard living room size and typical load requirements. Variations in beam size and material would necessitate adjustments to these designs based on precise load calculations performed by a structural engineer.

    • Rustic Design: This style emphasizes exposed, heavy timber beams. Imagine a living room with three large, roughly hewn beams running parallel to the ceiling, spaced approximately 6 feet apart. These beams would be supported by substantial wooden posts at each end, creating a strong, visually striking focal point. The uneven texture of the wood and the substantial size of the beams contribute to the rustic aesthetic.

      The beams would likely be made from a durable hardwood like Douglas fir or oak. The large cross-sectional area of the beams allows for a relatively wide spacing, reducing the number of support posts.

    • Modern Design: A minimalist approach would feature clean lines and strategically placed beams. Consider a living room with two slender, precisely milled beams running perpendicular to each other, intersecting near the center of the ceiling. These beams could be made from a lighter-colored wood, such as maple or ash, and have a smooth, polished finish. The beams would be subtly integrated into the ceiling design, acting as both structural elements and decorative features.

      The smaller size and precise placement of the beams are characteristic of modern architecture.

    • Traditional Design: This style employs a more balanced approach. Envision a living room with several smaller, evenly spaced beams arranged in a grid pattern across the ceiling. These beams could be made from a medium-toned wood, such as cherry or walnut, and have a slightly more ornate finish. The beams would be evenly spaced (approximately 4 feet apart), providing consistent support across the ceiling.

      This arrangement creates a sense of order and proportion, typical of traditional design principles. The spacing is tighter than in the rustic design, allowing for a higher load-bearing capacity for each beam.

    Beam Size, Spacing, and Structural Integrity

    The relationship between beam size, spacing, and structural integrity is governed by fundamental engineering principles. Increasing the cross-sectional area of a beam increases its moment of inertia, improving its resistance to bending. Closer spacing of beams reduces the span length for each beam, thereby lowering the bending moment and stress. Conversely, larger spans and wider spacing increase bending stress, requiring larger beams to compensate.

    For example, a living room with a 16-foot span might require 6×12 inch beams spaced 4 feet apart, whereas a similar room with a 12-foot span might only need 4×12 inch beams spaced 5 feet apart. A significant reduction in beam size or increase in spacing without appropriate load calculations could result in unacceptable deflection or even failure.

    Proper engineering calculations, considering factors like wood species, moisture content, and load estimates, are essential to ensure the structural soundness of any beam arrangement. Failure to consider these factors can lead to costly repairs or, in extreme cases, structural collapse.

    Installation and Finishing

    The successful integration of wooden beams into a home involves meticulous installation and thoughtful finishing. Proper installation ensures structural integrity and longevity, while the finishing process significantly impacts the beam’s aesthetic appeal and durability. These two stages are crucial for achieving the desired visual effect and maintaining the structural soundness of the beams.

    Beam Installation

    Precise and careful installation is paramount to the structural integrity and longevity of wooden beams. Incorrect installation can lead to structural weakness, compromising the safety of the building. The following steps Artikel a typical installation process, although specific procedures may vary depending on the beam type, size, and the structural requirements of the building.

    1. Preparation: Begin by carefully measuring and marking the beam locations on the ceiling or wall. Ensure that the support structures are adequately prepared to handle the weight of the beams. This might involve reinforcing existing joists or adding additional supports. Precise measurements are essential to ensure proper alignment and spacing.
    2. Fastening: Secure the beams using appropriate fasteners, such as heavy-duty screws or bolts, depending on the beam material and size. The fasteners should be driven into the supporting structure with the correct torque to avoid damage to the wood. Pre-drilling pilot holes is often necessary to prevent splitting. The number and placement of fasteners will depend on the beam’s length, weight, and the load it will bear.

    3. Securing: After fastening, inspect the installation for stability and proper alignment. Any sagging or misalignment should be addressed immediately. Shims can be used to level the beams if necessary. Ensure all fasteners are securely tightened. For particularly heavy or long beams, consider using additional support brackets or hangers to reinforce the connection.

    Finishing Techniques for Wooden Beams

    The finishing process significantly influences the aesthetic appeal and longevity of wooden beams. Various techniques are available, each with its own advantages and disadvantages. The choice depends on the desired aesthetic, the type of wood, and the environmental conditions.

    • Staining: Staining enhances the natural beauty of the wood grain while protecting it from moisture and UV damage. Different stains offer varying levels of color intensity and transparency. The process involves applying the stain evenly using a brush, rag, or spray gun, followed by allowing sufficient drying time before applying a sealant. Proper preparation, such as sanding to achieve a smooth surface, is crucial for even stain absorption.

    • Painting: Painting provides a durable and uniform finish, effectively concealing imperfections and offering a wide range of color choices. It provides superior protection against moisture and UV degradation compared to staining alone. Painting involves applying multiple coats of paint, allowing each coat to dry thoroughly before applying the next. Proper surface preparation is essential for achieving a smooth and even finish.

      Priming the wood before painting enhances adhesion and prevents the wood grain from showing through.

    • Sealing: Sealing protects the wood from moisture, insects, and UV damage, extending its lifespan. Sealants are available in various forms, including clear sealants that enhance the natural wood appearance, and tinted sealants that add a subtle color. Application methods vary depending on the type of sealant used. Proper ventilation is crucial during application and drying to prevent the build-up of harmful fumes.

    Creating a Rustic Look

    Achieving a rustic aesthetic for exposed wooden beams involves employing specific finishing techniques and details. This style emphasizes the natural beauty of the wood, highlighting its texture and imperfections.To achieve a rustic look, consider using a natural-toned stain or a clear sealant to showcase the wood’s grain and character. Distressing techniques, such as carefully applying a wire brush to create a worn appearance or using a chisel to add texture, can enhance the rustic feel.

    A matte finish, rather than a high-gloss finish, will further contribute to the desired aesthetic. The use of reclaimed or salvaged wood can also add to the authenticity of the rustic style, showcasing the natural imperfections and marks of age. Consider leaving some knots and imperfections visible, as these contribute to the overall rustic charm. For example, a slightly distressed finish with a clear coat sealer on Douglas Fir beams would create a beautiful, rustic feel, enhancing the natural variations in color and grain.

    Maintenance and Repair

    Ceiling beams decorative add why

    The longevity and structural integrity of wooden beams within a home are paramount to its safety and aesthetic appeal. Understanding the potential challenges these natural materials face and implementing proactive maintenance strategies are crucial for preserving their value and preventing costly repairs. Neglecting maintenance can lead to significant structural damage and even compromise the overall stability of the building.

    Wooden beams, while robust, are susceptible to several forms of deterioration over time. These issues often arise from exposure to the elements, pest infestations, or simply the natural aging process of the wood itself. Early detection and prompt action are key to minimizing damage and extending the lifespan of these essential structural components.

    Common Issues Affecting Wooden Beams

    Wood, a hygroscopic material, readily absorbs and releases moisture from its surroundings. This fluctuation in moisture content can cause significant problems. Excessive moisture leads to wood rot, a decay process initiated by fungal organisms that break down the cellulose and lignin in the wood, reducing its strength and structural integrity. Conversely, excessively dry conditions can cause the wood to shrink and crack.

    In addition to moisture-related issues, insect infestations, particularly from wood-boring insects like termites and carpenter ants, pose a serious threat. These insects tunnel through the wood, weakening its structure and potentially creating pathways for further decay. Finally, the natural aging process can lead to cracking and splitting of the beams, especially in older structures. These cracks can compromise the beam’s load-bearing capacity if left unaddressed.

    Preventative Maintenance Strategies

    Regular inspections are the cornerstone of effective preventative maintenance. A yearly visual inspection should be conducted to identify any signs of damage, such as cracks, discoloration, or insect activity. Look for signs of fungal growth (white, gray, or brown fuzzy patches), which indicate rot. Pay close attention to areas prone to moisture accumulation, such as areas near plumbing fixtures or exterior walls.

    Proper ventilation is essential to minimize moisture buildup. Ensure adequate airflow around the beams, especially in basements or crawl spaces. This can be achieved through proper insulation, ventilation systems, and the use of dehumidifiers where necessary. Applying a protective sealant or coating to the beams can further help to prevent moisture penetration and insect infestation. The type of sealant will depend on the type of wood and the specific environment.

    Regularly inspect and maintain any sealant or coating to ensure its effectiveness.

    Repairing Minor Damage to Wooden Beams

    Repairing minor damage, such as cracks or minor rot, can prevent these issues from escalating into major structural problems. For small cracks, filling them with a suitable wood filler is often sufficient. The filler should be color-matched to the beam to maintain its aesthetic appearance. Before applying the filler, clean the crack thoroughly to remove any loose debris or decayed wood.

    For minor rot, carefully remove the affected area using a chisel and wire brush. This ensures that all compromised wood is removed, preventing the spread of rot. Once the affected area is cleaned, apply a wood hardener to consolidate the remaining sound wood. After the hardener has dried, fill the cavity with an epoxy resin or a wood filler suitable for structural repair.

    Allow the filler to cure completely before sanding it smooth and applying a finish to match the surrounding wood. For more extensive damage, professional assessment and repair are recommended to ensure the structural integrity of the beam is maintained. Always prioritize safety when working with damaged beams; if you are unsure about any aspect of the repair process, consult a qualified structural engineer or carpenter.

    Aesthetic Considerations

    The strategic incorporation of wooden beams elevates a home’s interior design, transforming a simple structural element into a powerful aesthetic statement. Their presence can dramatically alter the perceived scale and character of a space, lending warmth, rustic charm, or modern sophistication depending on the design choices made. Understanding how wood type, finish, and surrounding design elements interact is key to achieving the desired effect.The visual impact of wooden beams is multifaceted, affecting not only the ceiling but also the overall perception of the room’s proportions and style.

    Their size, color, and grain pattern all play a significant role in shaping the atmosphere. For instance, dark, heavily textured beams can create a sense of intimacy in a large space, while lighter, smoother beams can make a small room feel more open and airy.

    The Influence of Wood Type and Finish on Ambiance

    The selection of wood species significantly influences the aesthetic outcome. Oak beams, with their characteristic grain and strength, exude a classic, sometimes traditional feel. Their durability also makes them a popular choice for high-traffic areas. In contrast, the lighter tones and smoother texture of pine beams contribute to a more contemporary or rustic aesthetic. A dark walnut finish can add a touch of elegance and sophistication, while a natural, oiled finish emphasizes the wood’s inherent beauty and creates a warmer, more inviting atmosphere.

    The choice of stain or finish also affects the light reflection within the room. Darker finishes absorb light, creating a more dramatic and intimate ambiance, whereas lighter finishes reflect light, making the space feel brighter and more open. For example, a rustic farmhouse style might utilize reclaimed wood beams with a natural finish, showcasing the wood’s imperfections and history, while a minimalist modern home might feature smooth, white-washed beams for a clean and uncluttered look.

    Design Elements to Enhance the Visual Appeal of Wooden Beams

    Careful consideration of complementary design elements can further enhance the beauty and impact of wooden beams. Strategic lighting, for instance, can dramatically highlight the texture and color of the wood. Recessed lighting installed above or around the beams can create a dramatic effect, casting shadows and emphasizing the three-dimensionality of the structure. Alternatively, pendant lights suspended from the beams can add a focal point and contribute to the overall ambiance of the room.

    Wall treatments also play a crucial role. Textured walls, such as those with exposed brick or stone, can create a visually interesting contrast with the smooth surface of the beams, adding depth and complexity to the space. Conversely, clean, minimalist walls can highlight the beams as the room’s primary architectural feature. The color palette of the walls should be considered carefully; neutral tones can complement a variety of wood finishes, while bolder colors can create a more dramatic and personalized look.

    For example, pairing dark wood beams with light-colored walls can create a sense of contrast and balance, while matching the beam color to the wall color can produce a cohesive and unified design.

    Examples of Wooden Beams in Different Interior Design Styles

    Wooden beams seamlessly integrate into diverse interior design styles. In a rustic farmhouse, exposed, heavily textured beams, possibly reclaimed from old barns, contribute to the authentic, lived-in feel. Their imperfections and natural variations in color and grain add character and charm. In a modern minimalist setting, clean-lined, smooth beams, often painted white or a neutral tone, complement the sleek and uncluttered aesthetic.

    These beams become almost architectural details, emphasizing clean lines and functionality. Transitional styles often incorporate beams as a bridge between traditional and modern elements, using medium-toned woods with a slightly distressed finish to create a balanced and sophisticated look. A Mediterranean-style home might feature beams with a weathered, whitewashed finish, echoing the sun-drenched architecture of the region.

    The choice of wood type and finish, along with the overall design scheme, ultimately determines the beam’s contribution to the overall aesthetic.

    Cost and Budget

    The allure of exposed wooden beams lies not only in their aesthetic appeal but also in their structural integrity. However, integrating these architectural elements into your home requires careful consideration of the associated costs. Understanding the price breakdown, potential savings, and comparisons with alternative materials is crucial for informed decision-making.The total cost of incorporating wooden beams into a home project is a multifaceted calculation, varying significantly based on several factors.

    These factors include the type of wood (with hardwoods like oak or walnut commanding higher prices than softwoods such as pine), the dimensions of the beams (larger beams naturally cost more), the quantity needed, the complexity of the installation (including any necessary structural modifications), and the chosen finishing techniques (staining, sealing, etc.). Furthermore, labor costs, which can constitute a substantial portion of the overall expense, are heavily influenced by geographical location and the contractor’s experience.

    Cost Breakdown of Wooden Beams

    A detailed breakdown of costs will vary greatly depending on the specifics of the project. However, a general estimate might look like this: Material costs can range from $5 to $20 per linear foot, depending on the wood type and dimensions. Installation costs, typically charged by the hour or per beam, can range from $50 to $150 per hour, with a project potentially requiring several hours of labor.

    Finishing costs depend on the chosen method, with staining and sealing adding another $2 to $10 per linear foot. Therefore, a modest project involving a few beams could cost several hundred dollars, while a large-scale renovation incorporating numerous beams could easily reach thousands.

    Saving Money on Wooden Beams

    Strategic planning can significantly reduce expenses without compromising structural integrity or visual appeal. One effective strategy is to opt for reclaimed wood beams. Reclaimed wood offers a unique character and often costs less than newly milled lumber. Careful planning of beam placement can also minimize the quantity required, thereby reducing material costs. For example, strategically placing beams to support existing structural elements might reduce the overall number of beams needed.

    Finally, tackling some aspects of the installation or finishing yourself, if you possess the necessary skills, can lead to substantial labor cost savings. However, it’s crucial to prioritize safety and structural soundness; if unsure about any aspect of the installation, consult a qualified professional.

    Cost-Effectiveness Compared to Alternatives

    While wooden beams offer unparalleled aesthetic appeal and a natural charm, it’s essential to weigh their cost-effectiveness against alternative structural materials.

    Material Cost (per linear foot, approximate) Durability Aesthetics
    Wooden Beams (Pine) $5 – $15 High (with proper treatment) Natural, warm
    Wooden Beams (Hardwood) $15 – $30+ Very High (with proper treatment) Elegant, luxurious
    Steel Beams $10 – $30+ Very High Industrial, modern
    Concrete Beams $15 – $40+ Very High Modern, minimalist

    Note: These cost estimates are approximate and can vary widely based on location, market conditions, and project specifics. Durability is relative and depends on proper installation and maintenance.

    Safety and Regulations

    The structural integrity and safety of a home are paramount, and the use of wooden beams, while aesthetically pleasing and often cost-effective, necessitates strict adherence to building codes and regulations. Ignoring these guidelines can lead to significant structural weaknesses, posing serious risks to the occupants. This section details the crucial safety aspects and regulatory compliance required when incorporating wooden beams into residential construction.Proper installation and maintenance are not merely recommendations but legal necessities in most jurisdictions.

    Building codes are designed to minimize risks, ensuring that structures can withstand anticipated loads and environmental factors. These codes specify requirements for beam size, species of wood, allowable spans, and connection methods, all critical to preventing catastrophic failures.

    Building Codes and Regulations for Wooden Beams

    Building codes, which vary by location (city, county, state, and even country), dictate the acceptable practices for using wooden beams in construction. These codes often reference established standards from organizations like the American Wood Council (AWC) or equivalent international bodies. Key aspects addressed include:

    • Species and Grade of Lumber: Codes specify acceptable wood species and grades based on their strength properties. Using lower-grade lumber than specified can compromise the beam’s load-bearing capacity. For instance, a structural beam might require a specific grade of Douglas Fir or Southern Yellow Pine, meeting minimum strength requirements defined by the relevant standard.
    • Beam Sizing and Span: Codes provide tables and formulas to determine the minimum size of a beam needed to support a given load over a specific span. Incorrect sizing can lead to bending, cracking, or even collapse under the weight it’s meant to carry. For example, a beam supporting a second-floor load over a 16-foot span will require a larger cross-section than one supporting the same load over an 8-foot span.

    • Connections and Fasteners: The manner in which beams are connected to other structural elements (walls, columns, etc.) is crucial. Codes specify the type, size, and spacing of fasteners (nails, bolts, screws) needed to ensure adequate connection strength. Improper fastening can result in the beam pulling away from its supports, leading to instability.
    • Moisture Content: The moisture content of the lumber must be within acceptable limits to prevent shrinkage, warping, and decay. Excessive moisture can weaken the wood, significantly reducing its load-bearing capacity. Codes usually stipulate a maximum moisture content for structural lumber.
    • Treatment for Pests and Decay: Codes may require treatment with preservatives to protect against insect infestation (termites) and fungal decay, especially in areas with high humidity or ground contact. Untreated wood is susceptible to damage, reducing its lifespan and structural integrity.

    Importance of Inspection and Certification

    Independent inspections and certifications by qualified professionals are vital to ensure compliance with building codes and the safe use of wooden beams. These inspections verify that the selected lumber meets the required specifications, that the beams are correctly sized and installed, and that the connections are adequately strong. A certified inspector can identify potential problems before they become safety hazards.

    Certification provides assurance to homeowners and building inspectors that the work has been completed to the required standards. This documentation is often required for building permits and insurance purposes.

    Potential Safety Hazards of Improper Installation or Maintenance

    Neglecting safety regulations and proper installation can lead to several serious hazards:

    • Structural Failure: Overloaded or improperly installed beams can fail, causing partial or complete collapse of the structure, potentially resulting in injury or death.
    • Sagging or Deflection: Beams that are undersized or improperly supported may sag or deflect over time, creating uneven floors or ceilings and posing tripping hazards.
    • Rot and Decay: Moisture damage can weaken beams, leading to rot and decay, significantly reducing their strength and increasing the risk of failure. This can be exacerbated by poor ventilation or lack of protective treatments.
    • Pest Infestation: Untreated wood is vulnerable to insect infestations (e.g., termites), which can compromise the structural integrity of the beams, leading to weakening and potential collapse.
    • Fire Hazards: Wood is combustible. While treated lumber has improved fire resistance, improper installation or lack of fire-retardant treatments can increase the risk of fire spread.

    Concluding Remarks

    Integrating wooden beams into a home is a decision that blends structural necessity with aesthetic vision. By understanding the nuances of wood selection, beam design, installation, and maintenance, homeowners can harness the enduring strength and timeless beauty of these architectural elements. This guide has explored the multifaceted aspects of incorporating wooden beams, from the scientific principles governing their structural performance to the artistic considerations that shape their visual impact.

    Ultimately, the successful integration of wooden beams rests on a foundation of informed choices, meticulous planning, and a commitment to both structural integrity and lasting aesthetic appeal. Remember, careful planning and adherence to building codes are paramount to ensure the safety and longevity of your investment.

    FAQ Guide

    What is the lifespan of a properly maintained wooden beam?

    With proper maintenance, wooden beams can last for decades, even centuries. The lifespan depends on the wood type, environmental conditions, and the presence of any infestations or structural damage.

    Can I install wooden beams myself?

    While some smaller projects might be DIY-friendly, installing load-bearing beams is generally best left to experienced professionals. Improper installation can compromise structural integrity and safety.

    How do I prevent insect infestation in my wooden beams?

    Regular inspections, proper sealing, and the use of insect-repellent treatments can significantly reduce the risk of infestation. Early detection and professional treatment are crucial if an infestation occurs.

    Are there any fire safety considerations for wooden beams?

    Yes, fire-retardant treatments are often recommended, especially in areas with stringent fire codes. Consult local building regulations for specific requirements.

    How much weight can a wooden beam support?

    The load-bearing capacity varies significantly depending on the wood type, beam dimensions, and support structure. Consult an engineer for accurate calculations based on your specific design.